当前位置:网站首页>Deepinv20 installation MariaDB
Deepinv20 installation MariaDB
2022-04-23 16:36:00 【Sink the wine cup and fleeting time】
DeepinV20 Installation and configuration Mariadb
MySQL Michael, the founder of · Vidnius led development , Previously 10 A hundred million dollars , Will start their own companies MySQL Sold to SUN, thereafter , With SUN Acquired by Oracle ,MySQL The ownership of Oracle In the hands of . Oracle bought it MySQL after , There will be MySQL Potential risks of closed sources , So the community USES branching to avoid this risk .
MariaDB Database management system is MySQL A branch of , Mostly maintained by the open source community , use GPL licensing ,MariaDB Of API and agreement compatible MySQL, In addition, some functions have been added , To support local non blocking operations and progress reporting .
It means , All use MySQL The connectors 、 Libraries and applications will also be available in MariaDB Work under the .
install Mariadb
First, you can check whether the system has been installed MariaDB or MySQL database
MariaDB and MySQL The commands are basically the same
see MariaDB or MySQL edition
mysql -V
If no relevant information is displayed , Then use the following command to install , There will be corresponding prompts during installation , Input Y, then Enter You can enter.
install MariaDB service
sudo apt-get install mariadb-server
install libmariadbclient( This is generally required for development , No choice )
sudo apt-get install libmariadbclient-dev libssl-dev
Just these two sentences , Installation is complete , You can use commands mysql -V see MariaDB Version information , If the installation is successful , There will be corresponding information , Like the following

The next step is MariaDB Related configuration of
To configure Mariadb
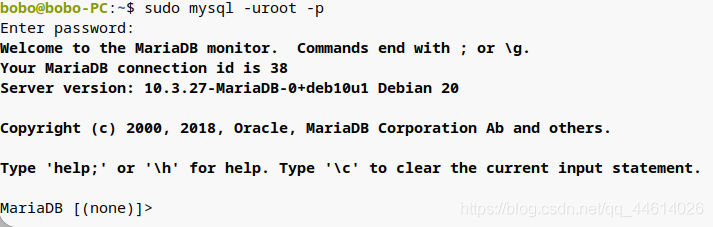
Connect Mariadb
sudo mysql -u root -p
General situation , installed Deepin After the system , There are no settings root The user's password , therefore , After entering this command , direct Enter You can enter. ;
If it is already set root User's password , After entering this command , Will prompt for password , Input root The user's password is OK
【 expand 】: see root User's password
sudo cat /etc/mysql/debian.cnf
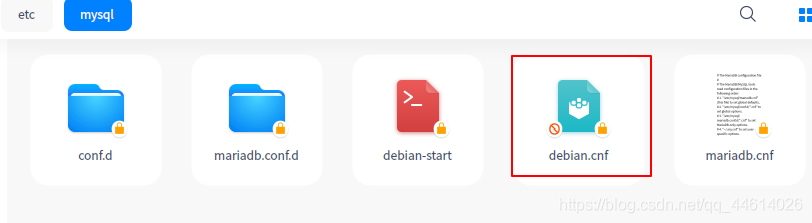
Linux Everything is a document , I have nothing to do , You can have a look at the contents of these documents
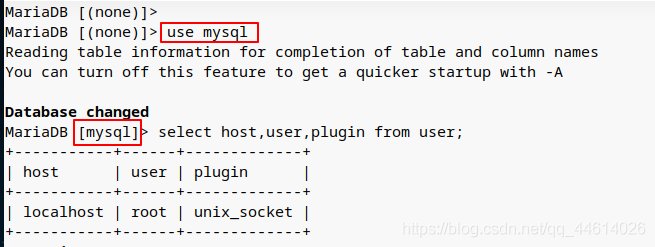
If you can see the following , explain MariaDB Successful connection
MariaDB There will be a default name of mysql The database of , Use mysql database
use mysql;
The name of the database used at this time is mysql
Mariadb user
Create user
Corresponding statement :create user ' user name '@'%' identified by ' password '
for example : Create user name as bobo, The password for hh123456 Users of
create user 'bobo'@'%' identified by 'hh123456';
Allow external access MariaDB
Authorization statement :
grant all privileges on Library name . Table name to ‘ user name ’@‘IP Address ’ identified by ‘ password ’ with grant option;
- Library name : The name of the database to be accessed remotely , All databases use
* - Table name : The name of the table under the database to be accessed remotely , All tables use
* - user name : The name of the user to assign remote access
- IP Address : Of computers that can be accessed remotely IP Address , All addresses use
% - password : The password corresponding to the user to be granted remote access
for example : grant bobo Access rights of external users
grant all privileges on *.* to 'bobo'@'%' identified by 'hh123456' with grant option;
Then refresh the permissions
flush privileges;
At this time, you can also use this statement to see the user's permissions :
select host,user,plugin,authentication_string from user;
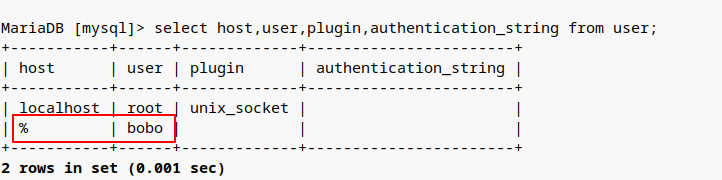
% explain bobo The user has external access
Mariadb Access to the configuration
Get into etc/mysql/mariadb.conf.d Under the table of contents
cd etc/mysql/mariadb.conf.d
edit 50-server.cnf file
Be careful : We must add sudo jurisdiction , Otherwise, the authority is not enough , The change cannot take effect , Temporary files will also be generated
sudo vim 50-server.cnf
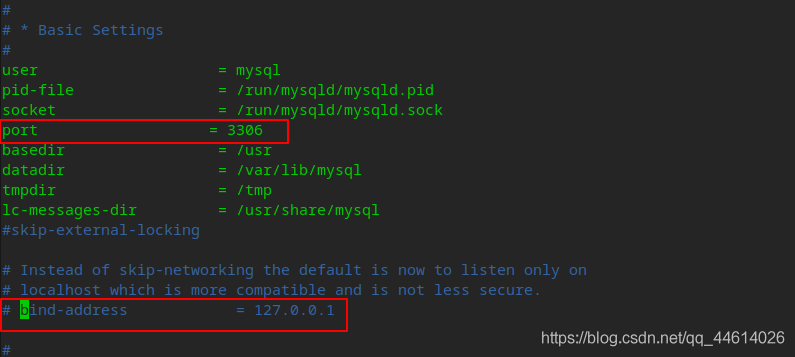
Then press i Enter input mode , Sliding roller , Move the cursor to port=3306 It's about , Press backspace ←BackSpace take # Delete , Move the cursor to... With the mouse bind-address=127.0.0.1 It's about , add # Comment this line
After modification , Press Esc Key to enter command mode , Then press : Key to enter the last line mode , Input wq Save and exit vim edit
Restart it Mariadb sudo systemctl restart mysql
Mariadb Start and shut down
- Check the status
sudo systemctl status mysql - start-up
sudo systemctl start mysql - restart
sudo systemctl restart mysql - close
sudo systemctl stop mysql
版权声明
本文为[Sink the wine cup and fleeting time]所创,转载请带上原文链接,感谢
https://yzsam.com/2022/04/202204231402128620.html
边栏推荐
- 磁盘管理与文件系统
- Dlib of face recognition framework
- 下载并安装MongoDB
- Sail soft calls the method of dynamic parameter transfer and sets parameters in the title
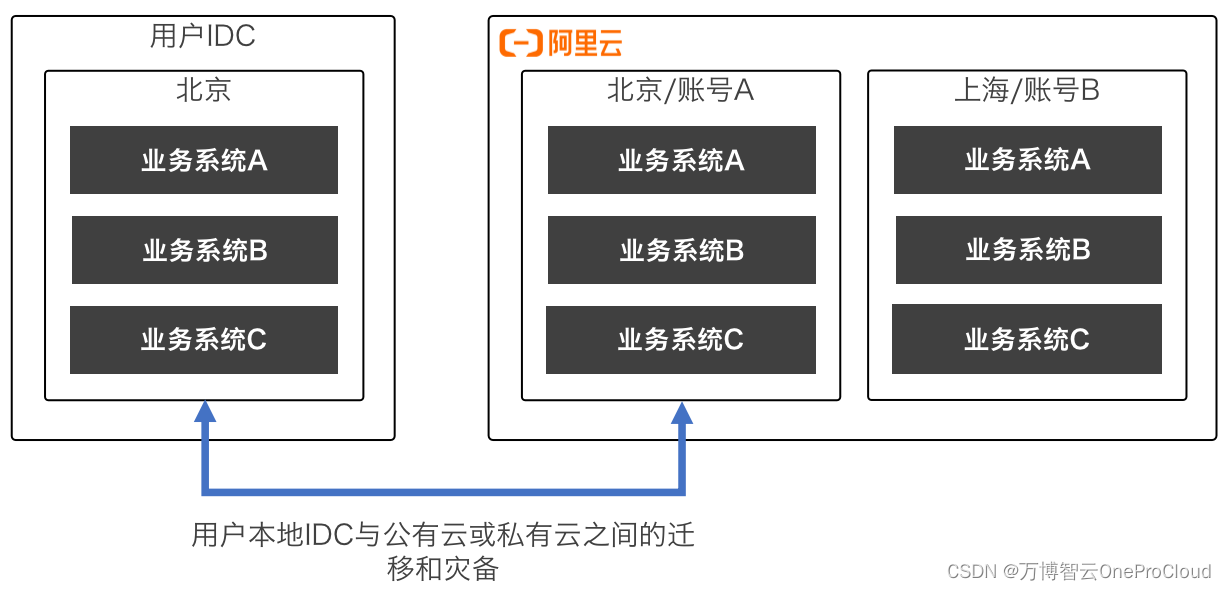
- Cloud migration practice in the financial industry Ping An financial cloud integrates hypermotion cloud migration solution to provide migration services for customers in the financial industry
- Nacos 详解,有点东西
- 伪分布安装spark
- Postman batch production body information (realize batch modification of data)
- Review 2021: how to help customers clear the obstacles in the last mile of going to the cloud?
- The system research problem that has plagued for many years has automatic collection tools, which are open source and free
猜你喜欢

![[key points of final review of modern electronic assembly]](/img/17/007ca1f4fedd11ab878bddda3faf56.jpg)

随机推荐
Use if else to judge in sail software - use the title condition to judge
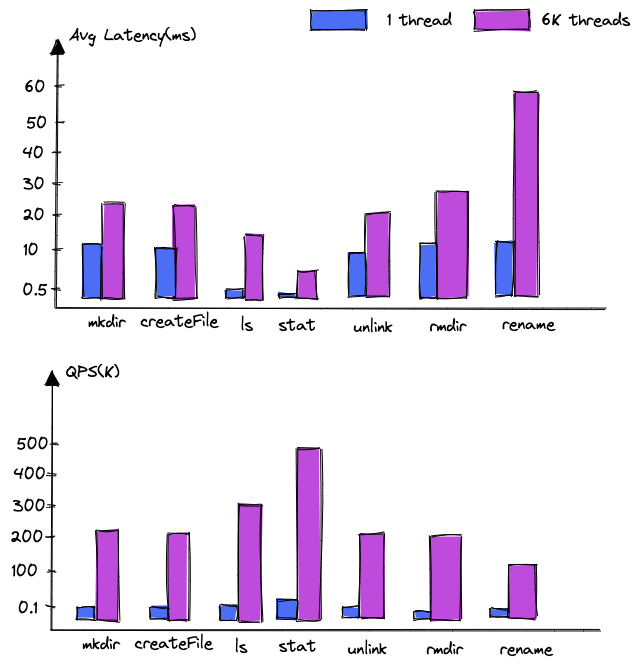
文件系统读写性能测试实战
Six scenarios of cloud migration
Cloudy data flow? Disaster recovery on cloud? Last value content sharing years ago
NVIDIA显卡驱动报错
Creation of RAID disk array and RAID5
OAK-D树莓派点云项目【附详细代码】
Win11 / 10 home edition disables the edge's private browsing function
Detailed explanation of UWA pipeline function | visual configuration automatic test
JSP learning 1
Redis "8" implements distributed current limiting and delay queues
PyTorch:train模式与eval模式的那些坑
如何进行应用安全测试(AST)
Installation and management procedures
Database dbvisualizer Pro reported file error, resulting in data connection failure
Cloud migration practice in the financial industry Ping An financial cloud integrates hypermotion cloud migration solution to provide migration services for customers in the financial industry
关于 background-image 渐变gradient()那些事!
5分钟NLP:Text-To-Text Transfer Transformer (T5)统一的文本到文本任务模型
Ali developed three sides, and the interviewer's set of combined punches made me confused on the spot
文件操作详解(2)