当前位置:网站首页>YOLOv3 SPP source analysis
YOLOv3 SPP source analysis
2022-08-10 19:56:00 【God Luohua】
文章目录
参考github项目YOLOv3 SPP、作者的bilibili讲解视频
The following code in double quotes"““注释””"Part is according to the author video interpretation add comments
Open the above project address,READMEIn project fromultralytics/yolov3.The authors found that a lot in trainingtrick没啥效果,So its training script was optimized.所以YOLOv3 SPP
中是针对ultralytics/yolov3做了一些简化.
一、Code USES the introduction
1.1 项目README说明
- 文件结构:
  ├── cfg: 配置文件目录
  │    ├── hyp.yaml: 训练网络的相关超参数
  │    └── yolov3-spp.cfg: yolov3-spp网络结构配置
  │
  ├── data: 存储训练时数据集相关信息缓存
  │    └── pascal_voc_classes.json: pascal voc数据集标签
  │
  ├── runs: 保存训练过程中生成的所有tensorboard相关文件(loss、mAP等)
  ├── build_utils: 搭建训练网络时使用到的工具
  │     ├── datasets.py: 数据读取以及预处理方法
  │     ├── img_utils.py: 部分图像处理方法
  │     ├── layers.py: 实现的一些基础层结构
  │     ├── parse_config.py: 调用yolov3-spp.cfg,解析yolov3-spp.cfgFile the information of each layer
  │     ├── torch_utils.py: 使用pytorch实现的一些工具
  │     └── utils.py: 训练网络过程中使用到的一些方法
  │
  ├── train_utils: 训练验证网络时使用到的工具(包括多GPU训练以及使用cocotools)
  ├── weights: All training and related training weight(下面会给出百度云的下载地址)
  ├── model.py: 模型搭建文件,调用parse_config.py
  ├── train.py: 针对单GPU或者CPU的用户使用
  ├── train_multi_GPU.py: 针对使用多GPU的用户使用
  ├── trans_voc2yolo.py: 将voc数据集标注信息(.xml)转为yolo标注格式(.txt)
  ├── calculate_dataset.py: 1)统计训练集和验证集的数据并生成相应.txt文件
  │                         2)创建data.data文件
  │                         3)根据yolov3-spp.cfg结合数据集类别数创建my_yolov3.cfg文件
  └── predict_test.py: 简易的预测脚本,使用训练好的权重进行预测测试
- 训练数据的准备以及目录结构
Annotation data generated directlyyolo格式的标签文件.txt.每个txtIs a picture of label information,Each line is a target in the image category index+Real box relative coordinates)
标注好的数据集请按照以下目录结构进行摆放:
├── my_yolo_dataset 自定义数据集根目录
│         ├── train   训练集目录
│         │     ├── images  训练集图像目录
│         │     └── labels  训练集标签目录
│         └── val    验证集目录
│               ├── images  验证集图像目录
│               └── labels  验证集标签目录
- 利用标注好的数据集生成一系列相关准备文件
├── data 利用数据集生成的一系列相关准备文件目录
│    ├── my_train_data.txt:  该文件里存储的是所有训练图片的路径地址
│    ├── my_val_data.txt:  该文件里存储的是所有验证图片的路径地址
│    ├── my_data_label.names:  该文件里存储的是所有类别的名称,一个类别对应一行(这里会根据`.json`文件自动生成)
│    └── my_data.data:  该文件里记录的是类别数类别信息、train以及valid对应的txt文件
- train.txt和test.txt文件格式如下:(保存的是图片路径)

- my_data_label.names:类似cocoThe inside of the data set formatlabel_list:

- my_data.data:

- 使用trans_voc2yolo.py脚本进行转换将VOC标注数据转为YOLO标注数据(如果你的数据已经是YOLO格式了,可跳过该步骤).
- 使用calculate_dataset.pyScripts can be generatedmy_train_data.txt文件、my_val_data.txt文件以及my_data.data文件,并生成新的my_yolov3.cfg文件
- 更新my_yolov3.cfg文件,Such as the final prediction of convolution kernels number for(5+n)*3

- Other reference projectREADME说明
1.2 train.py说明
train.py完整代码如下:
import datetime
import argparse

import yaml
import torch.optim as optim
import torch.optim.lr_scheduler as lr_scheduler
from torch.utils.tensorboard import SummaryWriter

from models import *
from build_utils.datasets import *
from build_utils.utils import *
from train_utils import train_eval_utils as train_util
from train_utils import get_coco_api_from_dataset


def train(hyp):
    device = torch.device(opt.device if torch.cuda.is_available() else "cpu")
    print("Using {} device training.".format(device.type))

    wdir = "weights" + os.sep  # weights dir
    best = wdir + "best.pt"
    results_file = "results{}.txt".format(datetime.datetime.now().strftime("%Y%m%d-%H%M%S"))

    cfg = opt.cfg
    data = opt.data
    epochs = opt.epochs
    batch_size = opt.batch_size
    accumulate = max(round(64 / batch_size), 1)  # accumulate n times before optimizer update (bs 64)
    """每训练64Picture only update once the weight.如果显存小batch_size=4,就是训练16个steps更新一次,This helps to model training."""
    weights = opt.weights  # initial training weights
    imgsz_train = opt.img_size
    imgsz_test = opt.img_size  # test image sizes
    multi_scale = opt.multi_scale

    # Image sizes
    # 图像要设置成32的倍数.Project test imagessize=512,The smallest prediction mapssize=16,缩小了32倍
    gs = 32  # (pixels) grid size
    assert math.fmod(imgsz_test, gs) == 0, "--img-size %g must be a %g-multiple" % (imgsz_test, gs)
    """Top row in picturessize不是32An integer multiple will report an error"""
    grid_min, grid_max = imgsz_test // gs, imgsz_test // gs
    if multi_scale:"""Enable the multi-scale training"""
        imgsz_min = opt.img_size // 1.5
        imgsz_max = opt.img_size // 0.667

        # 将给定的最大,最小输入尺寸向下调整到32的整数倍
        grid_min, grid_max = imgsz_min // gs, imgsz_max // gs
        imgsz_min, imgsz_max = int(grid_min * gs), int(grid_max * gs)
        imgsz_train = imgsz_max  # initialize with max size
        print("Using multi_scale training, image range[{}, {}]".format(imgsz_min, imgsz_max))

    # configure run
    # init_seeds() # 初始化随机种子,保证结果可复现
    """通过.dataFile to read the corresponding data information"""
    data_dict = parse_data_cfg(data)
    train_path = data_dict["train"]
    test_path = data_dict["valid"]
    nc = 1 if opt.single_cls else int(data_dict["classes"])  # number of classes
    """According to the number of target classes and specifying resizing imagesclass loss和object loss"""
    hyp["cls"] *= nc / 80  # update coco-tuned hyp['cls'] to current dataset
    hyp["obj"] *= imgsz_test / 320

    # Remove previous results
    for f in glob.glob(results_file):
        os.remove(f)

    # Initialize model
    model = Darknet(cfg).to(device)"""通过Darknetmethod to build the model"""

    # 是否冻结权重,只训练predictorThe weight of the predictor
    """If trained predictor to the weight,再训练darknet-53All the best network parameters effect.And if the training all network parameters,Less effect than just training predictor."""
    if opt.freeze_layers:
        # 索引减一对应的是predictor的索引,YOLOLayer并不是predictor
        output_layer_indices = [idx - 1 for idx, module in enumerate(model.module_list) if
                                isinstance(module, YOLOLayer)]
        # 冻结除predictor和YOLOLayer外的所有层
        freeze_layer_indeces = [x for x in range(len(model.module_list)) if
                                (x not in output_layer_indices) and
                                (x - 1 not in output_layer_indices)]
        # Freeze non-output layers
        # 总共训练3x2=6个parameters(权重和偏置)
        for idx in freeze_layer_indeces:
            for parameter in model.module_list[idx].parameters():
                parameter.requires_grad_(False)
    else:
        # 如果freeze_layer为False,默认仅训练除darknet53之后的部分
        # 若要训练全部权重,删除以下代码
        """这里是针对yolov3spp cfg进行调整,If not use the problem file,Freeze would be an error"""
        darknet_end_layer = 74  # only yolov3spp cfg
        # Freeze darknet53 layers
        # 总共训练21x3+3x2=69个parameters
        for idx in range(darknet_end_layer + 1):  # [0, 74]
            for parameter in model.module_list[idx].parameters():
                parameter.requires_grad_(False)

    """optimizer:Training only need to update the parameters of the gradient,The optimizer parameters in hyp.yaml中指定"""
    pg = [p for p in model.parameters() if p.requires_grad]
    optimizer = optim.SGD(pg, lr=hyp["lr0"], momentum=hyp["momentum"],
                          weight_decay=hyp["weight_decay"], nesterov=True)

    scaler = torch.cuda.amp.GradScaler() if opt.amp else None

    start_epoch = 0
    best_map = 0.0
    """载入权重文件,一般是pt或者pth结尾.In addition to the model parameters and the optimizer、train loss epochs信息等等"""
    if weights.endswith(".pt") or weights.endswith(".pth"):
        ckpt = torch.load(weights, map_location=device)

        # load model
        try:#After loading the extract weight information,初始化模型
            ckpt["model"] = {
    k: v for k, v in ckpt["model"].items() if model.state_dict()[k].numel() == v.numel()}
            model.load_state_dict(ckpt["model"], strict=False)
        except KeyError as e:
            s = "%s is not compatible with %s. Specify --weights '' or specify a --cfg compatible with %s. " \
                "See https://github.com/ultralytics/yolov3/issues/657" % (opt.weights, opt.cfg, opt.weights)
            raise KeyError(s) from e

        # load optimizer
        if ckpt["optimizer"] is not None:
            optimizer.load_state_dict(ckpt["optimizer"])
            if "best_map" in ckpt.keys():
                best_map = ckpt["best_map"]

        # load results
        if ckpt.get("training_results") is not None:
            with open(results_file, "w") as file:
                file.write(ckpt["training_results"])  # write results.txt

        # epochs
        start_epoch = ckpt["epoch"] + 1
        if epochs < start_epoch:
            print('%s has been trained for %g epochs. Fine-tuning for %g additional epochs.' %
                  (opt.weights, ckpt['epoch'], epochs))
            epochs += ckpt['epoch']  # finetune additional epochs

        if opt.amp and "scaler" in ckpt:
            scaler.load_state_dict(ckpt["scaler"])

        del ckpt

    # Scheduler https://arxiv.org/pdf/1812.01187.pdf
    """定义cos学习率"""
    lf = lambda x: ((1 + math.cos(x * math.pi / epochs)) / 2) * (1 - hyp["lrf"]) + hyp["lrf"]  # cosine
    scheduler = lr_scheduler.LambdaLR(optimizer, lr_lambda=lf)
    scheduler.last_epoch = start_epoch  # 指定从哪个epoch开始

    # Plot lr schedule
    # y = []
    # for _ in range(epochs):
    # scheduler.step()
    # y.append(optimizer.param_groups[0]['lr'])
    # plt.plot(y, '.-', label='LambdaLR')
    # plt.xlabel('epoch')
    # plt.ylabel('LR')
    # plt.tight_layout()
    # plt.savefig('LR.png', dpi=300)

    # model.yolo_layers = model.module.yolo_layers

    # dataset
    # 训练集的图像尺寸指定为multi_scale_range中最大的尺寸
    """LoadImagesAndLabels方法在dataset.py中实现"""
    train_dataset = LoadImagesAndLabels(train_path, imgsz_train, batch_size,
                                        augment=True,
                                        hyp=hyp,  # augmentation hyperparameters
                                        rect=opt.rect,  # rectangular training
                                        cache_images=opt.cache_images,
                                        single_cls=opt.single_cls)

    # 验证集的图像尺寸指定为img_size(512)
    val_dataset = LoadImagesAndLabels(test_path, imgsz_test, batch_size,
                                      hyp=hyp,
                                      rect=True,  # 将每个batch的图像调整到合适大小,可减少运算量(并不是512x512标准尺寸)
                                      cache_images=opt.cache_images,
                                      single_cls=opt.single_cls)

    # dataloader
    nw = min([os.cpu_count(), batch_size if batch_size > 1 else 0, 8])  # number of workers线程数
    train_dataloader = torch.utils.data.DataLoader(train_dataset,
                                                   batch_size=batch_size,
                                                   num_workers=nw,
                                                   # Shuffle=True unless rectangular training is used
                                                   shuffle=not opt.rect,
                                                   pin_memory=True,
                                                   collate_fn=train_dataset.collate_fn)

    val_datasetloader = torch.utils.data.DataLoader(val_dataset,
                                                    batch_size=batch_size,
                                                    num_workers=nw,
                                                    pin_memory=True,
                                                    collate_fn=val_dataset.collate_fn)

    # Model parameters
    """Add the following three parameters to the model of variable,主要是build_utils/utils.py文件的compute_lossAre used in function to calculate loss"""
    model.nc = nc  # attach number of classes to model
    model.hyp = hyp  # attach hyperparameters to model
    model.gr = 1.0  # giou loss ratio (obj_loss = 1.0 or giou)
    # 计算每个类别的目标个数,并计算每个类别的比重
    # model.class_weights = labels_to_class_weights(train_dataset.labels, nc).to(device) # attach class weights

    # start training
    # caching val_data when you have plenty of memory(RAM)
    # coco = None
    """Traverse validation set in advance,读取标签信息,方便后面pycocotools计算mAP"""
    coco = get_coco_api_from_dataset(val_dataset)

    print("starting traning for %g epochs..." % epochs)#开始训练
    print('Using %g dataloader workers' % nw)
    for epoch in range(start_epoch, epochs):
        """Each iteration usetrain_one_epoch方法,Return this round of vector and the average loss"""
        mloss, lr = train_util.train_one_epoch(model, optimizer, train_dataloader,
                                               device, epoch,
                                               accumulate=accumulate,  # 迭代多少batch才训练完64张图片
                                               img_size=imgsz_train,  # 输入图像的大小
                                               multi_scale=multi_scale,
                                               grid_min=grid_min,  # grid的最小尺寸
                                               grid_max=grid_max,  # grid的最大尺寸
                                               gs=gs,  # grid step: 32
                                               print_freq=50,  # 每训练多少个step打印一次信息
                                               warmup=True,
                                               scaler=scaler)
        # update scheduler
        scheduler.step()

        if opt.notest is False or epoch == epochs - 1:#notes默认False,Verify each round a precision
            # evaluate on the test dataset
            result_info = train_util.evaluate(model, val_datasetloader,
                                              coco=coco, device=device)
            """上面得到的cocoEvaluation indicators only keep three,coco指标在csdn笔记cocoData set chapter has introduced"""
            coco_mAP = result_info[0]
            voc_mAP = result_info[1]
            coco_mAR = result_info[8]

            # write into tensorboard,通过tensorboard绘制
            if tb_writer:
                tags = ['train/giou_loss', 'train/obj_loss', 'train/cls_loss', 'train/loss', "learning_rate",
                        "[email protected][IoU=0.50:0.95]", "[email protected][IoU=0.5]", "[email protected][IoU=0.50:0.95]"]

                for x, tag in zip(mloss.tolist() + [lr, coco_mAP, voc_mAP, coco_mAR], tags):
                    tb_writer.add_scalar(tag, x, epoch)

            # write into txt
            with open(results_file, "a") as f:
                # 记录coco的12个指标加上训练总损失和lr,保存到txt文件中,In subsequent drawing curves
                result_info = [str(round(i, 4)) for i in result_info + [mloss.tolist()[-1]]] + [str(round(lr, 6))]
                txt = "epoch:{} {}".format(epoch, ' '.join(result_info))
                f.write(txt + "\n")

            # update best mAP(IoU=0.50:0.95)
            if coco_mAP > best_map:
                best_map = coco_mAP
            """如果savebest=True,每次只保存mAPThe highest model parameters,Otherwise each wheel save model parameters"""
            if opt.savebest is False:
                # save weights every epoch
                with open(results_file, 'r') as f:
                    save_files = {

                        'model': model.state_dict(),
                        'optimizer': optimizer.state_dict(),
                        'training_results': f.read(),
                        'epoch': epoch,
                        'best_map': best_map}
                    if opt.amp:
                        save_files["scaler"] = scaler.state_dict()
                    torch.save(save_files, "./weights/yolov3spp-{}.pt".format(epoch))
            else:
                # only save best weights
                if best_map == coco_mAP:
                    with open(results_file, 'r') as f:
                        save_files = {

                            'model': model.state_dict(),
                            'optimizer': optimizer.state_dict(),
                            'training_results': f.read(),
                            'epoch': epoch,
                            'best_map': best_map}
                        if opt.amp:
                            save_files["scaler"] = scaler.state_dict()
                        torch.save(save_files, best.format(epoch))


if __name__ == '__main__':
    parser = argparse.ArgumentParser()
    parser.add_argument('--epochs', type=int, default=30)
    parser.add_argument('--batch-size', type=int, default=4)
    parser.add_argument('--cfg', type=str, default='cfg/my_yolov3.cfg', help="*.cfg path")
    parser.add_argument('--data', type=str, default='data/my_data.data', help='*.data path')
    parser.add_argument('--hyp', type=str, default='cfg/hyp.yaml', help='hyperparameters path')
    parser.add_argument('--multi-scale', type=bool, default=True,
                        help='adjust (67%% - 150%%) img_size every 10 batches')
    parser.add_argument('--img-size', type=int, default=512, help='test size')
    parser.add_argument('--rect', action='store_true', help='rectangular training')
    parser.add_argument('--savebest', type=bool, default=False, help='only save best checkpoint')
    parser.add_argument('--notest', action='store_true', help='only test final epoch')
    parser.add_argument('--cache-images', action='store_true', help='cache images for faster training')
    parser.add_argument('--weights', type=str, default='weights/yolov3-spp-ultralytics-512.pt',
                        help='initial weights path')
    parser.add_argument('--name', default='', help='renames results.txt to results_name.txt if supplied')
    parser.add_argument('--device', default='cuda:0', help='device id (i.e. 0 or 0,1 or cpu)')
    parser.add_argument('--single-cls', action='store_true', help='train as single-class dataset')
    parser.add_argument('--freeze-layers', type=bool, default=False, help='Freeze non-output layers')
    # 是否使用混合精度训练(需要GPU支持混合精度)
    parser.add_argument("--amp", default=False, help="Use torch.cuda.amp for mixed precision training")
    opt = parser.parse_args()

    # 检查文件是否存在
    opt.cfg = check_file(opt.cfg)
    opt.data = check_file(opt.data)
    opt.hyp = check_file(opt.hyp)
    print(opt)
    #如果上面文件都存在,加载配置文件
    with open(opt.hyp) as f:
        hyp = yaml.load(f, Loader=yaml.FullLoader)

    print('Start Tensorboard with "tensorboard --logdir=runs", view at http://localhost:6006/')
    tb_writer = SummaryWriter(comment=opt.name)#实例化tensorboard
    train(hyp)#开启训练
拉到最下面if __name__ == '__main__':处:
--hypcorresponds to a hyperparameteryaml文件,即cfg文件夹下的 hyp.yaml--multi-scale:是否进行多尺度训练.默认启用,Training image size asimg-size的67% - 150%随机选取.--img-size:Test image size.Training does not restrict image size,Because using multi-scale training--savebest:Only save the highestmAP的模型权重.默认关闭,Every time after verification save weight--notest:只在最后一个epoch验证模型,节省时间,默认关闭--weights:预训练模型权重.If you disconnect when training,Can be set to the last saved model weightsfreeze-layers:Whether the freeze network part weight.默认为ture,Weight training three prediction feature layer,Tests found doing so the result is right also,And greatly speed up the training.设为False,会训练darknet-53All of the network parameters.If trained predictor to the weight,再训练darknet-53All the best network parameters effect.And if the training all network layer parameters,more effective than just Training predictor is worse.- Training has the following confirmed fault,不影响.多GPU训练15min.训练完在runsFolder will savetensorboardSave a series of data curve fileevents,还会生成results.txt文件.Subsequent can according to the12A data to draw curves


- 训练完成后,打开runs文件夹,在此文件夹打开powershell,输入以下命令,最后打开localhost:6006The curve of the web site can see drawing.


colabEnter the code below to enable
%load_ext tensorboard				#启动tensorboard

%tensorboard --logdir='runs/log_dir' #According to the log files are generated view
1.3 predict_test.py文件
import os
import json
import time

import torch
import cv2
import numpy as np
from matplotlib import pyplot as plt
from PIL import Image

from build_utils import img_utils, torch_utils, utils
from models import Darknet
from draw_box_utils import draw_objs


def main():
    img_size = 512  # 必须是32的整数倍 [416, 512, 608]
    cfg = "cfg/my_yolov3.cfg"  # 改成生成的.cfg文件
    weights = "weights/yolov3spp-29.pt"  # 改成自己训练好的权重文件
    json_path = "./data/pascal_voc_classes.json"  # json标签文件
    img_path = "my_yolo_dataset/val/images/2011_003261.jpg"
    assert os.path.exists(cfg), "cfg file {} dose not exist.".format(cfg)
    assert os.path.exists(weights), "weights file {} dose not exist.".format(weights)
    assert os.path.exists(json_path), "json file {} dose not exist.".format(json_path)
    assert os.path.exists(img_path), "image file {} dose not exist.".format(img_path)

    """读取json文件,Convert index in the form of corresponding category name"""
    with open(json_path, 'r') as f:
        class_dict = json.load(f)

    category_index = {
    str(v): str(k) for k, v in class_dict.items()}

    input_size = (img_size, img_size)

    device = torch.device("cuda:0" if torch.cuda.is_available() else "cpu")

    model = Darknet(cfg, img_size)#实例化模型
    model.load_state_dict(torch.load(weights, map_location='cpu')["model"])#Load the trained model weights
    model.to(device)

    model.eval()
    with torch.no_grad():
        """initInitial im into an empty image was introduced into the network to spread positive.In the network authentication for the first time,Will initialize a series of network structure,会比较慢 Introduced into an empty image to initialize it"""
        img = torch.zeros((1, 3, img_size, img_size), device=device)
        model(img)

        img_o = cv2.imread(img_path)  # opencv读取的图片是BGR格式
        assert img_o is not None, "Image Not Found " + img_path
        """resize图片,auto=TrueAccording to the input image edge, and scaling to long512,短边等比例缩放(保持长宽比不变).Not enough short sides512的部分用(0,0,0)填充 Do the input image is actually less than512*512,可以减少运算量"""
        img = img_utils.letterbox(img_o, new_shape=input_size, auto=True, color=(0, 0, 0))[0]
        # Convert
        img = img[:, :, ::-1].transpose(2, 0, 1)  # BGR to RGB, to 3x416x416
        img = np.ascontiguousarray(img)#Determine whether in memory is continuous,Not become continuous

        img = torch.from_numpy(img).to(device).float()
        img /= 255.0  # scale (0, 255) to (0, 1),Don't need to reduce the mean in addition to the standard deviation
        img = img.unsqueeze(0)  # 新增batch维度
        t1 = torch_utils.time_synchronized()
        pred = model(img)[0]  # only get inference result
        t2 = torch_utils.time_synchronized()
        print(t2 - t1)
        """对结果进行NMS非极大值抑制处理"""
        pred = utils.non_max_suppression(pred, conf_thres=0.1, iou_thres=0.6, multi_label=True)[0]
        t3 = time.time()
        print(t3 - t2)

        if pred is None:
            print("No target detected.")
            exit(0)

        # process detections
        """Will predict bounding box on the scale of the map back to the original image,Because the input network before,We on the image scaling"""
        pred[:, :4] = utils.scale_coords(img.shape[2:], pred[:, :4], img_o.shape).round()
        print(pred.shape)
        """提取bboxes、scores、classes信息,使用draw_objs方法进行绘制"""
        bboxes = pred[:, :4].detach().cpu().numpy()
        scores = pred[:, 4].detach().cpu().numpy()
        classes = pred[:, 5].detach().cpu().numpy().astype(int) + 1

        pil_img = Image.fromarray(img_o[:, :, ::-1])
        plot_img = draw_objs(pil_img,
                    bboxes,
                    classes,
                    scores,
                    category_index=category_index,
                    box_thresh=0.2,
                    line_thickness=3,
                    font='arial.ttf',
                    font_size=20)
        plt.imshow(plot_img)
        plt.show()
        # 保存预测的图片结果
        plot_img.save("test_result.jpg")


if __name__ == "__main__":
    main()
二、配置文件解析
2.1 yolov3-spp.cfg模型配置文件
打开yolov3_spp/cfg/yolov3-spp.cfg文件,有[net] 、[convolutional]、[shortcut] And a series of layer structure.Model is according to the layer structure, in turn, build out.
- net不需要管,从第一个[convolutional]层开始
- [convolutional]layer enabledbatch_normalize,Convolution layer offset any role,需要去掉.
- [shortcut] Fusion isresnettwo in the networkshapeThe same matrix additive operation.Linear activation is just thaty=x,不做任何处理.

可将yolov3_spp/cfg/yolov3-spp.cfg`Documents and pictures below one by one contrast.第一个 [shortcut] 是和# Downsample这一层的[convolutional]融合,Is below two convolution of the box out of the output layer integration is.
- maxpool最大池化下采样层,只在spp结构中使用.maxpoolThe size of the layer in order not to change the input feature,进行了padding填充,Then the results are joining together.

- route层,也是spp结构中使用

- [upsample]层:stride=2,The characteristics of the figure amplifier to two times
- [yolo]层:Followed in three side expected predictor the structure,对预测结果进行处理,生成一系列anchors.
- classes:目标类别数
- mask:使用哪些anchors进行预测.0.1.2表示使用[10,13, 16,30, 33,23]这三组anchors.
- anchors:18Group number for each grid generation9个anchors,每个anchorIn width and height.The first three groups to detect small target,After three sets of large target detection.
- After five parameters in less than,不作讲解

2.2 parse_config.py解析cfg配置文件
下面是yolov3_spp/build_utils/parse_config.py文件,Used to parse justyolov3-spp.cfg配置文件.将cfgEach layer of the structure analysis is one of the elements in the list of,Each element is a dictionary form,Contains of this layertypeAnd other structure information.
import os
import numpy as np


def parse_model_cfg(path: str):
    # 检查文件是否存在,是否以.cfg结尾
    if not path.endswith(".cfg") or not os.path.exists(path):
        raise FileNotFoundError("the cfg file not exist...")

    # 读取文件信息
    with open(path, "r") as f:
        lines = f.read().split("\n")

    # 去除空行和注释行
    lines = [x for x in lines if x and not x.startswith("#")]
    # 去除每行开头和结尾的空格符
    lines = [x.strip() for x in lines]

    mdefs = []  # module definitions
    for line in lines:
        """Traverse reads all layer structure"""
        if line.startswith("["):  # Said a new layer structure
            mdefs.append({
    })
            """在mdefsAt the end of the list add a dictionary,键是type,Value of layer structure name"""
            mdefs[-1]["type"] = line[1:-1].strip()  # 记录module类型
            # 如果是卷积模块,设置默认不使用BN(普通卷积层后面会重写成1,最后的预测层conv保持为0)
            if mdefs[-1]["type"] == "convolutional":
                mdefs[-1]["batch_normalize"] = 0
        else: #不是[The beginning is some parameters
            key, val = line.split("=")#Split with an equals signkey何value
            key = key.strip()#去除空格
            val = val.strip()

            if key == "anchors":
                #只有最后的yolo层有anchors这个参数,值为anchors = 10,13, 16,30, 33,23, 30,61, 62,45, 59,119, 116,90, 156,198, 373,326
                val = val.replace(" ", "")  # 将空格去除.下面用,分割遍历,转为float类型.然后reshape成9*2大小
                mdefs[-1][key] = np.array([float(x) for x in val.split(",")]).reshape((-1, 2))  # np anchors
            elif (key in ["from", "layers", "mask"]) or (key == "size" and "," in val):
                """from是shortcut层,layers是route层"""
                mdefs[-1][key] = [int(x) for x in val.split(",")]#val转int再转为列表
            else:
                # TODO: .isnumeric() actually fails to get the float case
                if val.isnumeric():  # return int or float.
                    """val.isnumeric()To judge whether the numerical.(int(val) - float(val)) == 0Is to determine the integer or floating point"""
                    mdefs[-1][key] = int(val) if (int(val) - float(val)) == 0 else float(val)
                else:
                    mdefs[-1][key] = val  # return string 是字符的情况

    # check all fields are supported
    supported = ['type', 'batch_normalize', 'filters', 'size', 'stride', 'pad', 'activation', 'layers', 'groups',
                 'from', 'mask', 'anchors', 'classes', 'num', 'jitter', 'ignore_thresh', 'truth_thresh', 'random',
                 'stride_x', 'stride_y', 'weights_type', 'weights_normalization', 'scale_x_y', 'beta_nms', 'nms_kind',
                 'iou_loss', 'iou_normalizer', 'cls_normalizer', 'iou_thresh', 'probability']

    # 遍历检查每个模型的配置
    for x in mdefs[1:]:  # 0对应net配置
        # 遍历每个配置字典中的key值
        for k in x:
            if k not in supported:
                raise ValueError("Unsupported fields:{} in cfg".format(k))

    return mdefs


def parse_data_cfg(path):
    # Parses the data configuration file
    if not os.path.exists(path) and os.path.exists('data' + os.sep + path):  # add data/ prefix if omitted
        path = 'data' + os.sep + path

    with open(path, 'r') as f:
        lines = f.readlines()

    options = dict()
    for line in lines:
        line = line.strip()
        if line == '' or line.startswith('#'):
            continue
        key, val = line.split('=')
        options[key.strip()] = val.strip()

    return options
三、 网络搭建
Network part inmodel.py中,先看后面class Darknet(nn.Module)部分.
self.module_defs = parse_model_cfg(cfg)解析yolov3的cfg文件.In this step to set breakpoints run,得到module_defs 列表,内容如下:
- 通过
create_modulesFunction is introduced to parse goodmodulesList buildingyolov3_spp网络. - 正向传播得到yolo_layer层输出yolo_out为最终输出(During the reasoning testyolo_outThere will be some post-processing)
model.py整体代码如下
from build_utils.layers import *
from build_utils.parse_config import *

ONNX_EXPORT = False


def create_modules(modules_defs: list, img_size):
    """ Constructs module list of layer blocks from module configuration in module_defs :param modules_defs: 通过.cfg文件解析得到的每个层结构的列表 :param img_size: :return: """

    img_size = [img_size] * 2 if isinstance(img_size, int) else img_size
    """ 1.popMethod remove parsingcfg列表中的第一个配置(对应[net]的配置) 2.output_filtersRecord the output of each modulechannel(Write at the end of the traversal),The first module inputchannels=3(RGB图片) 3.实例化nn.ModuleList(),The building behind when each layer module in turn into the tomodule_list中 4.routs统计哪些特征层的输出会被后续的层使用到(可能是特征融合,也可能是拼接) """
    modules_defs.pop(0)  # cfg training hyperparams (unused)
    output_filters = [3]  # input channels
    module_list = nn.ModuleList()
    routs = []  # list of layers which rout to deeper layers
    yolo_index = -1

    # 遍历搭建每个层结构
    for i, mdef in enumerate(modules_defs):
        """ 1.If a module contains multiple layer structure,just pass it inSequential中 2.用mdef["type"]To judge the type of each module in turn. 3.yolov3_spp中每个convolutional都有stride,So no need to worry about actually(mdef['stride_y'], mdef["stride_x"]) """
        modules = nn.Sequential()

        if mdef["type"] == "convolutional":
            bn = mdef["batch_normalize"]  # 1 or 0 / use or not
            filters = mdef["filters"]
            k = mdef["size"]  # kernel size
            stride = mdef["stride"] if "stride" in mdef else (mdef['stride_y'], mdef["stride_x"])
            if isinstance(k, int):
                """ The authors say project is mainly to buildyolov3_spp网络,所以相比u版yolov3_spp源代码,To delete a lot of code in less than here in_channelsCorresponds to an output channel number,output_filters[-1]Is the final output module matrixchannnel数 bn为True就不使用bias """
                modules.add_module("Conv2d", nn.Conv2d(in_channels=output_filters[-1],
                                      out_channels=filters,
                                      kernel_size=k,
                                      stride=stride,
                                      padding=k // 2 if mdef["pad"] else 0,
                                      bias=not bn))
            else:
                raise TypeError("conv2d filter size must be int type.")

            if bn:
                modules.add_module("BatchNorm2d", nn.BatchNorm2d(filters))#Output parameters corresponding to a layer of matrixchannels
            else:
                """ 如果该卷积操作没有bn层,意味着该层为yolo的predictor,i.e. three predictors. The output of the predictor will spread to backyolo layer中,So you need to add predictor serial number to therouts中 """
                routs.append(i)  # detection output (goes into yolo layer)

            if mdef["activation"] == "leaky":
                modules.add_module("activation", nn.LeakyReLU(0.1, inplace=True))
            else:
                pass

        elif mdef["type"] == "BatchNorm2d":
            pass

        elif mdef["type"] == "maxpool":#SPPlayer onlymaxpool层
            k = mdef["size"]  # kernel size
            stride = mdef["stride"]
            modules= nn.MaxPool2d(kernel_size=k,stride=stride,padding=(k-1)//2)

        elif mdef["type"] == "upsample":
            if ONNX_EXPORT:  # 是否导出ONNX模型
                g = (yolo_index + 1) * 2 / 32  # gain
                modules = nn.Upsample(size=tuple(int(x * g) for x in img_size))
            else:
                modules = nn.Upsample(scale_factor=mdef["stride"])#strideis the upsampling rate,传入scale_factor

        elif mdef["type"] == "route":  # [-2], [-1,-3,-5,-6], [-1, 61]
            """ filtersRecord the current output matrix layer ofchannel.如果l>0,那么需要l+1,因为最开始output_filters添加了元素3. So the first output modulechannel,不是output_filters列表第一个元素.而是索引1的元素,即l+1 如果l<0That is down several,There is no problem with the order,Can directly writel layers是一个值,filters=output_filters[layers];are multiple values,filtersIt's these layerschannnelsum of numbers(SPPThe structure of the concatenation operation) Some modules output follow-up to use(SPP和yolopredicted structure),routs通过extendMethods recorded the index of these modules. i是当前route索引,l<0时l表示相对于iThe reciprocal index of ,Real index should bei+l.如果l>0Is directly recorded the layer index,直接用l就行 FeatureConcatClass to create multiple layers splicing modules,这个类在build_utils.layers中 """
            layers = mdef["layers"]
            filters = sum([output_filters[l + 1 if l > 0 else l] for l in layers])
            routs.extend([i + l if l < 0 else l for l in layers])
            modules = FeatureConcat(layers=layers)

        elif mdef["type"] == "shortcut":
            layers = mdef["from"]
            filters = output_filters[-1]#获取shortcutThe output of the module on a layer of
            # routs.extend([i + l if l < 0 else l for l in layers])
            """layersIs only a list of values,索引0获取这个值.i+layers[0]就是需要shortcutAnother layer of index WeightedFeatureFusion也在build_utils.layers中,weight参数没有用到,不用管 """
            routs.append(i + layers[0])
            modules = WeightedFeatureFusion(layers=layers, weight="weights_type" in mdef)

        elif mdef["type"] == "yolo":
            yolo_index += 1  # 记录是第几个yolo_layer.Three prediction feature layer index for[0,1,2],前面赋值yolo_index=-1
            stride = [32, 16, 8]  # 预测特征层对应原图的缩放比例
            """一共9组anchors,Each group has three two parameters.通过maskParameter selection in any of the threeanchors YOLOLayer在forword中返回io和p,分别是[Predict box absolute coordinates、obj概率、classes概率],以及[Prediction box offset、obj、classes] """
            modules = YOLOLayer(anchors=mdef["anchors"][mdef["mask"]],  # anchor list
                                nc=mdef["classes"],  # number of classes
                                img_size=img_size,#ONNXOnly for export,不用管
                                stride=stride[yolo_index])

            # Initialize preceding Conv2d() bias
            """(这一步是根据focal loss论文对predictor的bias进行初始化:https://arxiv.org/pdf/1708.02002.pdf section 3.3)"""
            try:
                j = -1#yolo_layer前一层,也就是predictor层
                # bias: shape(255,) 索引0对应Sequential中的Conv2d
                # view: shape(3, 85)
                """#j是上一层,0是卷积层.predictor中没有bn层和激活层,只有卷积层,在Sequential中索引为0"""
                b = module_list[j][0].bias.view(modules.na, -1)
                b.data[:, 4] += -4.5  # obj
                b.data[:, 5:] += math.log(0.6 / (modules.nc - 0.99))  # cls (sigmoid(p) = 1/nc)
                module_list[j][0].bias = torch.nn.Parameter(b.view(-1), requires_grad=True)
            except Exception as e:
                print('WARNING: smart bias initialization failure.', e)
        else:
            print("Warning: Unrecognized Layer Type: " + mdef["type"])

        # Register module list and number of output filters
        module_list.append(modules)
        output_filters.append(filters)#convolutional、shortcut、routelayer only,Other layer matrix channel number remains the same

    routs_binary = [False] * len(modules_defs)#根据routs列表的索引,Determine which layers are used in the back
    for i in routs:
        routs_binary[i] = True
    return module_list, routs_binary


class YOLOLayer(nn.Module):
    """ 对YOLO的predictorThe output is processed """
    def __init__(self, anchors, nc, img_size, stride):
        super(YOLOLayer, self).__init__()
        self.anchors = torch.Tensor(anchors)
        self.stride = stride  # layer stride 特征图上一步对应原图上的步距 [32, 16, 8]
        self.na = len(anchors)  # Each prediction feature layer USES three dimensionsanchors
        self.nc = nc  # number of classes (80)
        self.no = nc + 5  # 每个anchorPredict how many parameters.anchorparameters and confidence、每个类别的分数 (85:x,y,w,h,obj,cls1, ...)
        """nx/nyForecast is feature layer width and height,ng是grid cell的size"""
        self.nx, self.ny, self.ng = 0, 0, (0, 0)  # initialize number of x, y gridpoints
        # anchors是原图上的anchor大小,除以stride将anchorsSize, and scaling to predict characteristics of layer scale(gridScale on the grid)
        self.anchor_vec = self.anchors / self.stride # size=[3,2],3个anchor,Two elements of height and width
        """ self.anchor_wh的size=[1,3,1,1,2],分别对应batch_size, na, grid_h, grid_w, wh anchor的个数3和wh个数2是不变的,Other will changes with different input,设置为1就行 """
        # 值为1的维度对应的值不是固定值,后续操作可根据broadcast广播机制自动扩充
        self.anchor_wh = self.anchor_vec.view(1, self.na, 1, 1, 2)# size=[1,3,1,1,2]
        self.grid = None

        if ONNX_EXPORT:
            self.training = False
            self.create_grids((img_size[1] // stride, img_size[0] // stride))  # number x, y grid points

    def create_grids(self, ng=(13, 13), device="cpu"):
        """ 更新grids信息并生成新的grids参数.ng对应forword里面的(nx,ny) :param ng: 特征图大小 :param device: :return: """
        self.nx, self.ny = ng
        self.ng = torch.tensor(ng, dtype=torch.float)

        # build xy offsets 构建每个grid cell处的anchor的xy偏移量(在feature map上的)
        if not self.training:  # 训练模式不需要回归到最终预测boxes,不需要求self.grid,And only need to compute losses.
            """xv和yvAre these the top left corner of the gridx坐标和y坐标.通过torch.stack方法将xv和yvJoining together get left upper corner of the grid coordinates"""
            yv, xv = torch.meshgrid([torch.arange(self.ny, device=device),
                          torch.arange(self.nx, device=device)])
            # batch_size, na, grid_h, grid_w, wh
            self.grid=torch.stack((xv,yv),2).view((1,1,self.ny,self.nx,2)).float()#调整成self.anchor_vec的shape

        if self.anchor_vec.device != device:
            self.anchor_vec = self.anchor_vec.to(device)
            self.anchor_wh = self.anchor_wh.to(device)

    def forward(self, p):#p为predictor预测的参数,Forecast including frame offset
        if ONNX_EXPORT:
            bs = 1  # batch size
        else:#ny,nx是grid cell的高度和宽度
            bs, _, ny, nx = p.shape  # batch_size, predict_param(255), grid(13), grid(13)
            """判断self.nx,self.ny)Whether is equal to the current input characteristic matrix(nx,ny).不相等说明grid size发生了变化. self.grid=NoneSaid the spread of the positive first time,In both cases is to generategrid 参数"""
            if (self.nx, self.ny) != (nx, ny) or self.grid is None:  # fix no grid bug
                self.create_grids((nx, ny), p.device)

        # view: predictorGet the ultimate matrixp从shape(batch_size,255,13,13)->shape(batch_size,3,85,13,13)
        # permute: (batch_size,3,85,13,13) -> (batch_size,3,13,13,85).na=3,A feature layer to predict threeanchors.no=classes+5
        # 最终结果是[bs,anchor数,grid_size,grid_size,xywh+obj+classes]
        # permuteAfter the discrete memory,contiguous()Methods into a continuous variable memory
        p = p.view(bs,self.na,self.no,self.ny,self.nx).permute(0,1,3,4,2).contiguous()

        if self.training:
            return p
        elif ONNX_EXPORT:
            # Avoid broadcasting for ANE operations
            m = self.na * self.nx * self.ny  # 3*
            ng = 1. / self.ng.repeat(m, 1)
            grid = self.grid.repeat(1, self.na, 1, 1, 1).view(m, 2)
            anchor_wh = self.anchor_wh.repeat(1, 1, self.nx, self.ny, 1).view(m, 2) * ng

            p = p.view(m, self.no)
            # xy = torch.sigmoid(p[:, 0:2]) + grid # x, y
            # wh = torch.exp(p[:, 2:4]) * anchor_wh # width, height
            # p_cls = torch.sigmoid(p[:, 4:5]) if self.nc == 1 else \
            # torch.sigmoid(p[:, 5:self.no]) * torch.sigmoid(p[:, 4:5]) # conf
            p[:, :2] = (torch.sigmoid(p[:, 0:2]) + grid) * ng  # x, y
            p[:, 2:4] = torch.exp(p[:, 2:4]) * anchor_wh  # width, height
            p[:, 4:] = torch.sigmoid(p[:, 4:])
            p[:, 5:] = p[:, 5:self.no] * p[:, 4:5]
            return p
        else:  # inferenceThe situation of the reasoning to verify
            # [bs, anchor, grid, grid, xywh + obj + classes]
            io = p.clone()  # inference output
            """ io[..., :2]The three points is the front four dimensions,即batch_size、anchor、gird、grid. 最后一个维度是xywh+obj+classes,Just take the first twoxy偏移量.self.gridIs each of the top left corner of the grid coordinates xy偏移量用sigmoid限制+self.gridIs to predict box on the gridxy坐标(绝对坐标) """
            io[..., :2] = torch.sigmoid(io[..., :2]) + self.grid  # xy 计算在feature map上的xy坐标
            io[..., 2:4] = torch.exp(io[..., 2:4]) * self.anchor_wh  # wh Calculate the prediction box atfeature map上的wh
            io[..., :4] *= self.stride    #换算映射回原图尺度.self.stride是girdGrid relative scaling of the original image
            torch.sigmoid_(io[..., 4:])    #obj+classes经过sigmoid函数得到概率
            return io.view(bs,-1,self.no),p  # view [1,3,13,13,85] as [1,507,85].Practice is a multi-scale training,不一定是13*13的网格


class Darknet(nn.Module):
    """ YOLOv3 spp object detection model img_sizeDoes not have any effect in the process of training,可暂时忽略.img_size只在导出ONNXFormat the model work verboseMeans at the time of instantiation model do you want to print model of each layer information,默认False不打印 """
    def __init__(self, cfg, img_size=(416, 416), verbose=False):
        super(Darknet, self).__init__()
        # 这里传入的img_size只在导出ONNX模型时起作用
        self.input_size = [img_size] * 2 if isinstance(img_size, int) else img_size
        # 解析网络对应的.cfg文件.也就是parse_config.py中解析cfg文件的函数
        self.module_defs = parse_model_cfg(cfg)
        # 根据解析的网络结构一层一层去搭建.create_modules返回module_list模块和routs_binary
        self.module_list, self.routs = create_modules(self.module_defs, img_size)
        # 获取所有YOLOLayer层的索引
        self.yolo_layers = get_yolo_layers(self)

        # 打印下模型的信息,如果verbose为True则打印详细信息
        self.info(verbose) if not ONNX_EXPORT else None  # print model description

    def forward(self, x, verbose=False):
        return self.forward_once(x, verbose=verbose)

    def forward_once(self, x, verbose=False):
        # yolo_out收集每个yolo_layer层的输出,out收集每个模块的输出
        # x表示输入图像
        yolo_out, out = [], []
        if verbose:
            print('0', x.shape)
            str = ""

        for i, module in enumerate(self.module_list):
            name = module.__class__.__name__
            if name in ["WeightedFeatureFusion", "FeatureConcat"]:  # sum, concat.分别是shortcut层和spp层的操作
                if verbose:
                    l = [i - 1] + module.layers  # layers
                    sh = [list(x.shape)] + [list(out[i].shape) for i in module.layers]  # shapes
                    str = ' >> ' + ' + '.join(['layer %g %s' % x for x in zip(l, sh)])
                x = module(x,out)  # WeightedFeatureFusion(), FeatureConcat()
            elif name == "YOLOLayer":
                yolo_out.append(module(x))
            else:  # run module directly, i.e. mtype = 'convolutional', 'upsample', 'maxpool', 'batchnorm2d' etc.
                x = module(x)

            out.append(x if self.routs[i] else [])#routsIs the true and false matrix list,Determine which behind the output layer to use.如果是False后面用不到,The location to save an empty list
            if verbose:
                print('%g/%g %s -' % (i, len(self.module_list), name), list(x.shape), str)
                str = ''

        if self.training:  # train模式YOLOLayer只返回p,只需要yolo_out就行
            return yolo_out
        elif ONNX_EXPORT:  # export
            # x = [torch.cat(x, 0) for x in zip(*yolo_out)]
            # return x[0], torch.cat(x[1:3], 1) # scores, boxes: 3780x80, 3780x4
            p = torch.cat(yolo_out, dim=0)

            # # 根据objectness虑除低概率目标
            # mask = torch.nonzero(torch.gt(p[:, 4], 0.1), as_tuple=False).squeeze(1)
            # # onnx不支持超过一维的索引(pytorch太灵活了)
            # # p = p[mask]
            # p = torch.index_select(p, dim=0, index=mask)
            #
            # # 虑除小面积目标,w > 2 and h > 2 pixel
            # # ONNX暂不支持bitwise_and和all操作
            # mask_s = torch.gt(p[:, 2], 2./self.input_size[0]) & torch.gt(p[:, 3], 2./self.input_size[1])
            # mask_s = torch.nonzero(mask_s, as_tuple=False).squeeze(1)
            # p = torch.index_select(p, dim=0, index=mask_s) # width-height 虑除小目标
            #
            # if mask_s.numel() == 0:
            # return torch.empty([0, 85])

            return p
        else:  # inference or test
            """Inference verification modeyolo_layer返回两个值,以zipMethods separate assigned tox和p两个列表"""
            x, p = zip(*yolo_out)  # inference output, training output
            """1Said in the second dimension for Mosaic.拼接后size=[1,16128,25],即[bs,生成的anchors数,classes+5]"""
            x = torch.cat(x, 1)  # 拼接yolo outputs.
            return x, p

    def info(self, verbose=False):
        """ 打印模型的信息 :param verbose: :return: """
        torch_utils.model_info(self, verbose)


def get_yolo_layers(self):
    """ 获取网络中三个"YOLOLayer"模块对应的索引 :param self: if m.__class__.__name__=='YOLOLayer':If the module is named'YOLOLayer',就记录其索引.在yolov3_spp中是[89,101,113] """
    return [i for i, m in enumerate(self.module_list) if m.__class__.__name__ == 'YOLOLayer']
下面依次分析:
YOLOLayerIn the training mode,要
create_grids.forwordIn according to the actual coordinates frame offset for forecasting box,即YOLOLayer里面的最后面else部分代码,O predict box practical coordinate diagram is as follows:
- l i x ^ \hat{l_{i}^{x}} lix^、 l i y ^ \hat{l_{i}^{y}} liy^Is the picture above on the right side of the σ ( t x ) \sigma(t_{x}) σ(tx)、 σ ( t x ) \sigma(t_{x}) σ(tx),Forecast says box center relative to thegrid cellThe top left corner of this point offset,也对应 L l o c L_{loc} Lloc中的 l i m ^ \hat{l_{i}^{m}} lim^.
- g表示anchorMatch to the real box. g i x ^ \hat{g_{i}^{x}} gix^According to real frame relative to thegrid cellThe upper left corner this pointx偏移量
- l i m ^ \hat{l_{i}^{m}} lim^和 g i m ^ \hat{g_{i}^{m}} gim^Are predicted frame offsets and real box offset,The mean difference of the sum of squares is positioning loss.
class YOLOLayer(nn.Module)的forword部分,Training will not requiredself.grid,直接跳过create_grids函数中的torch.meshgrid:Suppose to get a4*4的grid网格,Coordinate each grid in the upper left corner.torch.meshgrid得到的xv和yvAre these gridx坐标和y坐标.通过torch.stack方法将xv和yvJoining together get left upper corner of the grid coordinates.示意图如下:
调试predict_test.py脚本,运行model.py.在
class Darknet(nn.Module):类下的x, p = zip(*yolo_out)处设置断点,See the reasoning validation returned to the output of thex和p.

class YOLOLayer(nn.Module)中给出了yolo_layer层的输出:- p为yolo_layer前一层predictor层的输出,Contains the offset parameters prediction bounding box,obj和classes.
shape=(batch_size,255,13,13),通过p=p.view(bs,self.na,self.no,self.ny,self.nx).permute(0,1,3,4,2).contiguous()处理后,shape=(batch_size,3,13,13,85),即[bs,anchor数,grid_size,grid_size,xywh+obj+classes].训练模式yolo_layerDirect return to the outputp. - Reasoning and test mode,返回两个结果:
io.view(bs,-1,self.no),p.前一个结果io.view(bs,-1,self.no)是将pContains the forecast of box offsetxywh结合grid cellCoordinates and height and width,Get high forecast box absolute coordinates and wide,obj和classes经过sigmoid函数得到概率值.shape=[bs,-1,self.no],Practice is a multi-scale training,The second dimension is not necessarily13*13*3.
- p为yolo_layer前一层predictor层的输出,Contains the offset parameters prediction bounding box,obj和classes.
- Darknet的输出,是经过
module_listA series of layer structure in the former to spread,最终得到yolo_layer层的输出yolo_out.- 训练模式下,结果就是yolo_out,即训练模式yolo_layer输出p,
shape=(batch_size,3,13,13,85).三个yolo_layer有三个p,yolo_outIs a list of three elements. - Reasoning test mode,
yolo_out=io.view(bs,-1,self.no),p.通过x, p = zip(*yolo_out)处理,由于有三个yolo_layer,所以xIs it contains a list of three elements,每个元素是一个yolo_layerOutput the first element of theio.view(bs,-1,self.no).pAlso there are three elements,都是yolo_layerThe output of the second element,也就是原先predictor输出p只进行view和permute操作的结果. x = torch.cat(x, 1)Said it will predict the threeyolo_layerOutput the first element of theio.view(bs,-1,self.no)In the second dimension for Mosaic.The authors demonstrate before joining togetherx.shape=[1,768,25],拼接后x.shape=[1,16128,25],Said test a picture,The picture generated16128个anchors.
- 训练模式下,结果就是yolo_out,即训练模式yolo_layer输出p,
Completing this model part.
四、自定义数据集
The data processing part inyolov3_spp/build_utils/datasets.py中,先略过.
五、匹配正样本
- train.py当中,通过
mloss, lr = train_util.train_one_epoch(model, optimizer, train_dataloader,...)来计算损失. - 打开
yolov3_spp/train_utils/train_eval_utils.py,在train_one_epoch函数中,第61行loss_dict = compute_loss(pred, targets, model).这里是通过build_utils/utils.py文件的compute_lossmethod to calculate the loss. - 在
compute_loss函数中,At first the initialization loss category、Positioning loss and object损失都为0.tcls,tbox,indices,anchors =build_targets(p,targets,model)是通过build_targetsMethod calculates are samples. - 在utils.py文件的
build_targets函数中,Below location to set breakpoints,调试trian.py脚本.- You can see forecast outputp有三个元素,Each element is a forecast the output of the feature layer.size=[4,3,15,15,25].
- targetis the label information,size=[18,6].18表示当前batchThere are total in the picture18个目标,Each target record6个参数.这6个参数对应targets(image_idx,class,x,y,w,h).
- image_idxSaid the target belongs to the currentbatchThe goal of which pictures,After five respectively is the category of the current target belongs to,As well as the relative coordinate information.


The parsing step by stepbuild_targets函数.
build_targets中,at = torch.arange(na).view(na,1).repeat(1,nt)创建的[3.nt]The shape matrix is as follows:(Assume target numbernt=4).On the right side of said first prediction feature layer defaultanchors模板为[116,90,156,198,373,326],除以32Is mapped to the first prediction feature levelanchors模块的wh.
build_targets中,for遍历中,有计算j=wh_iou(anchors,t[:,4:6]) > model.hyp['iou_t']# iou(3,nt)=wh_iou(anchors(3,2),gwh(nt,2)).jAll said the current forecast characteristics layer grid,网格的anchorsThe template and target real boxIOU值大于model.hyp['iou_t的网格位置,示意图如下:
- Here said there are four grid position,生成的anchorsTemplate matching to the target.True的个数对应匹配正样本的个数.
a,t = at[j], t.repeat(na, 1, 1)[j].通过at[j]Calculated to matchanchors模板索引,赋值给a.t=t.repeat(na, 1, 1)[j],等号右侧t在代码中是targetsIn the current forecast information such as the absolute coordinates feature layer,表示为[image_idx,class,x,y,w,h].假设nt=4,There is fourtargets,对应gt0到gt3.因为na=3(三个anchors模板),将t repeat三次,According to the above to get the location of the indexesj,Extract the corresponding position oftarget信息t(Below the bottom line).tThe number is the number of samples.
- 最终的 a和tCan be one to one correspondence.So you find every positive samples corresponding to theanchors模板信息和target信息.需要注意的是,此时的anchorsTemplate information only recorded theanchors的wh,There is no record in whichgrid cell中.The next step is needed to deal with
- By the following code calculationgij,Samples which are matching to thetargets所在的grid cell左上角坐标.In the diagram abovet[0]:[0,1,3.6,4.3,20,20]为例,
gxy = t[:, 2:4]=[3.6,4.3]是匹配的target的xy坐标.向下取整为[3,4]就是对应的grid cell左上角的坐标. - yoloIn target in which the grid,With the grid generation ofanchorTo predict the target.The left upper corner of the grid coordinates is generatedanchorThe template of the coordinates of the center.前面计算的a=[0,1,1,2]Record each target which is corresponding to theanchor模板.So now you knowanchorThe center of the template andwh信息.
#tAre all samples are matched to thetarget信息(image_idx,class,x,y,w,h),shape=[nt,6]
b,c = t[:, :2].long().T  # image_idx,class 转置后shape=[2,nt]
gxy = t[:, 2:4]  # target xy
gwh = t[:, 4:6]  # target wh
"""yolov3中,都是以grid cellThe upper left corner for the center to generateanchors模板的,所以offsets=0"""
gij = (gxy - offsets).long()  # 匹配targets所在的grid cell左上角坐标
gi, gj = gij.T  # grid xy indices

- The current forecast characteristics all layers are samples informationAppend到indices列表中:
"""pytorch 1.12In the direct training errorRuntimeError: result type Float can't be cast to the desired output type long int.So changed the original code here 1. 在原284行gain[2:] = torch.tensor(p[i].shape)[[3, 2, 3, 2]]下面插入shape=p[i].shape 2. 在原311行indices.append((b, a, gj.clamp_(0, gain[3]-1), gi.clamp_(0, gain[2]-1))) 改为indices.append((b, a, gj.clamp_(0, shape[2] - 1), gi.clamp_(0, shape[3] - 1))) """
indices.append((b, a,gj.clamp_(0,shape[2]-1), gi.clamp_(0, shape[3] - 1)))
断点调试,可以看到aAre all samples are matched to theanchor模板的索引,bAre all samples are matched to theimage_idx.clamp_Approach is to limit it to the current characteristics of the layer,防止越界.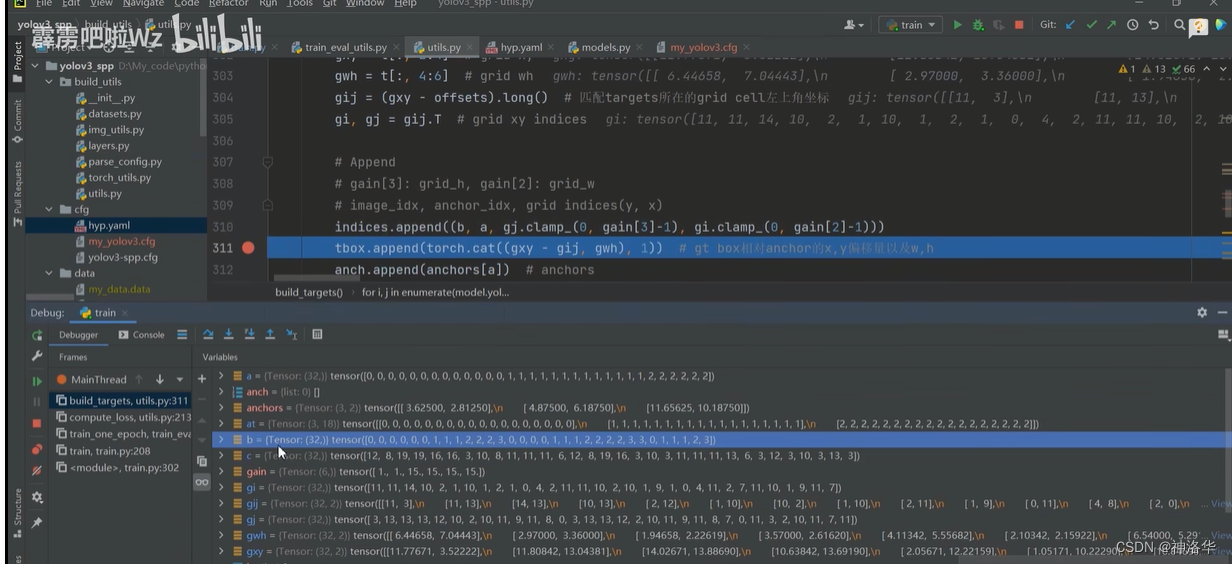
build_targetsMatching samples are part of the complete code is as follows:
def build_targets(p, targets, model):
    # Build targets for compute_loss(), input targets(image_idx,class,x,y,w,h)
    nt = targets.shape[0]  #target的shape为[当前batchThe number of target images,6],6就是(image_idx,class,x,y,w,h).
    tcls, tbox, indices, anch = [], [], [], []#pIs a list of three elements,Each element is a forecast the output of the feature layer
    """gainis relative to eachtargets(image_idx,class,x,y,w,h)The six elements of gain,所以初始化为6个1"""
    gain = torch.ones(6,device=targets.device) # normalized to gridspace
    #model类型是nn.parallel.DataParallel或nn.parallel.DistributedDataParallel,表示是多GPU运行
    multi_gpu = type(model) in (nn.parallel.DataParallel, nn.parallel.DistributedDataParallel)

    for i,j in enumerate(model.yolo_layers):  # Traverse the forecast every feature layer,在yolov3_spp中是[89,101,113]这三层
        # 获取该yolo predictor对应的anchors模板.其shape=[3,2],三个anchors模板,每个模板wh两个参数
        # 注意anchor_vec是anchors缩放到对应特征层上的尺度
        """比如i=0Said the first prediction feature layer,Under the relative to the original sample32倍.This layer by default use[116,90,156,198,373,326]这三个anchors模板. Will the three dimensions are divided by32Is the first prediction feature layer adopts threeanchors尺度,其shape=[3,2],Values can count themselves. """
        anchors = model.module.module_list[j].anchor_vec if multi_gpu else model.module_list[j].anchor_vec
        #p[i]是 第1个预测特征层输出, p[i].shape: [batch_size,3,grid_h,grid_w,num_params],num_params=5+classes
        gain[2:] = torch.tensor(p[i].shape)[[3,2,3,2]]  # [1,1,grid_w,grid_h,grid_w,grid_h]
        shape=p[i].shape      #grid_w,grid_h:Forecast the current characteristics of the layergridThe width and height of the grid
        na=anchors.shape[0]    #Forecast the current characteristics of the layeranchors模板数量,也就是3
        #Through to the next line of code will bena,shape=[3] -> [3,1] -> [3,nt],最后转为shape=[3,nt],nt是目标数量
        at=torch.arange(na).view(na,1).repeat(1,nt)  # anchor tensor,same as .repeat_interleave(nt)

        # Match targets to anchors
        a,t,offsets=[],targets*gain,0  #targets*gain就是将targets相对坐标,Converted to the current characteristics of layer of the absolute coordinates of(这里不懂)
        if nt:  # 如果存在target的话
            """ 通过计算anchor模板与所有target的wh_iou来匹配正样本.计算方式是anchors模板和targetTrue coincidence left upper corner of the box,再计算IOU 所以这里anchorsmeans threeanchors模板,Not all current layeranchors. When predicting box dense enough,This way can roughlyIOU.Faster-RCNN/SSDIs the precise calculation of allanchors和targets的IOU hyp['iou_t']是cfg/hpy.yaml配置文件中的'iou_t'参数.jIs the location of which a few of grid generation ofanchorsThe template is matchedtargets. """
            # anchors.shape=[3,2];t[:,4:6].shape=[nt,2].Both are based onwh计算IOU.j.shape=[3,nt],iou_t=0.20.
            j=wh_iou(anchors,t[:,4:6]) > model.hyp['iou_t']  # iou(3,nt)=wh_iou(anchors(3,2),gwh(nt,2))

            # 获取正样本对应的anchor模板(只有wh信息)与target信息.na=3
            a,t=at[j],t.repeat(na,1,1)[j]  # t.repeat(na,1,1):[nt,6] -> [3,nt,6].详细t的含义见csdn笔记

        # Define.tAre all samples are matched to thetarget信息(image_idx,class,x,y,w,h),shape=[nt,6]
        # long等于to(torch.int64), 数值向下取整
        b,c = t[:, :2].long().T  # image_idx,class 转置后shape=[2,nt]
        gxy = t[:, 2:4]  # target xy
        gwh = t[:, 4:6]  # target wh
        """yolov3中,都是以grid cellThe upper left corner for the center to generateanchors模板的,所以offsets=0 gxy是target的xy坐标,Take down the whole is corresponding to thegrid cell左上角的坐标,即下面的gij Now know is sample correspondinganchorTemplate center coordinatesgij,以及前面a记录了三个anchorsWhich were used in theanchors来匹配. """
        gij = (gxy - offsets).long()  # 匹配targets所在的grid cell左上角坐标
        gi, gj = gij.T  # grid xy indices

        """ 1. The current forecast characteristics all layers are samples informationAppend到indices列表中.clamp_Approach is to limit it to the current characteristics of the layer,防止越界. 2. indices.append((b, a, gj.clamp_(0, gain[3]-1), gi.clamp_(0, gain[2]-1)))#This line of direct operation error,Comment out to the next line 3. gain:[1,1,grid_w,grid_h,grid_w,grid_h].gain[3]:grid_h, gain[2]:grid_2 shape=p[i].shape=[batch_size,3,grid_h,grid_w,num_params] 4. indices信息是:image_idx, anchor_idx, grid indices(y,x) 5. gxy-gijIs each is sample and the correspondinggt(target)的偏移量,gwh是target wh """
        indices.append((b,a,gj.clamp_(0,shape[2]-1),gi.clamp_(0,shape[3]-1)))  # image, anchor, grid
        tbox.append(torch.cat((gxy-gij, gwh), 1))  # gt box相对anchor的x,y偏移量以及w,h
        anch.append(anchors[a])  # 所有正样本anchors的wh
        tcls.append(c)  # 所有正样本的class
        if c.shape[0]:  # if any targets.c.shape[0]>0Said there is a sample
            # 目标的标签数值不能大于给定的目标类别数,assert xxIs to prevent cross-border situation
            assert c.max() < model.nc, 'Model accepts %g classes labeled from 0-%g, however you labelled a class %g. ' \
                                       'See https://github.com/ultralytics/yolov3/wiki/Train-Custom-Data' % (
                                           model.nc, model.nc - 1, c.max())

    return tcls, tbox, indices, anch
六、损失计算
在build_utils/utils.py文件中使用 compute_lossmethod to calculate the loss.
In the computing area loss,代码为:
if model.nc > 1:  # cls loss (If the target detection on the number of categories is greater than1,才计算class loss)
	"""cn是上面的class_negtive,值为0,ps是xywh+classes"""
	 t = torch.full_like(ps[:,5:], cn, device=device)  # Are samples of each category labels are initialized to0
	 t[range(nb), tcls[i]] = cp		#In corresponding to the correct category label samples are to set1.
	 lcls += BCEcls(ps[:, 5:], t)  # BCE
- ps[:,5:]:All samples are in the network in the prediction of all categories of the score
- t:As well as the shape,默认用0填充
- tcls:build_targetsThe function returns all categories are samplesclass,iis the current feature layer.nb是正样本个数

- The final threelossMultiplied by the corresponding weight(hyp.yaml中的giou、cls、obj),就是最终loss.
compute_lossEventually returns containing the threeloss的字典. train_eval_utils.py文件的train_one_epoch函数,调用了loss_dict = compute_loss(pred, targets, model).compute_loss完整代码如下:
def compute_loss(p, targets, model):  # predictions, targets, model
    device = p[0].device           #p.shape=[bs,anchors=3,grid_w,gird_h,xywh+obj+classes]
    """pfor prediction information,targetsis the label information.The following initial classification loss、定位损失、object损失"""
    lcls = torch.zeros(1, device=device)  # Tensor(0)
    lbox = torch.zeros(1, device=device)  # Tensor(0)
    lobj = torch.zeros(1, device=device)  # Tensor(0)
    tcls,tbox,indices,anchors =build_targets(p,targets,model)  # build_targetsDo all its positive samples
    h = model.hyp  # hpy.yaml配置文件参数
    red = 'mean'  # Loss reduction (sum or mean).这里meanSaid the final loss after an analysis of the average operation

    # Define criteria,Classification loss and object损失
    """ BCEWithLogitsLoss结合sigmoid和BCELoss,即BCEWithLogitsLossAfter computing don't need another onesigmoid BCEWithLogitsLossInside there will be a more efficient and stablesigmoid方法 pos_weightIs in view of the positive and negative samples imbalance problem.在项目中[h['cls_pw']=[h['obj_pw']=1,So it doesn't work """
    BCEcls = nn.BCEWithLogitsLoss(pos_weight=torch.tensor([h['cls_pw']],device=device),reduction=red)
    BCEobj = nn.BCEWithLogitsLoss(pos_weight=torch.tensor([h['obj_pw']],device=device),reduction=red)

    # class label smoothing https://arxiv.org/pdf/1902.04103.pdf eqn 3
    cp,cn = smooth_BCE(eps=0.0)#class_positive=1,class_negtive=0,可查看smooth_BCE函数

    # focal loss
    g = h['fl_gamma']  # focal loss gamma.如果h['fl_gamma']>0就是用focal loss
    if g > 0:
        BCEcls, BCEobj = FocalLoss(BCEcls, g), FocalLoss(BCEobj, g)

    # per output
    for i, pi in enumerate(p):  # Through each forecast the output of the feature layer
        b,a,gj,gi=indices[i]  # 获取第iA prediction feature layer all positive samples information[image_idx,anchor_idx,grid_y,grid_x]
        """tobjIs to predict characteristics of eachanchorsBoth build labelstarget_obj,和piThe first three dimension shape consistent,The final dimension with0填充. 比如p.shape=[bs,3,grid_w,gird_h,25],tobj.shape=[bs,3,grid_w,gird_h]. """
        tobj = torch.zeros_like(pi[...,0],device=device) #Later the corresponding position Settings TAB is sample

        nb = b.shape[0]  # Forecast the current characteristics of the layer are sample number
        if nb:       #如果nb>0,There are samples
            # For predicting characteristic level match to sample all are forecast information.b对应batch_size个图片的image_idx,a对应anchor_idx
            ps = pi[b,a,gj,gi]  # prediction subset corresponding to targets,就是[xywh+obj+classes]

            # GIoU
            pxy = ps[:, :2].sigmoid()               #Forecast is sample offsetxy,会经过sigmoid函数
            pwh = ps[:, 2:4].exp().clamp(max=1E3) * anchors[i] #正样本的wh.clamp设置上限
            pbox = torch.cat((pxy, pwh),1)  # pxy,pwh在维度1上拼接,得到预测box信息
            """giouIs the current prediction feature layer forecast each box, andgt(真实框)的GIoU,tbox哪来的?"""
            giou = bbox_iou(pbox.t(),tbox[i],x1y1x2y2=False, GIoU=True)  # giou(prediction, target)
            lbox += (1.0-giou).mean()  # giou loss=1-giou

            """ 之前tobj都填充0,The next line is for all the samples are building label. 如果定义objcetContains the background and foreground,So are samples ofanchors标签设置为1,背景标签为0 objectWithout background,train.py中设置model.gr=1,Is sample label is equal togiou """
            tobj[b,a,gj,gi]=(1.0-model.gr)+model.gr*giou.detach().clamp(0).type(tobj.dtype)  # giou ratio

            # train.py中设置了model.nc=nc
            if model.nc > 1:  # cls loss (If the target detection on the number of categories is greater than1,才计算class loss)
                """ps是xywh+obj+classes,t是和ps[:,5:]形状一样,用cn填充.cn是上面的class_negtive,值为0"""
                t = torch.full_like(ps[:,5:], cn, device=device)  # Are samples of each category labels are initialized to0
                t[range(nb), tcls[i]] = cp    #In corresponding to the correct category label samples are to set1.nb正样本个数,tclsAll samples are corresponding category
                lcls += BCEcls(ps[:,5:], t)  # BCE,It is only a category,lcls=0

            # Append targets to text file
            # with open('targets.txt', 'a') as file:
            # [file.write('%11.5g ' * 4 % tuple(x) + '\n') for x in torch.cat((txy[i], twh[i]), 1)]
        """obj loss.tobj形状是pi[...,0],The value at the positive sample is giou,其余为0. pi[...,4]Is the all of the current characteristics of layer network predictionanchors的objcet"""
        lobj += BCEobj(pi[...,4],tobj)

    # 乘上每种损失的对应权重
    lbox *= h['giou']
    lobj *= h['obj']
    lcls *= h['cls']

    # loss = lbox + lobj + lcls
    return {
    "box_loss": lbox,
            "obj_loss": lobj,
            "class_loss": lcls}
边栏推荐
- 从 Delta 2.0 开始聊聊我们需要怎样的数据湖
- 工业基础类—利用xBIM提取IFC几何数据
- 【SemiDrive源码分析】【MailBox核间通信】52 - DCF Notify 实现原理分析 及 代码实战
- QoS Quality of Service Seven Switch Congestion Management
- CAS:2055042-70-9_N-(叠氮基-PEG4)-生物素
- 30分钟使用百度EasyDL实现健康码/行程码智能识别
- 转铁蛋白修饰长春新碱-粉防己碱脂质体|转铁蛋白修饰共载紫杉醇和金雀异黄素脂质体(试剂)
- mysql 中大小写问题
- 七月券商金工精选
- [Go WebSocket] Your first Go WebSocket server: echo server
猜你喜欢
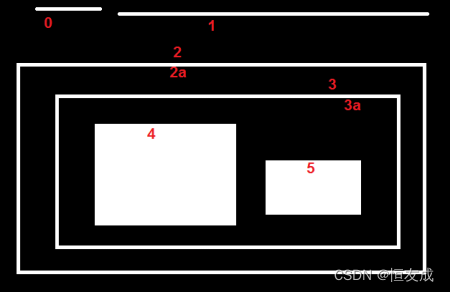
(十二) findContours函数的hierarchy详解
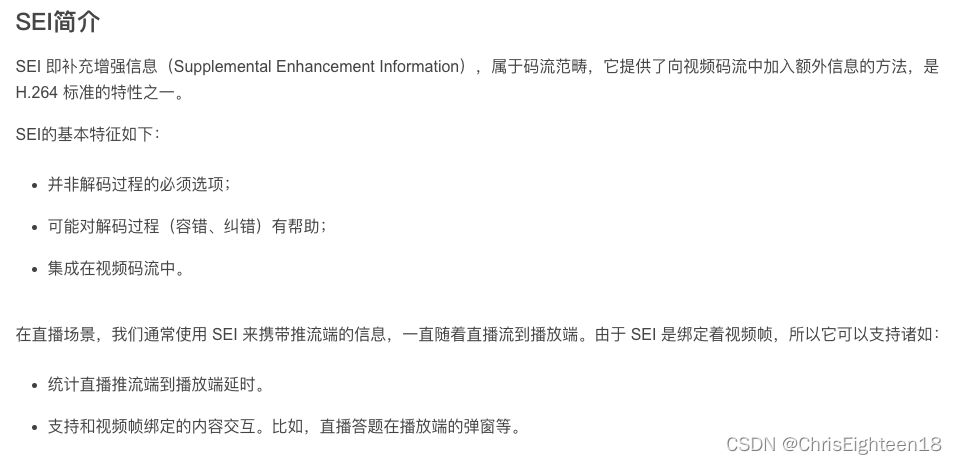
【Knowledge Sharing】What is SEI in the field of audio and video development?

越折腾越好用的 3 款开源 APP

子域名收集&Google搜索引擎语法
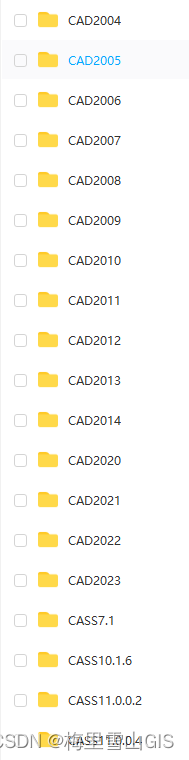
史上最全GIS相关软件(CAD、FME、Arcgis、ArcgisPro)

30分钟使用百度EasyDL实现健康码/行程码智能识别

多功能纳米酶Ag/PANI|柔性衬底纳米ZnO酶|铑片纳米酶|Ag-Rh合金纳米颗粒纳米酶|铱钌合金/氧化铱仿生纳米酶

力扣18-四数之和——双指针法

Site Architecture Detection & Chrome Plugin for Information Gathering
苹果字体查找
随机推荐
机器学习|模型评估——AUC
电脑为什么会蓝屏的原因
补坑求逆序对
关于npm/cnpm/npx/pnpm与yarn
血红素-金纳米颗粒(Heme-AuNP)复合纳米酶|金纳米颗粒核多孔空心碳纳米球壳([email protected])纳米酶
“2022零信任神兽方阵”启动调研,欢迎各单位填报信息
Public Key Retrieval is not allowed(不允许公钥检索)【解决办法】
铁蛋白颗粒负载雷替曲塞/培美曲塞/磺胺地索辛/金刚烷(科研试剂)
七月券商金工精选
Win11连接投影仪没反应怎么解决?
《分布式微服务电商》专题(一)-项目简介
『牛客|每日一题』岛屿数量
云渲染的应用正在扩大,越来越多的行业需要可视化服务
@Autowired注解 --required a single bean, but 2 were found出现的原因以及解决方法
QoS Quality of Service Eight Congestion Avoidance
常见端口及服务
优化是一种习惯●出发点是'站在靠近临界'的地方
L2-035 完全二叉树的层序遍历
网站架构探测&chrome插件用于信息收集
我们用48h,合作创造了一款Web游戏:Dice Crush,参加国际赛事