当前位置:网站首页>MultiTimer v2 重构版本 | 一款可无限扩展的软件定时器
MultiTimer v2 重构版本 | 一款可无限扩展的软件定时器
2022-04-23 15:22:00 【Mculover666】
前言
嵌入式开源项目精选专栏之前发布过一篇关于MultiTimer的文章, MultiTimer | 一款可无限扩展的软件定时器,这周有小伙伴在群里提醒我 MutilTimer 和文章写的不太一样,第一反应是重构了,大佬们技术水平提升一个段位后都喜欢重构项目,去github看看发生了什么。
master分支上还是之前的v1版本,和文章是一样的:

development分支上果然重构了项目,发布了v2版本:
同步更新下教程。
一、MultiTimer
本期给大家带来的开源项目是 MultiTimer,一款可无限扩展的软件定时器,作者0x1abin,目前收获 399 个 star,遵循 MIT 开源许可协议。
MultiTimer 是一个软件定时器扩展模块,可无限扩展你所需的定时器任务,取代传统的标志位判断方式, 更优雅更便捷地管理程序的时间触发时序。
二、移植MultiTimer
1. 移植思路
开源项目在移植过程中主要参考项目的readme文档,一般只需两步:
- ① 添加源码到裸机工程中;
- ② 实现需要的接口;
本文中我使用的是小熊派IoT开发套件,主控芯片为STM32L431RCT6:

移植之前需要准备一份裸机工程,我使用STM32CubeMX生成,需要初始化以下配置:
- 配置一个串口用于打印信息
- printf重定向
2.MDK移植
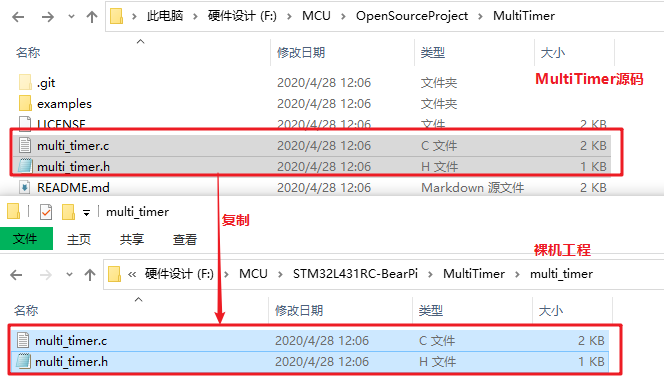
① 复制MultiTimer源码到工程中:
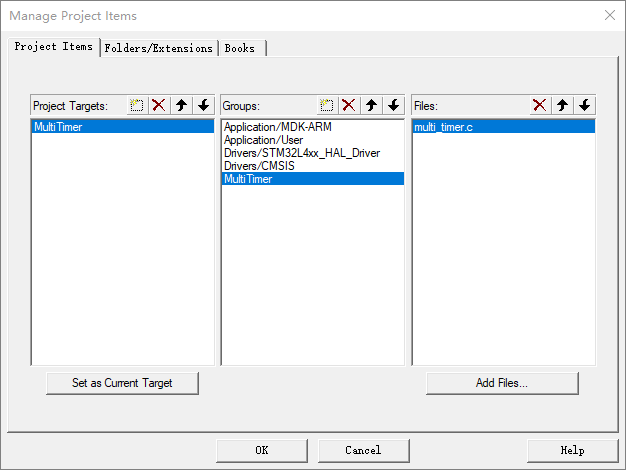
② 在keil中添加 MultiTimer的源码文件:
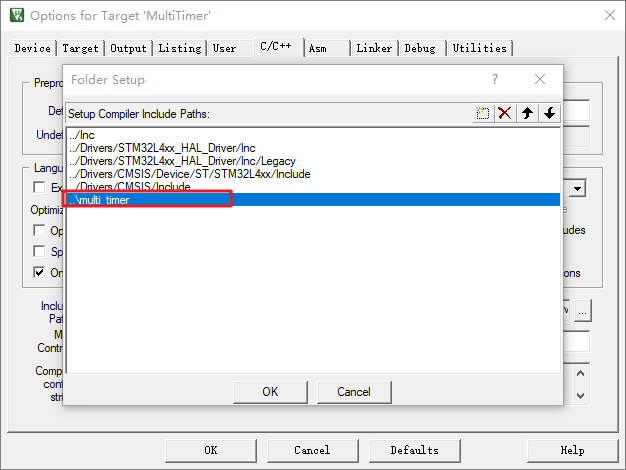
③ 将MultiTimer头文件路径添加到keil中:
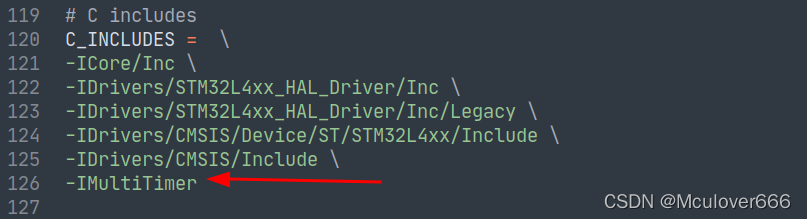
3. gcc移植
① 复制MultiTimer源码到工程中:

② 在 Makefile 中添加 MultiTimer的源码文件:
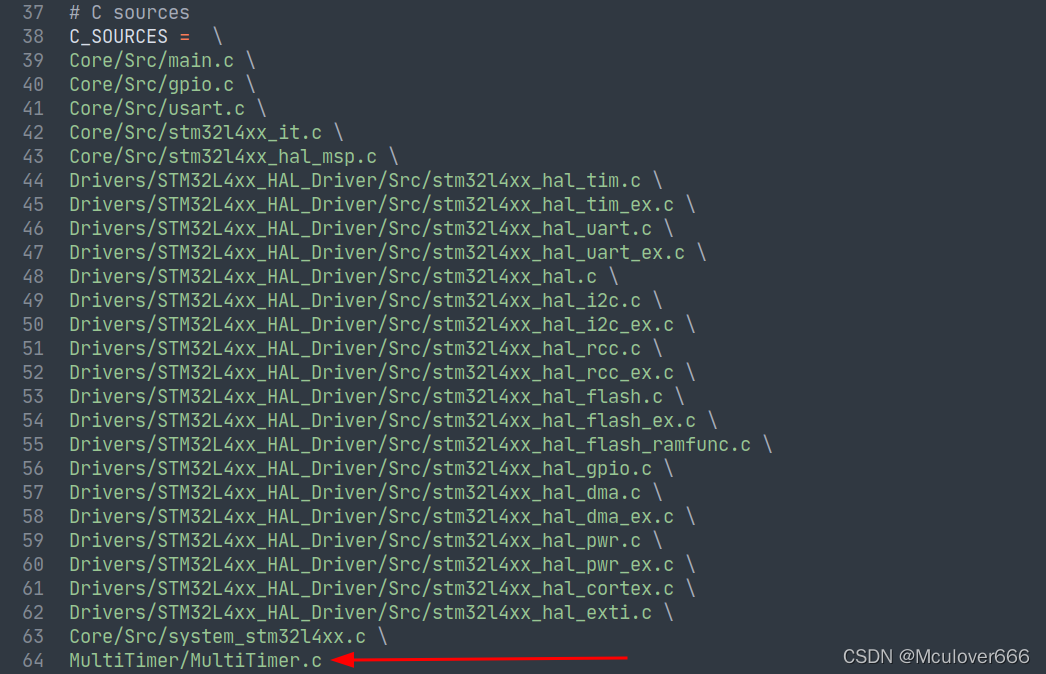
③ 添加MultiTimer头文件路径:
三、使用MultiTimer
使用时包含头文件:
#include "multi_timer.h"
1. 提供Timer时基信号
MultiTimer中的时基信号需要安装,API如下:
/** * @brief Platform ticks function. * * @param ticksFunc ticks function. * @return int 0 on success, -1 on error. */
int MultiTimerInstall(PlatformTicksFunction_t ticksFunc);
PlatformTicksFunction_t 函数指针定义如下:
typedef uint64_t (*PlatformTicksFunction_t)(void);
本文中使用的是STM32HAL库,所以通过Systick来提供,无需设置额外的定时器。
编写获取系统 tick 的函数:
/* Private user code ---------------------------------------------------------*/
/* USER CODE BEGIN 0 */
uint64_t PlatformTicksGetFunc(void)
{

  return (uint64_t)HAL_GetTick();
}
/* USER CODE END 0 */
在main函数中安装该tick函数:
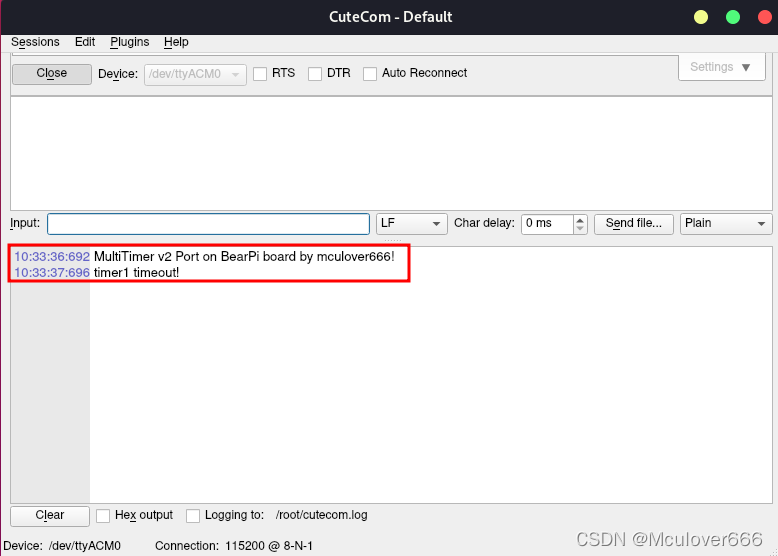
/* USER CODE BEGIN 2 */
printf("MultiTimer v2 Port on BearPi board by mculover666!\r\n");
MultiTimerInstall(PlatformTicksGetFunc);
/* USER CODE END 2 */
2. 创建Timer对象
软件定时器抽象为 MultiTimer 结构体:
struct MultiTimerHandle {

    MultiTimer* next;
    uint64_t deadline;
    MultiTimerCallback_t callback;
    void* userData;
};

typedef struct MultiTimerHandle MultiTimer;
所以直接使用 MultiTimer 类型创建软件定时器:
/* USER CODE BEGIN PV */
MultiTimer timer1;
/* USER CODE END PV */
3. Timer回调函数
回调函数类型定义如下:
typedef void (*MultiTimerCallback_t)(MultiTimer* timer, void* userData);
按照回调函数格式,创建超时回调函数:
/* Private user code ---------------------------------------------------------*/
/* USER CODE BEGIN 0 */
void timer1_callback(MultiTimer* timer, void* userData)
{

    printf("timer1 timeout!\r\n");
}
/* USER CODE END 0 */
4. 初始化并启动Timer
启动定时器的API如下:
/** * @brief Start the timer work, add the handle into work list. * * @param timer target handle strcut. * @param timing Set the start time. * @param callback deadline callback. * @param userData user data. * @return int 0: success, -1: fail. */
int MultiTimerStart(MultiTimer* timer, uint64_t timing, MultiTimerCallback_t callback, void* userData);
初始化定时器对象,注册定时器回调处理函数,设置超时时间(ms):
/* USER CODE BEGIN 2 */
printf("MultiTimer v2 Port on BearPi board by mculover666!\r\n");
MultiTimerStart(&timer1, 1000, timer1_callback, NULL);
/* USER CODE END 2 */
5. Timer对象处理
Timer对象处理函数API定义如下:
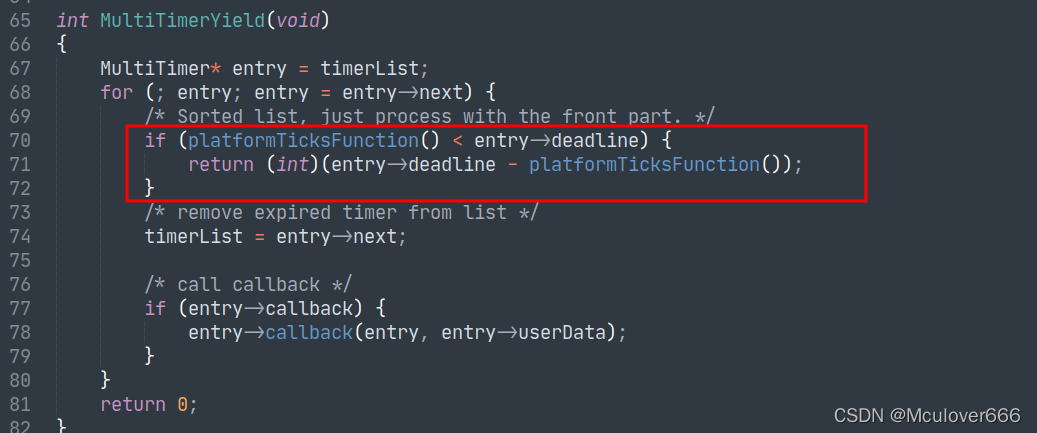
/** * @brief Check the timer expried and call callback. * * @return int The next timer expires. */
int MultiTimerYield(void);
在主循环中调用Timer对象处理函数,处理函数会判断链表上的每个定时器是否超时,如果超过,则拉起注册的回调函数:
/* Infinite loop */
/* USER CODE BEGIN WHILE */
while (1)
{

  /* USER CODE END WHILE */

  /* USER CODE BEGIN 3 */
  MultiTimerYield();
}
 /* USER CODE END 3 */
接下来编译下载,看在串口助手中看到打印的日志:
四、如何循环触发
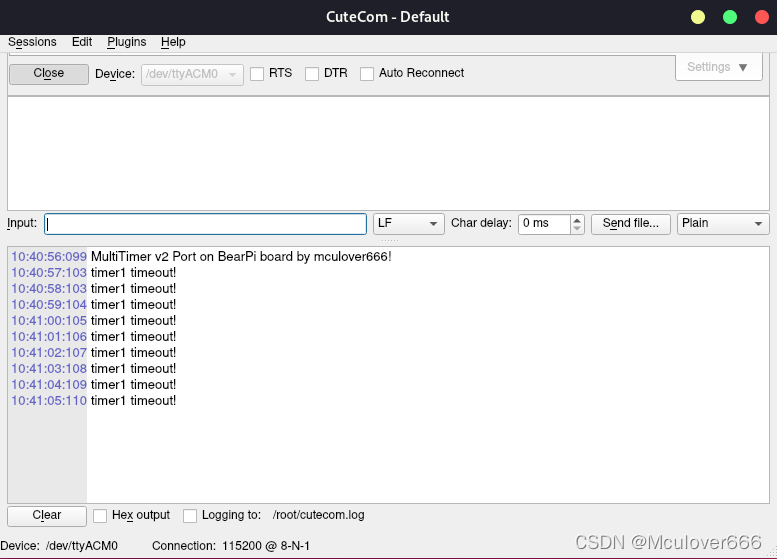
在定时器超时函数中,重启定时器即可。
void timer1_callback(MultiTimer* timer, void* userData)
{

    printf("timer1 timeout!\r\n");

    // restart
    MultiTimerStart(&timer1, 1000, timer1_callback, NULL);
}
五、设计思想解读
相对于v1版本,v2版本明显涉及简洁很多,c文件实现只有4个函数,82行代码。
v2版本中使用注册机制由用户提供tick,这样设计有个好处是,可移植性更强,无需干预系统tick中断,只有MultiTimer得到调度的时候,它才可以通过我们安装的API获取到系统tick,以此为基准来判断定时器是否超时。
v2版本还优化了链表插入机制,之前是简单粗暴直接单链表插入节点,现在通过超时时间排序插入,更加优雅:
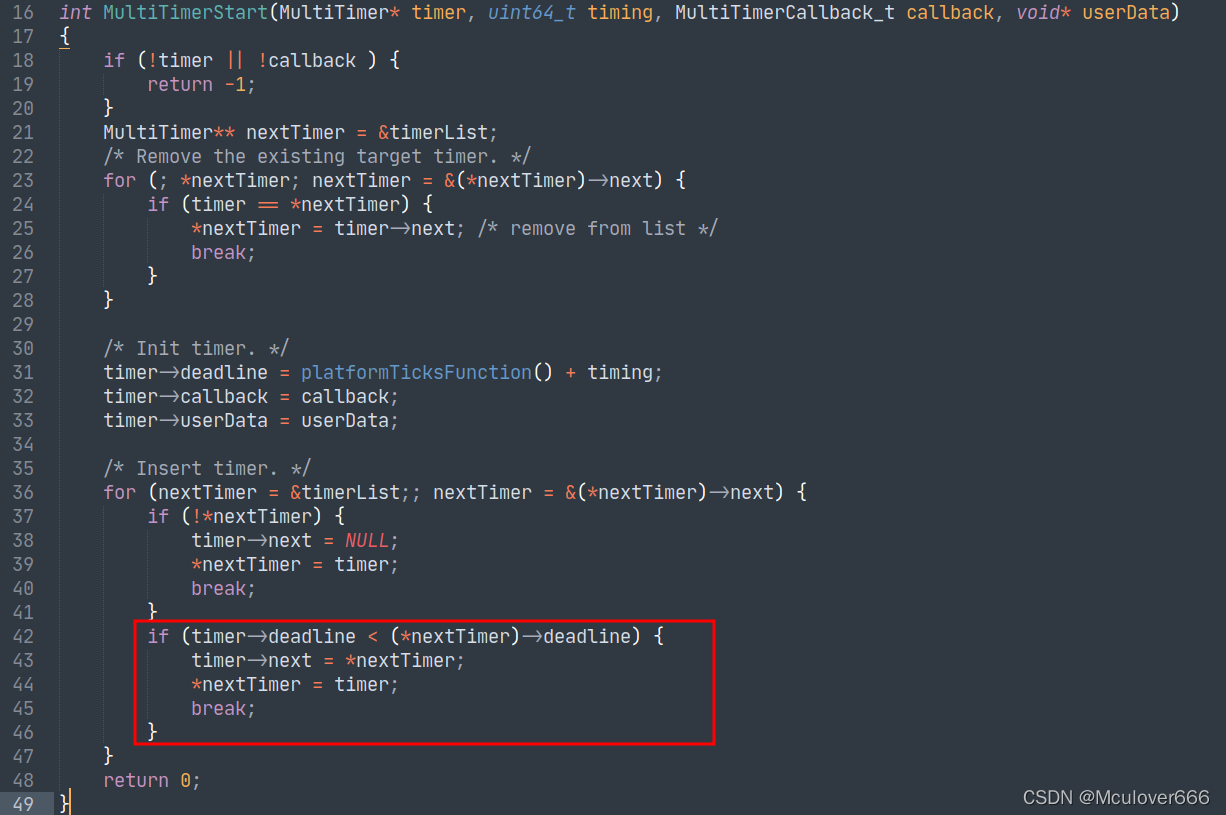
除了插入的更加优雅之外,这样做还有两个对于软件定时器性能的提升,在调度的时候:
- 超时时间近的定时器总能得到优先处理
- 前面的定时器还未超时,可以直接结束调度
软件定时器实现思想可以参考之前v1版本的教程。
接收更多精彩文章及资源推送,欢迎订阅我的微信公众号:『mculover666』。
版权声明
本文为[Mculover666]所创,转载请带上原文链接,感谢
https://mculover666.blog.csdn.net/article/details/124359206
边栏推荐
- async关键字
- Summary of interfaces for JDBC and servlet to write CRUD
- Baidu written test 2022.4.12 + programming topic: simple integer problem
- 网站某个按钮样式爬取片段
- Advanced version of array simulation queue - ring queue (real queuing)
- C语言超全学习路线(收藏让你少走弯路)
- API gateway / API gateway (II) - use of Kong - load balancing
- 分享 20 个不容错过的 ES6 的技巧
- Async void caused the program to crash
- My raspberry PI zero 2W tossing notes record some problems encountered and solutions
猜你喜欢
On the day of entry, I cried (mushroom street was laid off and fought for seven months to win the offer)
How to design a good API interface?
win10 任务栏通知区图标不见了
Detailed explanation of kubernetes (IX) -- actual combat of creating pod with resource allocation list

TLS / SSL protocol details (30) RSA, DHE, ecdhe and ecdh processes and differences in SSL
Tencent has written a few words, Ali has written them all for a month
分布式事务Seata介绍
About UDP receiving ICMP port unreachable
![Detailed explanation of C language knowledge points -- first understanding of C language [1] - vs2022 debugging skills and code practice [1]](/img/07/c534238c2b5405bbe4655e51cfee51.png)
Detailed explanation of C language knowledge points -- first understanding of C language [1] - vs2022 debugging skills and code practice [1]
UML学习_day2
随机推荐
For 22 years, you didn't know the file contained vulnerabilities?
Openfaas practice 4: template operation
redis-shake 使用中遇到的错误整理
PSYNC synchronization of redis source code analysis
Llvm - generate local variables
Kubernetes详解(九)——资源配置清单创建Pod实战
adobe illustrator 菜單中英文對照
What is the role of the full connection layer?
The win10 taskbar notification area icon is missing
T2 icloud calendar cannot be synchronized
Leetcode162 - find peak - dichotomy - array
Design of digital temperature monitoring and alarm system based on DS18B20 single chip microcomputer [LCD1602 display + Proteus simulation + C program + paper + key setting, etc.]
What is the effect of Zhongfu Jinshi wealth class 29800? Walk with professional investors to make investment easier
Will golang share data with fragment append
重定向和请求转发详解
Basic operation of circular queue (Experiment)
Educational Codeforces Round 127 A-E题解
机器学习——逻辑回归
Precautions for use of dispatching system
Thinkphp5 + data large screen display effect