当前位置:网站首页>On IRP from the perspective of source code
On IRP from the perspective of source code
2022-04-23 20:38:00 【Cambridge art student】
From the source point of view IRP The construction of
One 、 Preface
1、 purpose
Recently studied the driver code of file encryption and decryption , Benefit a lot . It's building Post The filter function encountered the operation of sending a request again from the current device to check whether there is encrypted code in the data , There are several steps of code that I can't figure out , After all, I'm a novice who has just come into contact with driver programming , So I checked 《Windows Detailed explanation of driver development technology 》 This book , But at many levels, the research is not thorough enough . So I checked the source code again , I went to the Internet to find some articles written by Daniel , To sum up, build IRP Common problems in requesting data . If there is a mistake , Still hope more !
2、 Reference material
《Windows Detailed explanation of driver development technology 》
ReactOs Source code
Zheng Han Andrew.Hann Blog Garden articles ( Attached connection )https://www.cnblogs.com/LittleHann/p/3450436.html
Two 、 File encryption and decryption IRP application
1、 overview
File encryption and decryption is nothing more than building a black-and-white list of their own processes and files , When Ring3 When the layer sends a request for operation , First, through our pre filtration ( This process is important for Read and Write And other encryption and decryption operations are temporarily ignored , direct withcallback Just go back ), And then through Ring3 Called function , System NT Series of functions to create the main function code package IRP Send to device object . here IRP Look down for FSD Disk drive , In the process of returning, because there is no IRP The return value of , So at the top of the device stack IRP Stop . We are in our own MiniFilter Upper Post Function for post filtering . At this time, we reissue IRP, Decide whether to encrypt , Perform encryption and decryption operations ! This involves building and issuing your own IRP The process of , This is very important !
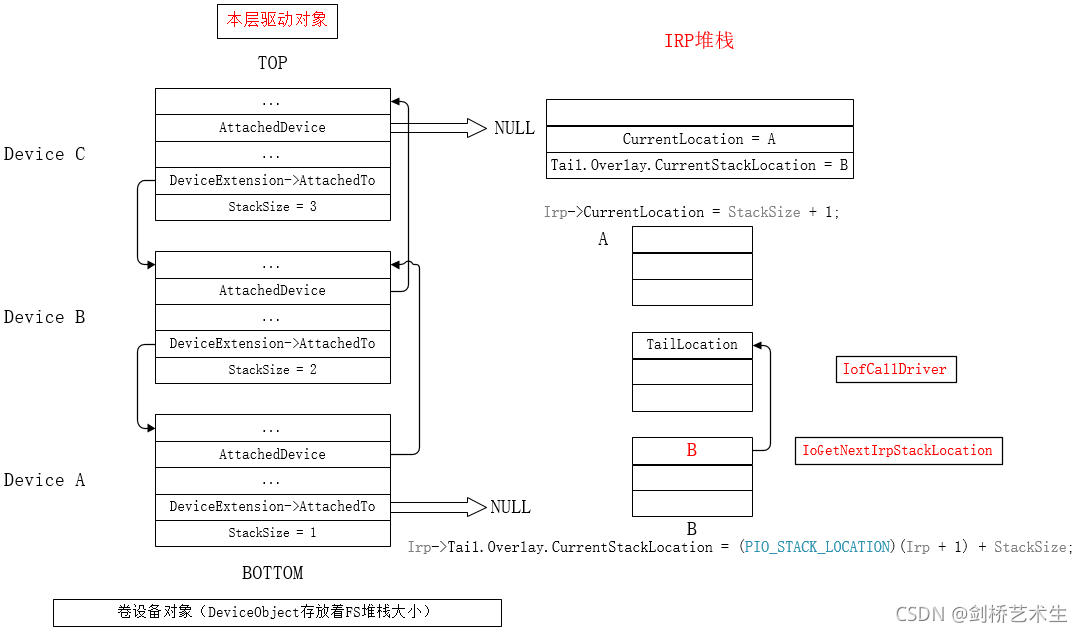
To carry out IRP Manual distribution of , First, locate the file device object, that is, the lowest device object , Because there is interaction with volumes , We used IoGetDeviceAttachmentBaseRef The loop gets the bottom layer DeviceObject!
DeviceObject = IoGetDeviceAttachmentBaseRef(FileObject->DeviceObject); // The lowest device object
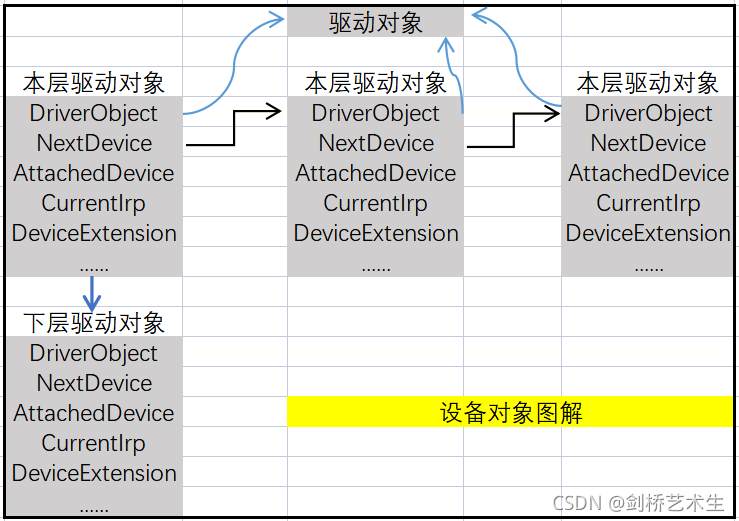
IoGetDeviceAttachmentBaseRef Function is to find the bottom of the stack DeviceObject Device objects . First, let's look at the parameters , The parameter is the device object of this layer . adopt Device Point to the DeviceExtension( The device extension is the only private property memory space of the device object ) Of AttachedTo Members can access the next member at the bottom ! In this way, the lowest device object is found ! The underlying device object is very important , It involves interaction with volumes , As for how to transmit information , Later we will talk about !
Enclosed ReactOS Chinese vs IoGetDeviceAttachmentBaseRef Source code !
PDEVICE_OBJECT
	NTAPI
	IoGetDeviceAttachmentBaseRef(IN PDEVICE_OBJECT DeviceObject)
{

	/* Reference the lowest attached device */
	DeviceObject = IopGetLowestDevice(DeviceObject);
	ObReferenceObject(DeviceObject);
	return DeviceObject;
}


PDEVICE_OBJECT
NTAPI
IopGetLowestDevice(IN PDEVICE_OBJECT DeviceObject)
{

	PDEVICE_OBJECT LowestDevice;
	PEXTENDED_DEVOBJ_EXTENSION DeviceExtension;

	/* Get the current device and its extension */
	LowestDevice = DeviceObject;
	DeviceExtension = IoGetDevObjExtension(LowestDevice); //Extension Is to expand memory , Inside attachedto Point to the underlying device object !

	/* Keep looping as long as we're attached */
	while (DeviceExtension->AttachedTo)
	{

		/* Get the lowest device and its extension */
		LowestDevice = DeviceExtension->AttachedTo;
		DeviceExtension = IoGetDevObjExtension(LowestDevice);
	}

	/* Return the lowest device */
	return LowestDevice;
}
2、 What is? IRP
IRP It's a data structure , It contains a description of IO Complete information requested .
IO Manager creates a IRP To represent a IO operation , And will be IRP Pass to the correct driver , When this IO The request package will be processed when the operation is completed . Relative , The driver ( The virtual device driver of the upper layer or the real device driver of the lower layer ) Receive one IRP, Execute this IRP Specified operation , And then IRP Send it back to IO Manager , Tell it , The operation has been completed , Or it should be passed to another driver for further processing .
talk about IRP,IRP It's a general concept , Essentially IRP from IRP Header and IRP Sub-Request form .[ Here we refer to Daniel Andrew.Hann An article from , Let me find out IRP The real structure of , The article has a connection at the end !
From the perspective of data structure , In fact, data structure IRP It's just "I/O Request package "IRP The head of , stay IRP There is another after the data structure IO_STACK_LOCATION An array of data structures , The size of the array depends on IRP In data structure StackCount( This structure counts device objects ), Its value comes from the top-level device object in the device stack StackSize Field .IRP For each layer in the device stack of the target device object, that is, each driver, a IO_STACK_LOCATION data structure ( Each stack cell in the array corresponds to one that will handle the IRP Driver program , The stack unit contains the IRP Type code, parameter information and address of the completion function ). and CurrentLocation, Is the subscript used for the array , Indicate which layer is currently in the stack , So which one is being used IO_STACK_LOCATION data structure .

The manual distribution mentioned in this article IRP in , Another structure will also be mentioned CurrentStackLocation Used to locate the current irp Distribution . Of course, that's the end of the story !
3、StackSize、Attached、AttachedTo Analysis of
【StackSize】
How to get the size of the whole device object stack to apply for the correct memory size IRP, It's also an important issue ! One of the codes solves this problem :
SourceDevice->StackSize = AttachedDevice->StackSize + 1;
It is worth noting that , Back in the early days of creating device objects , We give... In the device object StackSize Assigned a value to 1, stay IoCreateDevice The following codes can be clearly seen in :
CreatedDeviceObject->StackSize = 1;
The above two sentences of code illustrate , Whenever you newly mount a device object , Will give the device stack size +1.
【Attached、AttachedTo】
To find out Attached and AttachedTo What does that mean? , We must understand the relevant knowledge of equipment mounting , according to IoAttachDeviceToDeviceStack Source code , Here we call IopAttachDeviceToDeviceStackSafe function . We can get the meaning of the two according to the following analysis !
First, give the meaning :Attached Points to high-level device objects ,AttachedTo Point to the underlying device object !
In short, it calls IoGetAttachedDevice The function locates the device on the top of the stack by constantly looking for AttachedDevice. Then the equipment we need to mount is Source, The target is the top device object of the device stack . What we have to do is make Source Medium Attached It's empty , then AttachedTo Equal to the previous stack top element . At the same time, the previous stack top element Attached It should also become Source Mount device for ! This completes the whole mount .
Enclosed ReactOS Chinese vs IopAttachDeviceToDeviceStackSafe Source code !
IopAttachDeviceToDeviceStackSafe(IN PDEVICE_OBJECT SourceDevice, IN PDEVICE_OBJECT TargetDevice, OUT PDEVICE_OBJECT* AttachedToDeviceObject OPTIONAL)
{

	PDEVICE_OBJECT AttachedDevice;
	PEXTENDED_DEVOBJ_EXTENSION SourceDeviceExtension;

	/* Get the Attached Device and source extension */
	AttachedDevice = IoGetAttachedDevice(TargetDevice); // Find the device object at the top of the stack
	SourceDeviceExtension = IoGetDevObjExtension(SourceDevice); // Find the device extension that needs to be mounted
	ASSERT(SourceDeviceExtension->AttachedTo == NULL); // Device extension AttachTo by NULL

	/* Make sure that it's in a correct state */
	// If the stack top device has the following properties , that Attached Set to empty , Because it hasn't been handled yet , So the top is empty
	if ((AttachedDevice->Flags & DO_DEVICE_INITIALIZING) ||
		(IoGetDevObjExtension(AttachedDevice)->ExtensionFlags &
			(DOE_UNLOAD_PENDING |
				DOE_DELETE_PENDING |
				DOE_REMOVE_PENDING |
				DOE_REMOVE_PROCESSED)))
	{

		/* Device was unloading or being removed */
		AttachedDevice = NULL;
	}
	else // The device starts to mount ,Source Hang up Target On
	{

		/* Update atached device fields */
		AttachedDevice->AttachedDevice = SourceDevice; // Stack top device object mount Source object
		AttachedDevice->Spare1++; // Extra count ++, Indicates that you have another device mounted

		/* Update the source with the attached data */
		SourceDevice->StackSize = AttachedDevice->StackSize + 1; //IoCreateDevice There must be StackSize The initialization
		SourceDevice->AlignmentRequirement = AttachedDevice->
			AlignmentRequirement;
		SourceDevice->SectorSize = AttachedDevice->SectorSize;

		/* Check for pending start flag */
		if (IoGetDevObjExtension(AttachedDevice)->ExtensionFlags &
			DOE_START_PENDING)
		{

			/* Propagate */
			IoGetDevObjExtension(SourceDevice)->ExtensionFlags |=
				DOE_START_PENDING;
		}

		/* Set the attachment in the device extension */
		SourceDeviceExtension->AttachedTo = AttachedDevice;//Source The next one is Attach
	}

	/* Return the attached device */
	if (AttachedToDeviceObject) *AttachedToDeviceObject = AttachedDevice;// Inverse value
	return AttachedDevice; // Return the device object mounted on the top of the stack ???
}
Add a little more , There are three important members in the drive object , One is the driving object DriverObject In itself , also NextDevice and AttachedDevice, The distinction between the latter two is also very simple . Imagine ,QQ Housekeeper and 360 In charge of C Plate and D disc , among QQ The housekeeper is C Drive and in the disc D disc 360 The drive belongs to next Relationship , The driver under the same drive letter can be mounted , It will naturally form a device stack , It is natural that Attached mount ! The sail book has a clear explanation , No more details here .
4、 What is? VPB
Each time the target object is opened, there is a file object FILE_OBJECT Structure as a representative , At the same time, there is another CCB But sometimes CCB It's not necessary . data structure “ File parameter block ”VPB Associate the file volume in the abstract sense with the disk in the physical sense .VPB The punch has two pointers , One is DeviceObject, He asked the device object representing the file volume , Is the corresponding FSD The created device object . It determines how the information in the file volume is organized , The other is RealDevice, It refers back to the specific ( Logic ) The device object of the disk , This determines that the information is stored as .FILE_OBIECT The pointer in the structure points to a VPB, This aspect indicates which logical disk the target volume exists on , On the other hand, it indicates what kind of files are carried on this disk, and what kind of file system does the volume belong to .
In short , Now that you have found the lowest device object , We can interact with volumes , In the underlying driver object , There is... In the structure Vpb That's the volume , We achieved by Vpb Medium DeviceObject So as to obtain the size of the entire device stack and apply for irp Memory for distribution . There are two members in the volume structure DeviceObject and RealDevice,DeviceObject It can be understood as the spokesperson of the volume device object ,RealDevice It's the real object . It may be due to communication problems from file device objects to volumes , We just used DeviceObject Found the size of the whole stack .
5、irp Construction and distribution of
The next step is to irp Stack application . Get the whole FS After the size of the stack , Conduct IoAllocateIrp apply ( You can find from the source code , Their own IRP The number cannot be greater than 8) One of the key members is IoInitializeIrp, It's initialized irp Head !
VOID
NTAPI
IoInitializeIrp(IN PIRP Irp, IN USHORT PacketSize, IN CCHAR StackSize)
{

	/* Clear it */
	IOTRACE(IO_IRP_DEBUG,
		"%s - Initializing IRP %p\n",
		__FUNCTION__,
		Irp);
	RtlZeroMemory(Irp, PacketSize);

	/* Set the Header and other data */
	Irp->Type = IO_TYPE_IRP;
	Irp->Size = PacketSize;
	Irp->StackCount = StackSize;
	Irp->CurrentLocation = StackSize + 1; // Navigate to the top of the stack
	Irp->ApcEnvironment = KeGetCurrentThread()->ApcStateIndex;
	Irp->Tail.Overlay.CurrentStackLocation = (PIO_STACK_LOCATION)(Irp + 1) + StackSize;
	// Navigate to the next stack at the bottom of the stack ( Across the border )
	/* Initialize the Thread List */
	InitializeListHead(&Irp->ThreadListEntry);
}

/* * @implemented */
IoInitializeIrp The function is initialized CurrentLocation and TailCurrentLocation, And then use IoGetNextIrpStackLocation First of all, will Tail-1 Navigate to the tail stack , Then fill in the last irp Stack data .
__drv_aliasesMem
FORCEINLINE
PIO_STACK_LOCATION
IoGetNextIrpStackLocation(
	_In_ PIRP Irp)
{

	ASSERT(Irp->CurrentLocation > 0);
#ifdef NONAMELESSUNION
	return ((Irp)->Tail.Overlay.s.u.CurrentStackLocation - 1);
#else
	return ((Irp)->Tail.Overlay.CurrentStackLocation - 1);
#endif
}
It's not hard to understand IRP The filling process , From the reading of the source code, you can guess , Stack order and of device objects IRP The data request is reverse , So when we use IRP Request data , First use IoGetNextIrpStackLocation location Tail The position of the tail pointer to the head , And then call IoCallDriver function ( I'll talk about ) Move on to the next IRP Fill of !
6、 Complete the setting of the process
IoSetCompletionRoutine Set completion history , This process is set at the current IRP In the stack , When the delivery is complete , You can notify the underlying device stack of the completion of relevant operations !
If the driver needs to access a file that has been passed on the stack IRP, Then this driver must realize ( Set up )IoCompletion routine . When I/O Manager (I/O Manager) call IoCompletion Routine ( When the lower layer is finished , The callback function is called automatically ), This drive ( Before you leave IRP The upper driver issued ) Can be in IoCompletion During the execution of the routine, the control of this IRP The ownership of the . such ,IoCompletion Routines can access IRP In the domain .
Set the method of asynchronous completion callback function. The above code has been given , This is a classic model , That is, create an event object -> Initialize this event object -> The upper layer blocks this event, etc stay -> take IRP Send it to the lower drive -> Set this event after the lower driver completes the processing logic ( That is, trigger a completion signal , Remove the mutex of this event )-> The upper drive is Get the release of this event -> The upper driver continues the code logic , And do further operations according to the return structure of the lower drive .
7、IoCallDriver The understanding of function
Because the upper class MiniFilter Filter down notifications , Lower level equipment object you can't control , use IoCallDriver distributed IRP, Before I distribute irp The process of , It's in reverse order ( As for how to understand this flashback , You can refer to the source code ,IRP Stack usage Tail Carry out mobile distribution ). As for the principle of distribution :irp The head of the CurrentLocation–, then Tail For location IoGetNextIrpStackLocation Move up , Continue to fill in new information , Then the automatic execution completes the distribution !
a key : The driver will IRP After passing it to the next driver , You don't have this anymore IRP, And you can't access this view anymore IRP, Otherwise, the system will crash . that IRP Will be released by other drivers or threads, or this will be done directly .
NTSTATUS
FASTCALL
IofCallDriver(IN PDEVICE_OBJECT DeviceObject, IN PIRP Irp)
{

	PDRIVER_OBJECT DriverObject;
	PIO_STACK_LOCATION StackPtr;

	/* Make sure this is a valid IRP */
	ASSERT(Irp->Type == IO_TYPE_IRP);

	/* Get the Driver Object */
	DriverObject = DeviceObject->DriverObject;

	/* Decrease the current location and check if */
	Irp->CurrentLocation--;  // Count minus
	if (Irp->CurrentLocation <= 0)
	{

		/* This IRP ran out of stack, bugcheck */
		KeBugCheckEx(NO_MORE_IRP_STACK_LOCATIONS, (ULONG_PTR)Irp, 0, 0, 0);
	}

	/* Now update the stack location */
	StackPtr = IoGetNextIrpStackLocation(Irp);// reduce ,tail Move upward , Complete the positioning of the next !
	Irp->Tail.Overlay.CurrentStackLocation = StackPtr;

	/* Get the Device Object */
	StackPtr->DeviceObject = DeviceObject;

	/* Call it */
	return DriverObject->MajorFunction[StackPtr->MajorFunction](DeviceObject,
		Irp);
}
3、 ... and 、 summary
I've read too few books about drivers these days , Recommended by friends 《 Hanjiang fishing alone 》 and 《Windows Detailed explanation of driver development technology 》 Haven't got through . Because the author only has an understanding of the general framework , There may be errors in the analysis of some structures , I hope you can learn from each other , Make progress with each other . Finally, I want to thank Zheng Han Andrew.Hann My essay , It makes me have great inspiration after reading , Although I can't fully understand the part API Functions and internal principles , But it still benefits a lot . The article link has been given at the beginning , If you are interested, you can go and have a look at the boss IRP My understanding and opinions !
版权声明
本文为[Cambridge art student]所创,转载请带上原文链接,感谢
https://yzsam.com/2022/04/202204210546556641.html
边栏推荐
- 上海回應“面粉官網是非法網站”:疏於運維被“黑”,警方已立案
- 【PTA】整除光棍
- Vulnhub DC: 1 penetration notes
- Leetcode 232, queue with stack
- Matlab analytic hierarchy process to quickly calculate the weight
- 【PTA】L2-011 玩转二叉树
- JSX syntax rules
- SQL: query duplicate data and delete duplicate data
- Syntaxerror: unexpected token r in JSON at position 0
- How to do after winning the new debt? Is it safe to open an account online
猜你喜欢
【栈和队列专题】—— 滑动窗口
Resolve the eslint warning -- ignore the warning that there is no space between the method name and ()
Automatically fill in body temperature and win10 task plan
Solution: NPM err! code ELIFECYCLE npm ERR! errno 1
Commit and rollback in DCL of 16 MySQL
Installation and use of NVM
![[PTA] get rid of singles](/img/ab/b5d49f336cbfbede23b3377a9314ad.png)
[PTA] get rid of singles
How can matlab obtain the truncated image in trainingimagelabeler
Imitation Baidu map realizes the three buttons to switch the map mode by automatically shrinking the bottom
Case of the third day of go language development fresh every day project - news release system II
随机推荐
MySQL 存储过程和函数
Leetcode 1351. Negative numbers in statistical ordered matrices
Monte Carlo py solves the area problem! (save pupils Series)
[latex] 5 how to quickly write out the latex formula corresponding to the formula
The construction and use of Fortress machine and springboard machine jumpserver are detailed in pictures and texts
[PTA] l2-011 play with binary tree
Leetcode 542, 01 matrix
黑客的入侵方式你知道几种?
Recommend an open source free drawing software draw IO exportable vector graph
Matlab analytic hierarchy process to quickly calculate the weight
What is the difference between a host and a server?
Leetcode 1346. Check whether integers and their multiples exist
Click an EL checkbox to select all questions
16MySQL之DCL 中 COMMIT和ROllBACK
Numpy Index & slice & iteration
Commit and ROLLBACK in DCL of 16mysql
MySQL stored procedures and functions
Latex formula
How many hacking methods do you know?
Experience of mathematical modeling in 18 year research competition