当前位置:网站首页>Seata处理分布式事务
Seata处理分布式事务
2022-04-23 18:36:00 【华为云】
@[toc](SpringCloud Alibaba Seata处理分布式事务)
源码下载地址:gitee仓库地址
1、分布式事务问题
分布式之前:
单机单库的话没有这个问题。
分布式之后:
单体应用被拆分成微服务应用,原来的三个模块被拆分成三个独立的应用,分别使用三个独立的数据源,业务操作需要调用三个服务来完成。此时每个服务内部的数据一致性由本地事务来保证,但是全局的数据一致性问题没法保证。

==即:一次业务操作需要跨多个数据源或需要跨多个系统进行远程调用,就会产生分布式事务问题。==
2、Seata简介
2.1 Seata是什么?
Seata 是一款开源的分布式事务解决方案,致力于提供高性能和简单易用的分布式事务服务。Seata 将为用户提供了 AT、TCC、SAGA 和 XA 事务模式,为用户打造一站式的分布式解决方案。
官网地址:https://seata.io/zh-cn/docs/overview/what-is-seata.html
2.2 Seata能做什么?
一个典型的分布式事务过程:分布式事务处理过程的一ID+三组件模型
-
Transaction ID XID:全局唯一的事务ID
-
Transaction Coordinator (TC):事务协调器,维护全局事务的运行状态,负责协调并驱动全局事务的提交或回滚;
-
Transaction Manager :事务管理器,控制全局事务的边界,负责开启一个全局事务,并最终发起全局提交或全局回滚的决议;
-
Resource Manager (RM):资源管理器,控制分支事务,负责分支注册、状态汇报,并接收事务协调器的指令,驱动分支(本地)事务的提交和回滚

处理过程:
(1) TM 向 TC 申请开启一个全局事务,全局事务创建成功并生成一个全局唯一的 XID;
(2) XID 在微服务调用链路的上下文中传播;
(3) RM 向 TC 注册分支事务,将其纳入 XID 对应全局事务的管辖;
(4) TM 向 TC 发起针对 XID 的全局提交或回滚决议;
(5) TC 调度 XID 下管辖的全部分支事务完成提交或回滚请求。
2.3 下载
地址:https://github.com/seata/seata/releases
我下载的是1.3.0版本。

3、Seata-Server安装
3.1 Seata-Server的zip文件解压并修改配置
修改seata-server-1.3.0\seata\conf目录下面的file.conf文件
主要修改:自定义事务组名称+事务日志存储模式为db+数据库连接信息
这个1.3.0里面咋默认没有service了,我们自己添加上
service { #transaction service group mapping vgroupMapping.my_test_tx_group = "default" #only support when registry.type=file, please don't set multiple addresses default.grouplist = "127.0.0.1:8091" #degrade, current not support enableDegrade = false #disable seata disableGlobalTransaction = false}修改日志存储模式为db
mode = "db"
修改数据库连接信息,Seata1.3.0版本已经支持mysql8.0数据库了,早期版本是不支持的。
## database store property db { ## the implement of javax.sql.DataSource, such as DruidDataSource(druid)/BasicDataSource(dbcp)/HikariDataSource(hikari) etc. datasource = "druid" ## mysql/oracle/postgresql/h2/oceanbase etc. dbType = "mysql" driverClassName = "com.mysql.cj.jdbc.Driver" url = "jdbc:mysql://localhost:3306/seata?serverTimezone=GMT%2B8&characterEncoding=utf8&connectTimeout=10000&socketTimeout=30000&autoReconnect=true&useSSL=false" user = "root" password = "123456" minConn = 5 maxConn = 30 globalTable = "global_table" branchTable = "branch_table" lockTable = "lock_table" queryLimit = 100 maxWait = 5000 }
3.2 mysql8.0数据库新建数据库库seata
3.3 在seata库里面建表
早期版本的建表sql会直接在conf目录下面给出,但是新版不给了,这里我将找到的sql放在下面:
db_store.sql
-- -------------------------------- The script used when storeMode is 'db' ---------------------------------- the table to store GlobalSession dataCREATE TABLE IF NOT EXISTS `global_table`( `xid` VARCHAR(128) NOT NULL, `transaction_id` BIGINT, `status` TINYINT NOT NULL, `application_id` VARCHAR(32), `transaction_service_group` VARCHAR(32), `transaction_name` VARCHAR(128), `timeout` INT, `begin_time` BIGINT, `application_data` VARCHAR(2000), `gmt_create` DATETIME, `gmt_modified` DATETIME, PRIMARY KEY (`xid`), KEY `idx_gmt_modified_status` (`gmt_modified`, `status`), KEY `idx_transaction_id` (`transaction_id`)) ENGINE = InnoDB DEFAULT CHARSET = utf8;-- the table to store BranchSession dataCREATE TABLE IF NOT EXISTS `branch_table`( `branch_id` BIGINT NOT NULL, `xid` VARCHAR(128) NOT NULL, `transaction_id` BIGINT, `resource_group_id` VARCHAR(32), `resource_id` VARCHAR(256), `branch_type` VARCHAR(8), `status` TINYINT, `client_id` VARCHAR(64), `application_data` VARCHAR(2000), `gmt_create` DATETIME(6), `gmt_modified` DATETIME(6), PRIMARY KEY (`branch_id`), KEY `idx_xid` (`xid`)) ENGINE = InnoDB DEFAULT CHARSET = utf8;-- the table to store lock dataCREATE TABLE IF NOT EXISTS `lock_table`( `row_key` VARCHAR(128) NOT NULL, `xid` VARCHAR(96), `transaction_id` BIGINT, `branch_id` BIGINT NOT NULL, `resource_id` VARCHAR(256), `table_name` VARCHAR(32), `pk` VARCHAR(36), `gmt_create` DATETIME, `gmt_modified` DATETIME, PRIMARY KEY (`row_key`), KEY `idx_branch_id` (`branch_id`)) ENGINE = InnoDB DEFAULT CHARSET = utf8;
3.4 修改conf目录下面的registry.conf配置文件
配置注册中心连接信息,这里修改为Nacos
registry { # file 、nacos 、eureka、redis、zk、consul、etcd3、sofa type = "nacos" nacos { application = "seata-server" serverAddr = "127.0.0.1:8848" group = "SEATA_GROUP" namespace = "" cluster = "default" username = "nacos" password = "nacos" } ...}
3.5 启动测试
先启动nacos
startup.cmd -m standalone
再启动seata-server
执行bin目录下面的seata-server.bat

查看seata是否注册成功

4、订单/库存/账户业务数据库准备
以下测试都需要保证先启动Nacos再启动Seata,保证两个都没问题才可以。
4.1 分布式事务业务说明
这里我们会创建三个服务,一个订单服务,一个库存服务,一个账户服务。
当用户下单时,会在订单服务中创建一个订单,然后通过远程调用库存服务来扣减下单商品的库存,再通过远程调用账户服务来扣减用户账户里面的余额,最后在订单服务中修改订单状态为已完成。
该操作跨越三个数据库,有两次远程调用,很明显会有分布式事务问题。
总结:下订单—>扣库存—>减账户(余额)
4.2 创建业务数据库
seata_order:存储订单的数据库;
seata_storage:存储库存的数据库;
seata_account:存储账户信息的数据库。
CREATE DATABASE seata_order; CREATE DATABASE seata_storage; CREATE DATABASE seata_account;4.3对上面3个库分别创建对应的业务表
seata_order库下建t_order表
CREATE TABLE t_order ( `id` BIGINT(11) NOT NULL AUTO_INCREMENT PRIMARY KEY, `user_id` BIGINT(11) DEFAULT NULL COMMENT '用户id', `product_id` BIGINT(11) DEFAULT NULL COMMENT '产品id', `count` INT(11) DEFAULT NULL COMMENT '数量', `money` DECIMAL(11,0) DEFAULT NULL COMMENT '金额', `status` INT(1) DEFAULT NULL COMMENT '订单状态:0:创建中;1:已完结' ) ENGINE=INNODB AUTO_INCREMENT=7 DEFAULT CHARSET=utf8; SELECT * FROM t_order;
seata_storage库下建t_storage 表
CREATE TABLE t_storage ( `id` BIGINT(11) NOT NULL AUTO_INCREMENT PRIMARY KEY, `product_id` BIGINT(11) DEFAULT NULL COMMENT '产品id', `total` INT(11) DEFAULT NULL COMMENT '总库存', `used` INT(11) DEFAULT NULL COMMENT '已用库存', `residue` INT(11) DEFAULT NULL COMMENT '剩余库存') ENGINE=INNODB AUTO_INCREMENT=2 DEFAULT CHARSET=utf8; INSERT INTO seata_storage.t_storage(`id`, `product_id`, `total`, `used`, `residue`)VALUES ('1', '1', '100', '0', '100'); SELECT * FROM t_storage;
seata_account库下建t_account 表
CREATE TABLE t_account ( `id` BIGINT(11) NOT NULL AUTO_INCREMENT PRIMARY KEY COMMENT 'id', `user_id` BIGINT(11) DEFAULT NULL COMMENT '用户id', `total` DECIMAL(10,0) DEFAULT NULL COMMENT '总额度', `used` DECIMAL(10,0) DEFAULT NULL COMMENT '已用余额', `residue` DECIMAL(10,0) DEFAULT '0' COMMENT '剩余可用额度') ENGINE=INNODB AUTO_INCREMENT=2 DEFAULT CHARSET=utf8; INSERT INTO seata_account.t_account(`id`, `user_id`, `total`, `used`, `residue`) VALUES ('1', '1', '1000', '0', '1000'); SELECT * FROM t_account;
4.4 上面3个库分别创建对应的回滚日志表
订单-库存-账户3个库下都需要建各自的回滚日志表
-- the table to store seata xid data-- 0.7.0+ add context-- you must to init this sql for you business databese. the seata server not need it.-- 此脚本必须初始化在你当前的业务数据库中,用于AT 模式XID记录。与server端无关(注:业务数据库)-- 注意此处0.3.0+ 增加唯一索引 ux_undo_logDROP TABLE `undo_log`; CREATE TABLE `undo_log` ( `id` BIGINT(20) NOT NULL AUTO_INCREMENT, `branch_id` BIGINT(20) NOT NULL, `xid` VARCHAR(100) NOT NULL, `context` VARCHAR(128) NOT NULL, `rollback_info` LONGBLOB NOT NULL, `log_status` INT(11) NOT NULL, `log_created` DATETIME NOT NULL, `log_modified` DATETIME NOT NULL, `ext` VARCHAR(100) DEFAULT NULL, PRIMARY KEY (`id`), UNIQUE KEY `ux_undo_log` (`xid`,`branch_id`)) ENGINE=INNODB AUTO_INCREMENT=1 DEFAULT CHARSET=utf8;
5、订单/库存/账户业务微服务准备
业务需求:下订单->减库存->扣余额->改(订单)状态
5.1 新建订单Order-Module
5.1.1 新建Module:seata-order-service2001
5.1.2 pom.xml
<dependencies> <!--nacos--> <dependency> <groupId>com.alibaba.cloud</groupId> <artifactId>spring-cloud-starter-alibaba-nacos-discovery</artifactId> </dependency> <!--seata--> <dependency> <groupId>com.alibaba.cloud</groupId> <artifactId>spring-cloud-starter-alibaba-seata</artifactId> <!-- 排除内置的Seata --> <exclusions> <exclusion> <artifactId>seata-all</artifactId> <groupId>io.seata</groupId> </exclusion> </exclusions> </dependency> <dependency> <groupId>io.seata</groupId> <artifactId>seata-all</artifactId> <!-- 根据您Seata服务的版本进行选择 --> <version>1.3.0</version> </dependency> <!--feign--> <dependency> <groupId>org.springframework.cloud</groupId> <artifactId>spring-cloud-starter-openfeign</artifactId> </dependency> <!--web-actuator--> <dependency> <groupId>org.springframework.boot</groupId> <artifactId>spring-boot-starter-web</artifactId> </dependency> <dependency> <groupId>org.springframework.boot</groupId> <artifactId>spring-boot-starter-actuator</artifactId> </dependency> <!--mysql-druid--> <dependency> <groupId>mysql</groupId> <artifactId>mysql-connector-java</artifactId> <version>8.0.19</version> </dependency> <dependency> <groupId>com.alibaba</groupId> <artifactId>druid-spring-boot-starter</artifactId> <version>1.1.10</version> </dependency> <dependency> <groupId>org.mybatis.spring.boot</groupId> <artifactId>mybatis-spring-boot-starter</artifactId> <version>2.0.0</version> </dependency> <dependency> <groupId>org.springframework.boot</groupId> <artifactId>spring-boot-starter-test</artifactId> <scope>test</scope> </dependency> <dependency> <groupId>org.projectlombok</groupId> <artifactId>lombok</artifactId> <optional>true</optional> </dependency> </dependencies>5.1.3 application.yml
server: port: 2001spring: application: name: seata-order-service cloud: alibaba: seata: enabled: true application-id: ${spring.application.name} tx-service-group: my_test_tx_group nacos: discovery: server-addr: localhost:8848 datasource: driver-class-name: com.mysql.cj.jdbc.Driver url: jdbc:mysql://localhost:3306/seata_order?serverTimezone=GMT%2B8&characterEncoding=utf8&connectTimeout=10000&socketTimeout=30000&autoReconnect=true&useSSL=false username: root password: 123456feign: hystrix: enabled: falselogging: level: io: seata: infomybatis: mapperLocations: classpath:mapper/*.xml5.1.4 file.conf和registry.conf
将我们上面配置的file.conf文件和registry.conf复制到项目的resources目录下面

5.1.5 domain
OrderDao:
@Mapperpublic interface OrderDao { /** * 创建订单 */ void create(Order order); /** * 修改订单金额 */ void update(@Param("userId") Long userId, @Param("status") Integer status);}resources文件夹下新建mapper文件夹后添加OrderMapper.xml:
<?xml version="1.0" encoding="UTF-8" ?><!DOCTYPE mapper PUBLIC "-//mybatis.org//DTD Mapper 3.0//EN" "http://mybatis.org/dtd/mybatis-3-mapper.dtd" ><mapper namespace="com.atguigu.springcloud.alibaba.dao.OrderDao"> <resultMap id="BaseResultMap" type="com.atguigu.springcloud.alibaba.domain.Order"> <id column="id" property="id" jdbcType="BIGINT"/> <result column="user_id" property="userId" jdbcType="BIGINT"/> <result column="product_id" property="productId" jdbcType="BIGINT"/> <result column="count" property="count" jdbcType="INTEGER"/> <result column="money" property="money" jdbcType="DECIMAL"/> <result column="status" property="status" jdbcType="INTEGER"/> </resultMap> <insert id="create"> INSERT INTO `t_order` (`id`, `user_id`, `product_id`, `count`, `money`, `status`) VALUES (NULL, #{userId}, #{productId}, #{count}, #{money}, 0); </insert> <update id="update"> UPDATE `t_order` SET status = 1 WHERE user_id = #{userId} AND status = #{status}; </update></mapper>5.1.6 Service接口及其实现
OrderService:
public interface OrderService { /** * 创建订单 */ void create(Order order);}OrderServiceImpl:
@Service@Slf4jpublic class OrderServiceImpl implements OrderService{ @Resource private OrderDao orderDao; @Resource private StorageService storageService; @Resource private AccountService accountService; /** * 创建订单->调用库存服务扣减库存->调用账户服务扣减账户余额->修改订单状态 * 简单说: * 下订单->减库存->减余额->改状态 */ @Override //@GlobalTransactional(name = "fsp-create-order",rollbackFor = Exception.class) public void create(Order order) { log.info("------->下单开始"); //本应用创建订单 orderDao.create(order); //远程调用库存服务扣减库存 log.info("------->order-service中扣减库存开始"); storageService.decrease(order.getProductId(),order.getCount()); log.info("------->order-service中扣减库存结束"); //远程调用账户服务扣减余额 log.info("------->order-service中扣减余额开始"); accountService.decrease(order.getUserId(),order.getMoney()); log.info("------->order-service中扣减余额结束"); //修改订单状态为已完成 log.info("------->order-service中修改订单状态开始"); orderDao.update(order.getUserId(),0); log.info("------->order-service中修改订单状态结束"); log.info("------->下单结束"); }}这里暂时将@GlobalTransactional注解注释掉,我们演示下分布式事务。
StorageService:
@FeignClient(value = "seata-storage-service")public interface StorageService { /** * 扣减库存 */ @PostMapping(value = "/storage/decrease") CommonResult decrease(@RequestParam("productId") Long productId, @RequestParam("count") Integer count);}AccountService
@FeignClient(value = "seata-account-service")public interface AccountService { /** * 扣减账户余额 */ //@RequestMapping(value = "/account/decrease", method = RequestMethod.POST, produces = "application/json; charset=UTF-8") @PostMapping("/account/decrease") CommonResult decrease(@RequestParam("userId") Long userId, @RequestParam("money") BigDecimal money);}StorageService和AccountService的定义是为了在订单业务中调用存储库业务和账户业务的微服务。
5.1.6 Controller
@RestControllerpublic class OrderController { @Autowired private OrderService orderService; /** * 创建订单 */ @GetMapping("/order/create") public CommonResult create( Order order) { orderService.create(order); return new CommonResult(200, "订单创建成功!"); }}5.1.7 Config配置
MybatisConfig:
@Configuration@MapperScan({"com.atguigu.springcloud.alibaba.dao"})public class MyBatisConfig {}DataSourceProxyConfig:
//使用Seata对数据源进行代理@Configurationpublic class DataSourceProxyConfig { @Value("${mybatis.mapperLocations}") private String mapperLocations; @Bean @ConfigurationProperties(prefix = "spring.datasource") public DataSource druidDataSource(){ return new DruidDataSource(); } @Bean public DataSourceProxy dataSourceProxy(DataSource dataSource) { return new DataSourceProxy(dataSource); } @Bean public SqlSessionFactory sqlSessionFactoryBean(DataSourceProxy dataSourceProxy) throws Exception { SqlSessionFactoryBean sqlSessionFactoryBean = new SqlSessionFactoryBean(); sqlSessionFactoryBean.setDataSource(dataSourceProxy); sqlSessionFactoryBean.setMapperLocations(new PathMatchingResourcePatternResolver().getResources(mapperLocations)); sqlSessionFactoryBean.setTransactionFactory(new SpringManagedTransactionFactory()); return sqlSessionFactoryBean.getObject(); }}5.1.8 主启动类
@EnableDiscoveryClient@EnableFeignClients@SpringBootApplication(exclude = DataSourceAutoConfiguration.class)//取消数据源的自动创建public class SeataOrderMainApp2001{ public static void main(String[] args) { SpringApplication.run(SeataOrderMainApp2001.class, args); }}
5.2 新建库存Storage-Module
代码不赘述了,去文章顶部链接地址下载。

5.3 新建账户Account-Module
代码不赘述了,去文章顶部链接地址下载。

6、 分布式事务测试
下订单->减库存->扣余额->改(订单)状态
数据库初始情况


6.1 模拟正常下单
启动三个微服务


正常下单:http://localhost:2001/order/create?userId=1&productId=1&count=10&money=100

数据库情况:
SELECT * FROM `seata_order`.`t_order`
SELECT * FROM `seata_storage`.`t_storage`
SELECT * FROM `seata_account`.`t_account`;
可以看到,正常下单是没有问题的,库存减10,账户月减少100,订单状态变为1.
6.2 模拟超时异常,不加@GlobalTransactional注解
AccountServiceImpl添加超时

由于30秒已经超过了OpenFeign的超时时间,所以会执行失败。
 由于30秒已经超过了OpenFeign的超时时间,所以会执行失败。
再访问:http://localhost:2001/order/create?userId=1&productId=1&count=10&money=100

数据库情况:


卧槽,没下单成功竟然减掉了库存和用户的账户余额,这还了得。
6.3 超时异常,添加@GlobalTransactional
AccountServiceImpl添加超时
OrderServiceImpl添加@GlobalTransactional注解,这个注解的作用是只要发生异常就回滚。

此时访问:http://localhost:2001/order/create?userId=1&productId=1&count=10&money=100

此时数据库情况:


 )
)
可以看到,下单后数据库数据并没有任何改变,数据都没有添加进来,分布式事务回滚测试是成功的。
7、知识点补充
我们上面默认使用的是AT事务模式。
7.1 AT模式如何做到对业务的无侵入
AT模式的前提:
- 基于支持本地ACID事务的关系型数据库
- Java应用,通过JDBC访问数据库
整体机制:
两阶段提交协议的演变:
- 一阶段:业务数据和回滚日志记录在同一个本地事务中提交,释放本地锁和连接资源。
- 二阶段:
- 提交异步化,非常快速地完成。
- 回滚通过一阶段的回滚日志进行反向补偿
7.2 分布式事务三大组件

执行流程:
-
TM 开启分布式事务(TM 向 TC 注册全局事务记录);
-
按业务场景,编排数据库、服务等事务内资源(RM 向 TC 汇报资源准备状态 );
-
TM 结束分布式事务,事务一阶段结束(TM 通知 TC 提交/回滚分布式事务);
-
TC 汇总事务信息,决定分布式事务是提交还是回滚;
-
TC 通知所有 RM 提交/回滚 资源,事务二阶段结束。
我这里使用的是Seata1.3.0版本的,操作过程中也踩了不少坑。这只是个简单的使用教程,真正的分布式事务机制是非常复杂的,还需要更深入的研究才行。
版权声明
本文为[华为云]所创,转载请带上原文链接,感谢
https://bbs.huaweicloud.com/blogs/349220
边栏推荐
- Gson fastjason Jackson of object to JSON difference modifies the field name
- 【ACM】376. Swing sequence
- CISSP certified daily knowledge points (April 19, 2022)
- Nodejs installation
- From introduction to mastery of MATLAB (2)
- CISSP certified daily knowledge points (April 12, 2022)
- 多功能工具箱微信小程序源码
- Résolution: cnpm: impossible de charger le fichier... Cnpm. PS1 parce que l'exécution de scripts est désactivée sur ce système
- Use bitnami / PostgreSQL repmgr image to quickly set up PostgreSQL ha
- Serial port debugging tools cutecom and minicom
猜你喜欢
![[mathematical modeling] - analytic hierarchy process (AHP)](/img/ff/2350c9604a03fff6a6a751aa3cfa3b.png)
[mathematical modeling] - analytic hierarchy process (AHP)
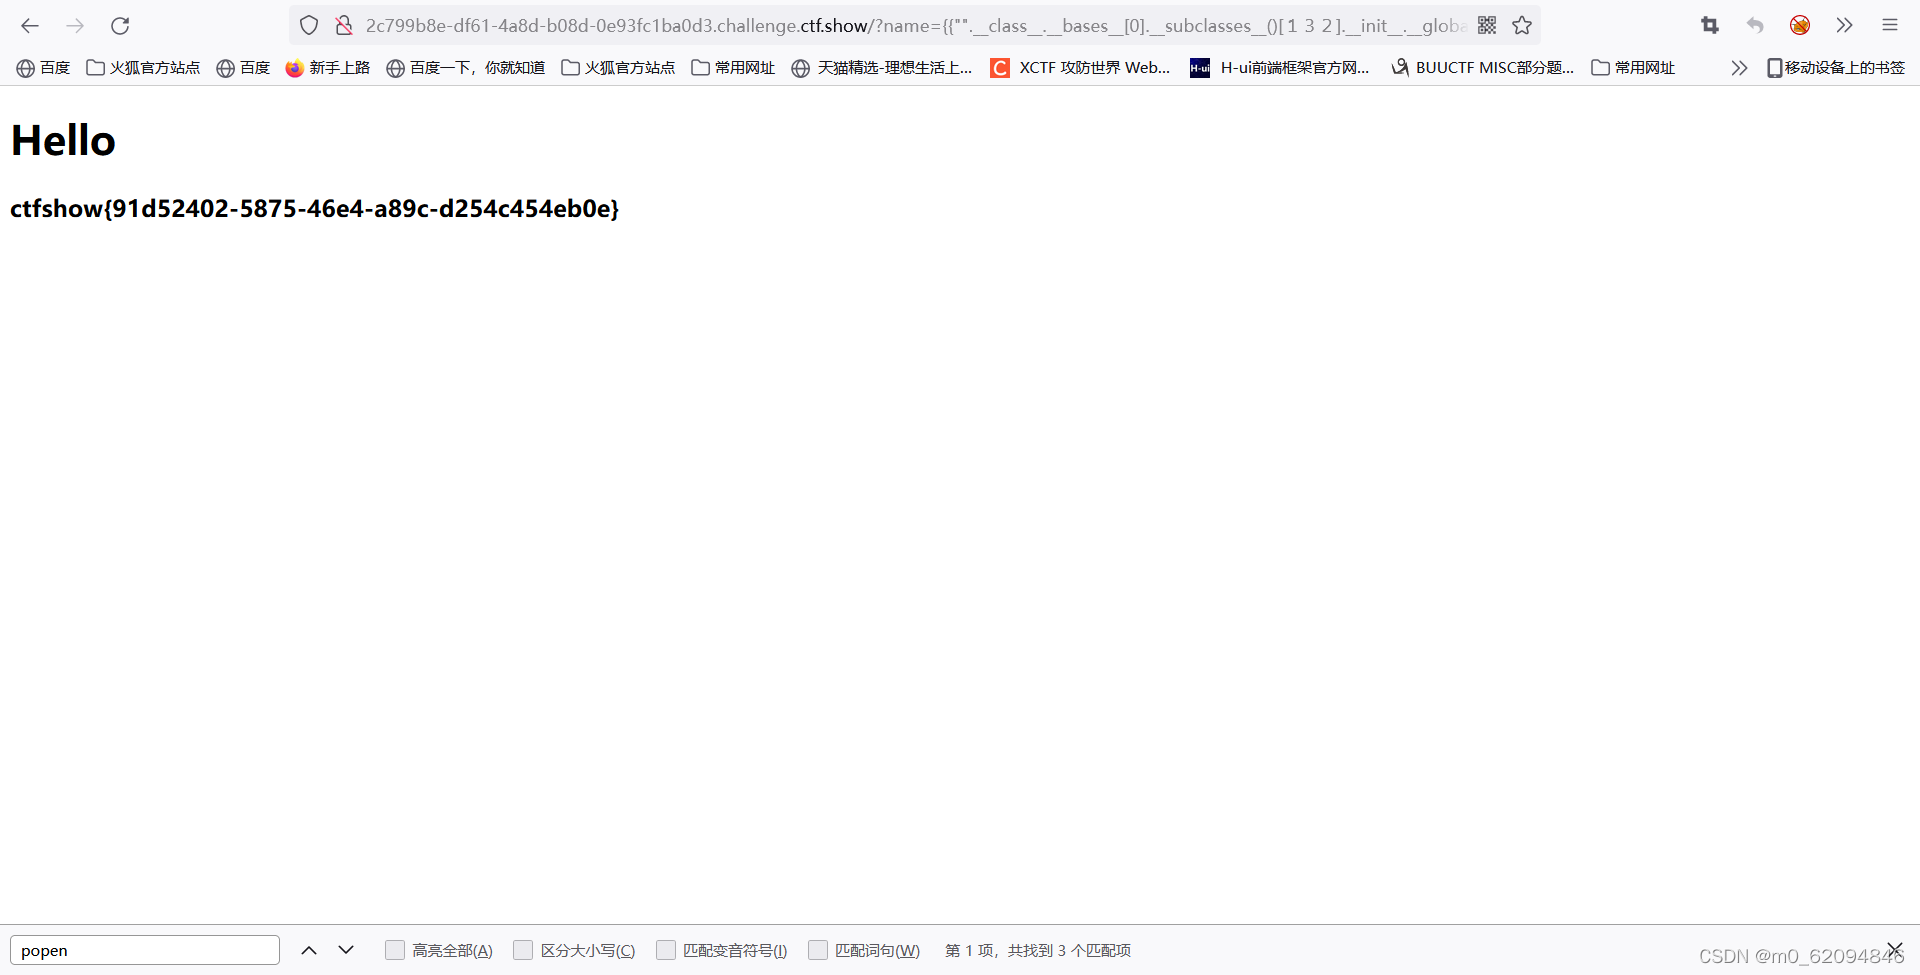
ctfshow-web362(SSTI)
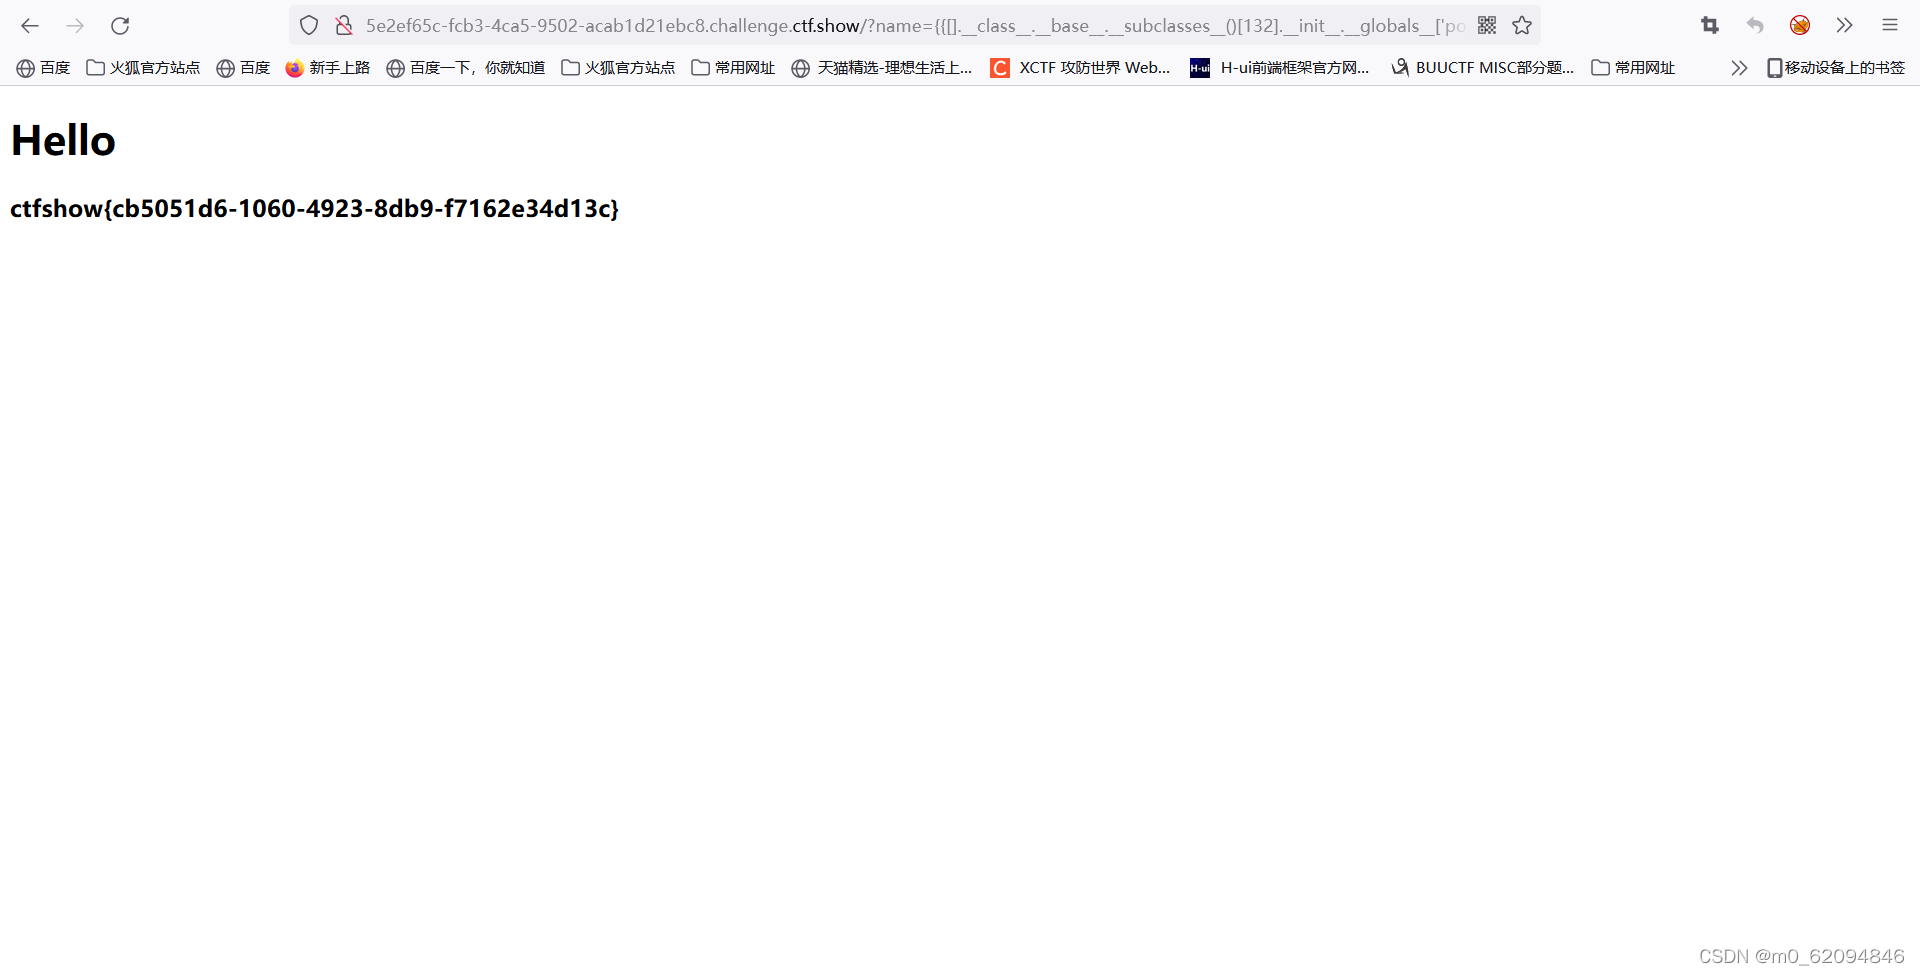
ctfshow-web361(SSTI)
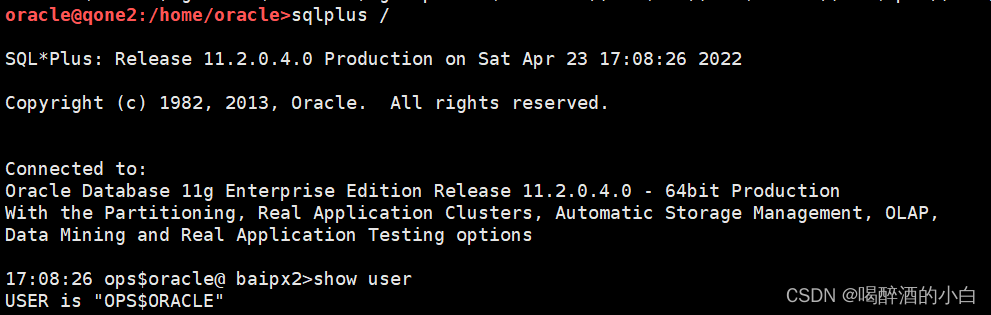
os_ authent_ Prefix
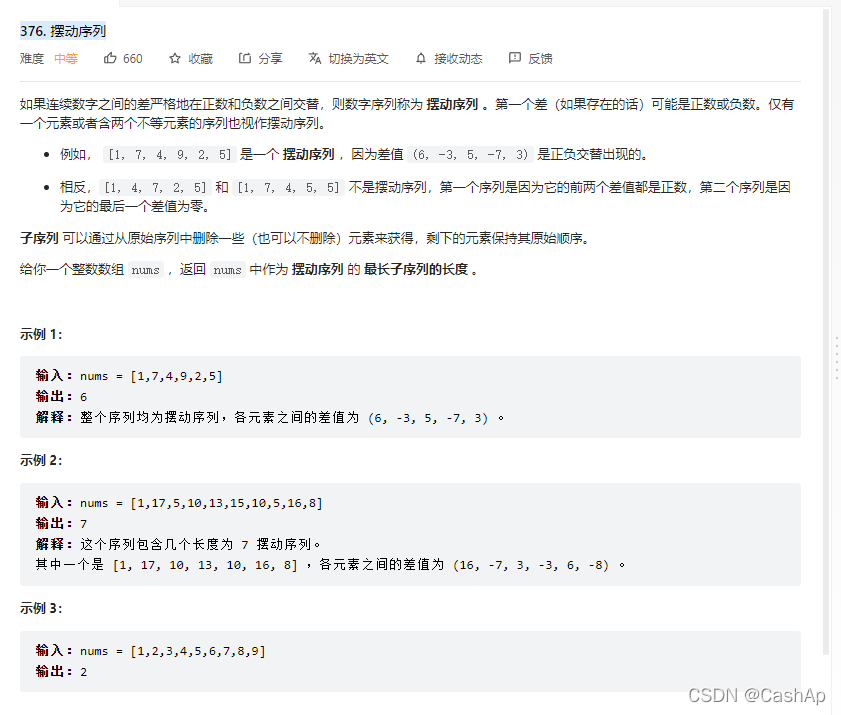
【ACM】376. Swing sequence
iptables -L执行缓慢
使用 bitnami/postgresql-repmgr 镜像快速设置 PostgreSQL HA

The vivado project corresponding to the board is generated by TCL script
Setting up keil environment of GD single chip microcomputer

Multifunctional toolbox wechat applet source code
随机推荐
机器学习实战 -朴素贝叶斯
Mysqldump backup database
Daily CISSP certification common mistakes (April 14, 2022)
The first leg of the national tour of shengteng AI developer creation and enjoyment day was successfully held in Xi'an
Serial port debugging tools cutecom and minicom
Ionic instruction set order from creation to packaging
Interpretation and compilation of JVM
【科普】CRC校验(一)什么是CRC校验?
Resolve the error Max virtual memory areas VM max_ map_ count [65530] is too low, increase to at least [262144]
CISSP certified daily knowledge points (April 19, 2022)
CANopen STM32 transplantation
Nodejs installation
STM32学习记录0008——GPIO那些事1
Resolution: cnpm: unable to load file \cnpm. PS1, because running scripts is prohibited on this system
iptables初探
CISSP certified daily knowledge points (April 15, 2022)
Kettle paoding jieniu Chapter 17 text file output
解决:cnpm : 無法加載文件 ...\cnpm.ps1,因為在此系統上禁止運行脚本
Cygwin64 right click to add menu, and open cygwin64 here
Gson fastjason Jackson of object to JSON difference modifies the field name