当前位置:网站首页>用哈希简单封装unordered_map和unordered_set
用哈希简单封装unordered_map和unordered_set
2022-08-09 22:13:00 【HHYX.】
哈希表的改造
哈希表的改造


unordered_map和unordered_set这两个stl容器,从上图可以看到,他们底层似乎都是使用哈希来实现的。那么在理解了哈希的基础上,不妨尝试一下自己模拟实现一下简单的unordered_map和unordered_set也给之前的哈希结构加上迭代器操作。
unordered_map和unordered_set的基本结构
从C++库中可以看出来,map和set一大区别就在于set只有一个关键字key,而map中存在key和T。因此他们的基本结构可以分别这样设计:其中在原来哈希的基础上又多了一个KeyOfT的仿函数,他的作用主要是确定需要进行比较的关键字,例如map中需要比较的是T中的first,而set就是key
	template<class K,class V,class HashFunc = Hash<K>>
	class Unordered_map
	{

			struct MapKeyOfT
		{

			const K& operator()(const pair<K, V>& kv)
			{

				return kv.first;
			}
		};
	private:
		LinkHash::HashTable<K, pair<K, V>, MapKeyOfT, hash> _ht;

	};
	template<class K, class HashFunc = Hash<K>>
	class unordered_map
	{

			struct SetKeyOfT
		{

			const K& operator()(const K& key)
			{

				return key;
			}
		};
	private:
		LinkHash::HashTable<K, K, SetKeyOfT, hash> _ht;

	};
哈希表改造
确定了基本结构之后就可以对原来的哈希表进行一系列的改造,例如:
节点结构体
为了方便使用同一个哈希表来实现unordered_map和unordered_set,这里是通过第二个参数将这两个进行区分,unordered_set传入的就是key,而unordered_map传入的则是一个pair,因此这里的哈希节点结构体可以进行如下改造
	//template<class K, class V>
	//struct HashNode
	//{

	// pair<K,V> _data;
	// HashNode<K, V>* _next;
	// HashNode(const pair<K,V>& data)
	// :_next(nullptr)
	// ,_data(data)
	// {}
	//};
	template<class T>
	struct HashNode
	{

		T _data;
		HashNode<T>* _next = nullptr;
		HashNode(const T& data)
			:_data(data)
			,_next(nullptr)
		{
    }
	};
迭代器
stl中的unordered_map和unordered_set内部实现了迭代器,可以使用迭代器访问其中的内容,这里我们也在哈希中实现一个迭代器操作,然后通过封装实现unordered_map和unordered_set的迭代器,实现代码如下,迭代器里面主要需要注意的是operator++操作。这个操作需要遍历哈希表以及每个点上所挂的链表。因此可以这样考虑:先判断当前链表是否走完,如果没走完就直接往下一个节点走,如果走完了就将index++,前往下一个哈希地址,然后开始遍历链表
	template<class K,class T,class Ref,class Ptr,class KeyOfT,class HashFunc>
	struct HTIterator//迭代器
	{

		typedef HashNode<T> Node;
		typedef HTIterator<K, T, Ref, Ptr, KeyOfT, HashFunc> Self;
		Node* _node;
		HashTable<K, T, KeyOfT, HashFunc>* _pht;
		HTIterator(Node* node, HashTable<K, T, KeyOfT, HashFunc>* pht)
			:_node(node)
			,_pht(pht)
		{
    }

		Ref operator*()
		{

			return _node->_data;
		}


		Ptr operator->()
		{

			return &_node->_data;
		}

		Self& operator++()
		{

			if (_node->_next)//该链表还未走完
			{

				_node = _node->_next;
			}
			else
			{

				KeyOfT kt;
				HashFunc hf;
				size_t index = hf(kt(_node->_data)) % _pht->_tables.size();
				index++;//找下一个哈希地址
				while (index < _pht->_tables.size())
				{

					if (_pht->_tables[index])
					{

						break;
					}
					else
					{

						index++;
					}
				}
				if (index == _pht->_tables.size())//走完了
				{

					_node = nullptr;
				}
				else
				{

					_node = _pht->_tables[index];
				}

			}
			return *this;
		}

		bool operator!=(const Self& s)
		{

			return _node != s._node;
		}

		bool operator==(const Self& s)
		{

			return _node == s._node;
		}

	};
哈希表改造
在完成迭代器之后,可以在原来的哈希表结构体中完善一下insert等参数的返回值,并加入新的begin,end接口函数,代码如下:
	template<class K,class T,class KeyOfT, class HashFunc>
	class HashTable
	{

		typedef HashNode<T> Node;

		template<class K, class T, class Ref, class Ptr, class KeyOfT, class HashFunc>
		friend struct HTIterator;//迭代器
	public:
		typedef HashTable<K, T, KeyOfT, HashFunc> Self;
		typedef HTIterator<K, T, T&, T*, KeyOfT, HashFunc> iterator;

		HashTable() = default;//默认构造函数

		HashTable(const Self& ht)//拷贝构造
		{

			_tables.resize(ht._tables.size());//开辟空间
			_n = ht._n;
			for (size_t i = 0; i < ht._tables.size(); i++)
			{


				Node* cur = ht._tables[i];
				while (cur)
				{

					Node* copy = new Node(cur->_data);
					copy->_next = _tables[i];
					_tables[i] = copy;
					cur = cur->_next;
				}

			}
		}


		Self& operator=(Self ht)
		{

			swap(_n, ht._n);
			_tables.swap(ht._tables);
			return *this;
		}


		~HashTable()
		{

			for (size_t i = 0; i < _tables.size(); i++)
			{

				Node* cur = _tables[i];
				while (cur)
				{

					Node* next = cur->_next;
					delete cur;
					cur = next;
				}
				_tables[i] = nullptr;
			}
		}

		iterator begin()
		{

			for (size_t i = 0; i < _tables.size(); i++)
			{

				if (_tables[i])
				{

					return iterator(_tables[i], this);
				}
			}
			return end();
		}

		iterator end()
		{

			return iterator(nullptr, this);
		}

		bool Erase(const K& key)//删除
		{

			if (_tables.empty())//如果表是空的则不用删除
			{

				return false;
			}
			HashFunc hf;
			size_t index = hf(key) % _tables.size();
			Node* prev = nullptr;
			Node* cur = _tables[index];
			KeyOfT kt;
			while (cur)//寻找存放key值的节点
			{

				if (kt(cur->_data) == key)//找到了
				{

					//头删
					if (prev == nullptr)
					{

						_tables[index] = cur->_next;
					}
					else
					{

						//中间位置删除
						prev->_next = cur->_next;
					}
					--_n;
					delete cur;
					return true;
				}
				else//继续往下走
				{

					prev = cur;
					cur = cur->_next;
				}

			}

		}


		iterator Find(const K& key)
		{

			if (_tables.size() == 0)
			{

				return end();
			}
			HashFunc hf;
			size_t index = hf(key) % _tables.size();
			Node* cur = _tables[index];
			KeyOfT kt;
			while (cur)
			{

				if (kt(cur->_data) == key)
				{

					return iterator(cur, this);
				}
				else
				{

					cur = cur->_next;
				}
			}
			return end();
		}


		pair<iterator,bool> Insert(const T& data)
		{

			KeyOfT kt;
			HashFunc hf;
			iterator ret = Find(kt(data));//判断是否已经存在重复值
			if (ret != end())
			{

				return make_pair(ret, false);
			}
			if (_tables.size() == _n)//载荷因子为1的时候需要进行扩容
			{

				size_t newCapacity = _tables.size() == 0 ? 10 : _tables.size() * 2;
				vector<Node*> newTables;
				newTables.resize(newCapacity);
				for (size_t i = 0; i < _tables.size(); i++)
				{

					Node* cur = _tables[i];
					while (cur)
					{

						size_t index = hf(kt(cur->_data)) % newTables.size();
						Node* next = cur->_next;
						//头插
						cur->_next = newTables[index];
						newTables[index] = cur;
						cur = next;
					}
					_tables[i] = nullptr;
				}
				_tables.swap(newTables);
			}
			size_t index = hf(kt(data)) % _tables.size();
			Node* newnode = new Node(data);
			newnode->_next = _tables[index];
			_tables[index] = newnode;
			_n++;
			return make_pair(iterator(newnode, this), true);
		}


	private:
		vector<Node*> _tables;//数组中存放的是节点的指针
		size_t _n = 0;
	};
完成了以上哈希表的改造之后就可以很简单的对哈希表进行封装来完成unordered_map和unordered_set的基本接口操作了。
unordered_map和unordered_set封装
unordered_map封装以及测试代码
	template<class K,class V,class HashFunc = Hash<K>>
	class Unordered_map
	{

		struct MapKeyOfT
		{

			const K& operator()(const pair<K, V>& kv)
			{

				return kv.first;
			}
		};
	private:
		LinkTable::HashTable<K, pair<K, V>, MapKeyOfT, HashFunc> _ht;
	public:
		typedef typename LinkTable::HashTable<K, pair<K,V>, MapKeyOfT, HashFunc>::iterator iterator;
		iterator begin()
		{

			return _ht.begin();
		}
		iterator end()
		{

			return _ht.end();
		}

		pair<iterator,bool> insert(const pair<K,V>& kv)
		{

			return _ht.Insert(kv);
		}
		V& operator[](const K& key)
		{

			auto ret = _ht.Insert(make_pair(key, V()));
			return ret.first->second;
		}


	};

	void test_unordered_map()
	{

		Unordered_map<string, string> dict;
		dict.insert(make_pair("sort", "排序"));
		dict.insert(make_pair("string", "ַ字符串"));
		dict.insert(make_pair("map", "地图"));

		Unordered_map<string, string>::iterator it = dict.begin();
		while (it != dict.end())
		{

			cout << it->first << ":" << it->second << endl;
			++it;
		}
		cout << endl;
	}
运行结果如下: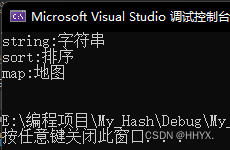
unordered_set封装以及测试代码
	template<class K, class HashFunc = Hash<K>>
	class unordered_set
	{

		struct SetKeyOfT
		{

			const K& operator()(const K& key)
			{

				return key;
			}
		};
	private:
		LinkTable::HashTable<K, K, SetKeyOfT, HashFunc> _ht;
	public:
		typedef typename LinkTable::HashTable<K, K, SetKeyOfT, HashFunc>::iterator iterator;
		iterator begin()
		{

			return _ht.begin();
		}

		iterator end()
		{

			return _ht.end();
		}

		pair<iterator, bool> insert(const K& key)
		{

			return _ht.Insert(key);
		}

	};

	void test_unordered_set()
	{

		unordered_set<int> us;
		us.insert(4);
		us.insert(14);
		us.insert(34);
		us.insert(7);
		us.insert(24);
		us.insert(17);
		unordered_set<int>::iterator it = us.begin();
		while (it != us.end())
		{

			cout << *it << " ";
			++it;
		}
		cout << endl;

		unordered_set<string> uss;
		uss.insert("sort");
		uss.insert("hash");
	}
测试结果如下:
这样一来一个简单的unordered_map和unordered_set就用手写的哈希表来模拟实现完成了。
边栏推荐
猜你喜欢


随机推荐
守护进程
&& 不是此版本的有效语句分隔符
Leetcode 701. 二叉搜索树中的插入操作
tiup cluster template
Miscellaneous talk - the sorrow of programmers
力扣:322. 零钱兑换
Chapter 15 HMM模型
HBuilder X 不能运行到内置终端
迁移学习 & 凯明初始化
LeetCode_2632_字符串压缩
中国SaaS企业排名,龙头企业Top10梳理
全面解析FPGA基础知识
Users should clearly know that quantitative trading is not a simple procedure
力扣:474.一和零
上海一科技公司刷单被罚22万,揭露网络刷单灰色产业链
金仓数据库 KingbaseGIS 使用手册(6.5. 几何对象编辑函数)
Comprehensive analysis of FPGA basics
What is the stability of the quantitative trading interface system?
Interfering with BGP routing---community attributes
shell数组