当前位置:网站首页>Recyclerview advanced use (I) - simple implementation of sideslip deletion
Recyclerview advanced use (I) - simple implementation of sideslip deletion
2022-04-23 14:09:00 【Senzhiqianshou】
Preface
Students doing Android Development , Yes RecyclerView It must be no stranger . Long before it came out , We Android apes implement lists or tables commonly used only ListView and GridView. Due to the problems related to early Android Development sdk The Chinese version of the description document is not perfect , Many usages are actually problematic . Like ListView, If not ViewHolder You can run, too , But why , At that time, few people could fully explain .RecyclerView The advent of has brought new vitality to this kind of unidentified . Simply speaking , This new control can be considered as its own ViewHolder Right ListView and GridView The integrators of . Deeper , Cache the list , The custom operation of list behavior is greatly extended . Take advantage of these extensions , We can easily achieve a lot in ListView The era needs to write a lot of code to realize the function . The next lesson , Let's talk about , How to simply implement a sideslip deletion operation .
Let's first look at the effect we want to achieve :

The page is simple , It's a list , Then support sideslip deletion .
To achieve this effect, you need a tool called ItemTouchHelper Auxiliary class . The following is the official English introduction of this class .
androidx.recyclerview.widget.ItemTouchHelper @Contract(pure = true)
public ItemTouchHelper(@NonNull ItemTouchHelper.Callback callback)
Creates an ItemTouchHelper that will work with the given Callback.
You can attach ItemTouchHelper to a RecyclerView via attachToRecyclerView(RecyclerView). Upon attaching, it will add an item decoration, an onItemTouchListener and a Child attach / detach listener to the RecyclerView.

Params:
callback – The Callback which controls the behavior of this touch helper.
Generally speaking, when constructing this class, you need to pass in a CallBack Parameters , And then through attachToRecyclerView This method and RecyclerView Bind together .
Since you need one CallBack As a construction parameter , So let's customize one first CallBack:
public class SlideDeleteHelperCallBack extends ItemTouchHelper.Callback {

    @Override
    public int getMovementFlags(@NonNull RecyclerView recyclerView, @NonNull RecyclerView.ViewHolder viewHolder) {

        return 0;
    }

    @Override
    public boolean onMove(@NonNull RecyclerView recyclerView, @NonNull RecyclerView.ViewHolder viewHolder, @NonNull RecyclerView.ViewHolder target) {

        return false;
    }

    @Override
    public void onSwiped(@NonNull RecyclerView.ViewHolder viewHolder, int direction) {


	}
}
Let's make a custom one SlideDeleteHelperCallBack Class inheritance ItemTouchHelper.Callbak, By default, three abstract methods must be implemented :
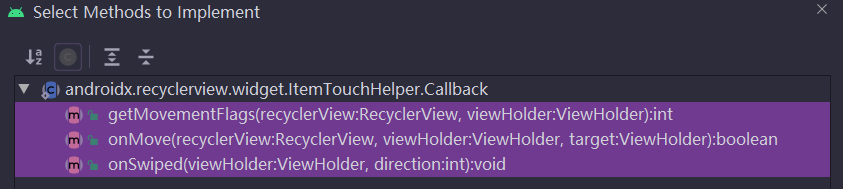
First look at it. getMovementFlags:
/** * Should return a composite flag which defines the enabled move directions in each state * (idle, swiping, dragging). * <p> * Instead of composing this flag manually, you can use {@link #makeMovementFlags(int, * int)} * or {@link #makeFlag(int, int)}. * <p> * This flag is composed of 3 sets of 8 bits, where first 8 bits are for IDLE state, next * 8 bits are for SWIPE state and third 8 bits are for DRAG state. * Each 8 bit sections can be constructed by simply OR'ing direction flags defined in * {@link ItemTouchHelper}. * <p> * For example, if you want it to allow swiping LEFT and RIGHT but only allow starting to * swipe by swiping RIGHT, you can return: * <pre> * makeFlag(ACTION_STATE_IDLE, RIGHT) | makeFlag(ACTION_STATE_SWIPE, LEFT | RIGHT); * </pre> * This means, allow right movement while IDLE and allow right and left movement while * swiping. * * @param recyclerView The RecyclerView to which ItemTouchHelper is attached. * @param viewHolder The ViewHolder for which the movement information is necessary. * @return flags specifying which movements are allowed on this ViewHolder. * @see #makeMovementFlags(int, int) * @see #makeFlag(int, int) */
  public abstract int getMovementFlags(@NonNull RecyclerView recyclerView,
          @NonNull ViewHolder viewHolder);
It was quite detailed , Chinese simple translation is , This method needs to return a int The number of tags of type . To construct this tag quantity, you can use makeMovementFlags This auxiliary method realizes :
/** * Convenience method to create movement flags. * <p> * For instance, if you want to let your items be drag & dropped vertically and swiped * left to be dismissed, you can call this method with: * <code>makeMovementFlags(UP | DOWN, LEFT);</code> * * @param dragFlags The directions in which the item can be dragged. * @param swipeFlags The directions in which the item can be swiped. * @return Returns an integer composed of the given drag and swipe flags. */
 public static int makeMovementFlags(int dragFlags, int swipeFlags) {

     return makeFlag(ACTION_STATE_IDLE, swipeFlags | dragFlags)
             | makeFlag(ACTION_STATE_SWIPE, swipeFlags)
             | makeFlag(ACTION_STATE_DRAG, dragFlags);
 }
and makeMovementFlags, What you actually need to pass in is a dragFlags( Drag tag ) And a swipeFlags( Slide mark ). therefore , We can clearly understand getMovementFlags What is actually needed is the amount of markers to drag and slide . As for why you need to return in this way , First , Simply use an array to return two types of values , I think it is completely feasible . however , Using bit or operation , It will be more efficient in execution efficiency , because , There are many of these multiple choice values in the Android source code layer ( for example Gravity) All use bit or operation , And the code is concise .
Come back , In our current example , We just need to sideslip , No need to drag . So how to transfer the specific value .
@Override
public int getMovementFlags(@NonNull RecyclerView recyclerView, @NonNull RecyclerView.ViewHolder viewHolder) {

    return makeMovementFlags(0,ItemTouchHelper.LEFT|ItemTouchHelper.RIGHT);
}
We can write it like this , This is also a popular way of writing on the Internet . The first parameter dragFlags Pass on 0, the second swipeFlags Pass on LEFT and RIGHT Or operation value of , Indicates that you can stroke left and right ( Of course, you can pass on only one , Then there is only one direction to draw ). But why is the first parameter passed 0, Many places didn't explain the reason . How to find the answer ? Since the following parameters are composed of constants , The previous parameters should also be constants . Let's click on the following constant parameter source code , have a look :
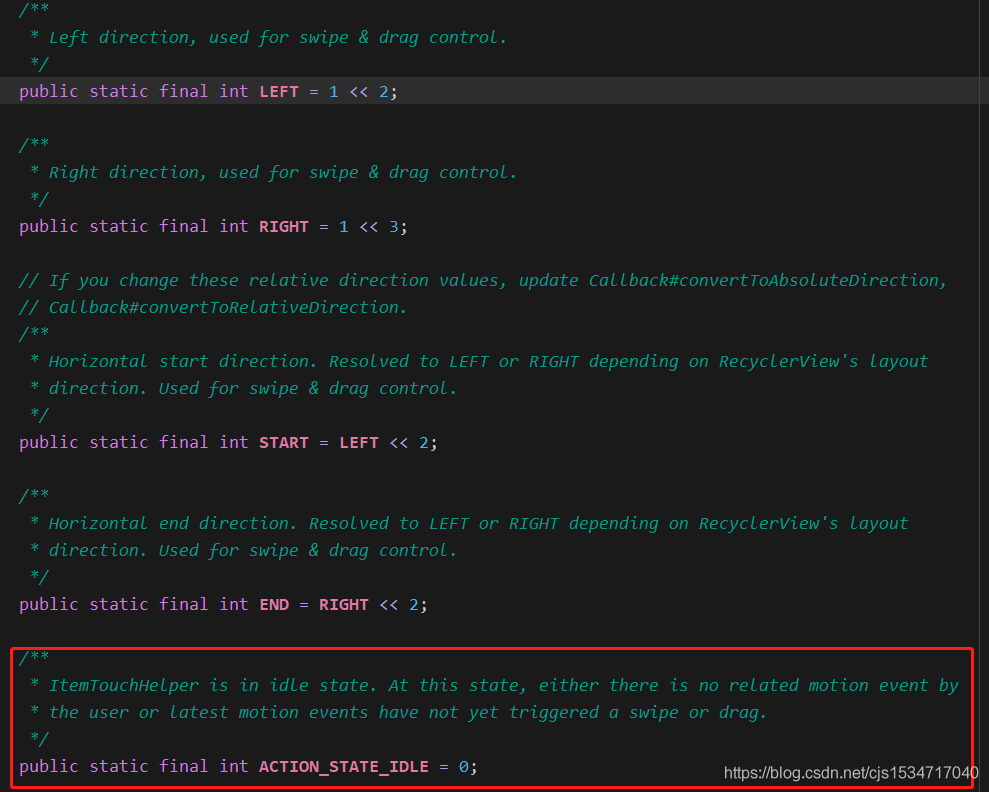
You can see , There's actually a 0 Constant of , be called ACTION_STATE_IDLE, As can be seen from the notes , This constant indicates a static state , There will be no operation . natural , Pass on 0 There will be no drag and drop operation , therefore , The more perfect way of writing should be changed to :
@Override
public int getMovementFlags(@NonNull RecyclerView recyclerView, @NonNull RecyclerView.ViewHolder viewHolder) {

    return makeMovementFlags(ItemTouchHelper.ACTION_STATE_IDLE,ItemTouchHelper.LEFT|ItemTouchHelper.RIGHT);
}
Next, let's look at one of the three methods onMove Method , To find the source code :
/** * Called when ItemTouchHelper wants to move the dragged item from its old position to * the new position. * <p> * If this method returns true, ItemTouchHelper assumes {@code viewHolder} has been moved * to the adapter position of {@code target} ViewHolder * ({@link ViewHolder#getAdapterPosition() * ViewHolder#getAdapterPosition()}). * <p> * If you don't support drag & drop, this method will never be called. * * @param recyclerView The RecyclerView to which ItemTouchHelper is attached to. * @param viewHolder The ViewHolder which is being dragged by the user. * @param target The ViewHolder over which the currently active item is being * dragged. * @return True if the {@code viewHolder} has been moved to the adapter position of * {@code target}. * @see #onMoved(RecyclerView, ViewHolder, int, ViewHolder, int, int, int) */
 public abstract boolean onMove(@NonNull RecyclerView recyclerView,
         @NonNull ViewHolder viewHolder, @NonNull ViewHolder target);
You can see , This method is mainly used to operate dragging , Some operations when moving items , If you return true Words , Can you still go onMoved This method of . But we're just sideslipping here , No need to drag , therefore , The method , We can skip it .
Finally, let's have a look at onSwiped This method of , Also look at the source code first :
/** * Called when a ViewHolder is swiped by the user. * <p> * If you are returning relative directions ({@link #START} , {@link #END}) from the * {@link #getMovementFlags(RecyclerView, ViewHolder)} method, this method * will also use relative directions. Otherwise, it will use absolute directions. * <p> * If you don't support swiping, this method will never be called. * <p> * ItemTouchHelper will keep a reference to the View until it is detached from * RecyclerView. * As soon as it is detached, ItemTouchHelper will call * {@link #clearView(RecyclerView, ViewHolder)}. * * @param viewHolder The ViewHolder which has been swiped by the user. * @param direction The direction to which the ViewHolder is swiped. It is one of * {@link #UP}, {@link #DOWN}, * {@link #LEFT} or {@link #RIGHT}. If your * {@link #getMovementFlags(RecyclerView, ViewHolder)} * method * returned relative flags instead of {@link #LEFT} / {@link #RIGHT}; * `direction` will be relative as well. ({@link #START} or {@link * #END}). */
 public abstract void onSwiped(@NonNull ViewHolder viewHolder, int direction);
This note probably means two :
1、 If not swipe, Then the method will never be called . Do you support swipe, You can copy :
@Override
public boolean isItemViewSwipeEnabled() {

    return super.isItemViewSwipeEnabled();
}
To control , Default return true, Show support swipe
2、 The method of direction The value of is the same as that of you in front getMovementFlags The value returned in is related to , If you return something similar in the front START and END The direction of this relative positioning , What we get here is also the direction of relative positioning , Otherwise, return to the absolute direction of upper left and lower right .
that , This is the core of the sideslip operation we need onSwiped There's a way .
Come here , Let's think about it first RecyclerView Design mode of , Observer mode . View and data are separated , Drive the change of view through the change of data (notifyXXchanged). stay ListView Time , Drive view updates only notifyDataSetChanged, This update is full-scale . here we are RecyclerView Time , Extended local update , for example notifyXXRemoved,notifyXXInserted...
Now let's look back at our custom ItemTouchHelper Of callBack:
public class SlideDeleteHelperCallBack extends ItemTouchHelper.Callback {

    @Override
    public int getMovementFlags(@NonNull RecyclerView recyclerView, @NonNull RecyclerView.ViewHolder viewHolder) {

        return 0;
    }

    @Override
    public boolean onMove(@NonNull RecyclerView recyclerView, @NonNull RecyclerView.ViewHolder viewHolder, @NonNull RecyclerView.ViewHolder target) {

        return false;
    }

    @Override
    public void onSwiped(@NonNull RecyclerView.ViewHolder viewHolder, int direction) {


	}
}
onSwiped Method provides only one viewHolder And a direction, So can we get the parent view and data source list through these two ? Native ViewHolder You can't ( In the later stage, we can encapsulate and realize ), So we need to pass in a RecyclerView And a data source List. Look at the first moving picture , The object of each entry is a picture and a text , So we can model :
public class RecyclerItem {

    private int icon;
    private String text;

    public RecyclerItem() {

    }

    public RecyclerItem(@DrawableRes int icon, String text) {

        this.icon = icon;
        this.text = text;
    }

    public int getIcon() {

        return icon;
    }

    public void setIcon(@DrawableRes int icon) {

        this.icon = icon;
    }

    public String getText() {

        return text;
    }

    public void setText(String text) {

        this.text = text;
    }

    @Override
    public String toString() {

        return "RecyclerItem{" +
                "icon=" + icon +
                ", text='" + text + '\'' +
                '}';
    }
}
Of course , For the convenience of log printing , We also copied toString Method . In this case , You can create a constructor :
private RecyclerView recyclerView;
private List<RecyclerItem> recyclerItemList;

public SlideDeleteHelperCallBack(RecyclerView recyclerView, List<RecyclerItem> recyclerItemList) {

    this.recyclerView = recyclerView;
    this.recyclerItemList = recyclerItemList;
}
onSwiped In the method, we can write :
@Override
public void onSwiped(@NonNull RecyclerView.ViewHolder viewHolder, int direction) {

   recyclerItemList.remove(viewHolder.getAdapterPosition());
   recyclerView.getAdapter().notifyItemRemoved(viewHolder.getAdapterPosition());
}
First delete the data from the data source , Then notify to delete data from the view level . So as to achieve the change of data to drive the view .
But there are actually pits here . The above writing method is also the writing method of most online articles . Because of the simple side slip effect , Yes, it has reached . But if it involves a click event , Then there will be the problem of incorrect position when clicking .* Specific implementation fixes can be viewed RecyclerView A detailed study -RecyclerView Discussion and repair of click dislocation . thus ,ItemTouchHelper.CallBack We've finished the part .
Now let's look at the connection callBack and RecyclerView Code for :
public class SlideDeleteActivity extends BaseActivity {

    private RecyclerView recycler;
    private List<RecyclerItem> list;
    private SimpleRecyclerListAdapter adapter;
    private ItemTouchHelper itemTouchHelper;

    @Override
    protected int setLayoutId() {

        return R.layout.activity_slide_delete;
    }

    @Override
    protected int setToolBarId() {

        return R.id.toolbar;
    }

    @Override
    protected void initView(Bundle savedInstanceState) {

        recycler = findViewById(R.id.recycler);
    }

    @Override
    protected void initEvents(Bundle savedInstanceState) {

        list = DataFactory.generateRecyclerItemList();
        adapter = new SimpleRecyclerListAdapter(list);
        adapter.setOnItemCLickListener(new SimpleRecyclerListAdapter.OnItemCLickListener() {

            @Override
            public void onItemClick(RecyclerItem recyclerItem, SimpleRecyclerViewHolder holder, int position) {

                toastShort(" Click. :" + recyclerItem + "  Location :" + position);
            }
        });
        recycler.setLayoutManager(new LinearLayoutManager(this, LinearLayoutManager.VERTICAL, false));
        recycler.setAdapter(adapter);
        recycler.addItemDecoration(new GapDecoration());

        SlideDeleteHelperCallBack callBack = new SlideDeleteHelperCallBack(recycler, list);
        callBack.setOnSwipedListener(new SlideDeleteHelperCallBack.OnSwipedListener() {

            @Override
            public void onSwiped(RecyclerView.ViewHolder viewHolder, RecyclerItem deletedItem, int deletedPos) {

                toastShort(" Deleted :" + deletedItem + "  Location :" + deletedPos);
            }
        });
        itemTouchHelper = new ItemTouchHelper(callBack);
        itemTouchHelper.attachToRecyclerView(recycler);
    }
}
Because I don't want to write duplicate code , Encapsulate the base class . Also set up a custom Decoration, If you are free later, you will write an article to introduce Decoration. Then there's the last line attachToRecyclerView, In this way, we can simply realize the first moving picture effect .
Of course , It's just a simple implementation , Later, we will introduce how to change magic to QQ Sideslip effect .
Communication email :[email protected]
Source code address :Github
版权声明
本文为[Senzhiqianshou]所创,转载请带上原文链接,感谢
https://yzsam.com/2022/04/202204231405037279.html
边栏推荐
猜你喜欢
Detailed tutorial on the use of smoke sensor (mq-2) (based on raspberry pie 3B +)
Cdh6 based on CM management 3.2 cluster integration atlas 2 one
Chapter I review of e-commerce spike products
微信小程序调用客服接口
visio安装报错 1:1935 2:{XXXXXXXX...

Wechat applet obtains login user information, openid and access_ token
使用DialogFragment的一些感受及防踩坑经验(getActivity、getDialog为空,cancelable无效等)
Kettle -- control parsing
基于CM管理的CDH6.3.2集群集成Atlas2.1.0
Postman的安装使用及填坑心得
随机推荐
关于Jmeter启动闪退问题
DeepinV20安装Mariadb
Detailed tutorial on the use of smoke sensor (mq-2) (based on raspberry pie 3B +)
RobotFramework 之 文件上传和下载
Wechat applet communicates with esp8266 based on UDP protocol
更改plsql工具栏的图标大小
Wechat applet positioning and ranging through low-power Bluetooth device (2)
RecyclerView高级使用(二)-垂直拖拽排序的简单实现
Logging module
Switch usage (wechat applet)
Understand the concepts of virtual base class, virtual function and pure virtual function (turn)
Multiple inheritance virtual base exercises
Mock测试
jsp学习1
关于NodeJS中JSON5的相关配置和使用
JDBC入门
Idea控制台乱码解决
Research on recyclerview details - Discussion and repair of recyclerview click dislocation
关于pthread多线程一些好文章
帆软实现分页时第一行和最后两行冻结方式