当前位置:网站首页>Use of node template engine
Use of node template engine
2022-04-23 20:28:00 【Different 213】
List of articles
template engine
1. The basic concept of template engine
1.2 art-template template engine
- Use... In command line tools
npm install art-templateCommand to download - Use
const template = require('art-template')Introduce template engine - Tell the template engine where the data and template to be spliced are :
const html = template(' Template path ', data );
The basic example code is as follows :
//  Import template engine
const template = require('art-template');
const {
     Agent } = require('http');
const path = require('path');

//  Splicing template path
const views = path.join(__dirname,'views','index.art')
// template Method is used to splice strings
// 1. Template path   Using absolute paths
// 2. Data to be displayed in the template   object type
//  Returns the concatenated string

const html = template(views, {

    name: ' Zhang San ',
    age:20
})
console.log(html);
2. Template engine Syntax
2.1 Template syntax
- art-template Supports both template syntax : Standard grammar and original grammar .
- Standard syntax makes templates easier to read and write , Primitive grammar has powerful logical processing ability .
2.2 Output
Output a piece of data in a template , The standard syntax and the original syntax are as follows :
-
Standard grammar :{ { data }}
-
Original grammar :<%= data %>
2.3 Original output
If the data carries HTML label , The default template engine does not parse tags , It will be escaped and output .
- Standard grammar :{ {@ data }}
- Original grammar :<%- data %>
2.4 conditional
In the template, you can decide which block to display according to the conditions HTML Code .
<!--  Standard syntax for conditional judgment  -->
{
   {if age > 18}}
     Older than 18
{
   {else if age < 15}}
     Age is less than 15
{
   {else}}
     Age does not meet the requirements
{
   {/if}}

<!--  The original grammar makes conditional judgment  -->
<% if (age > 18) { %>
     Older than 18
<% } else if (age < 15) { %>
     Age is less than 15
<% } else { %>
     Age does not meet the requirements
<% } %>
2.5 loop
-
Standard grammar :{ {each data }} { {/each}}
-
Original grammar :<% for() { %> <% } %>
<ul>
    {
     {each users}}
        <li>
            {
     {$value.name}}
            {
     {$value.age}}
            {
     {$value.sex}}
        </li>
    {
     {/each}}
</ul>

<ul>
    <% for(var i = 0;i<users.length; i++) {
        %>
        <li>
            <%= users[i].name%>
            <%= users[i].age%>
            <%= users[i].sex%>
        </li>
    <% }%>
</ul>
2.6 Sub template
Use the subtitle version to make the website public ( Head 、 Bottom ) Pull out into a separate file .
- Standard grammar :{ {include ‘ Templates ’}}
- Original grammar :<%include(’ Templates ‘) %>
{
   {include './common/header.art'}}
<div> {
   { msg }} </div>
{
   {include './common/footer.art'}}

<%include('./common/header.art') %>
<div> {
   { msg }} </div>
<%include('./common/footer.art')%>
2.7 Template inheritance
Using template inheritance, the website can be HTML Extract the skeleton into a separate file , Other page templates can inherit skeleton files .
The sample code is as follows :
This part is HTML Skeleton formwork part :
<!DOCTYPE html>
<html lang="en">

<head>
    <meta charset="UTF-8">
    <meta name="viewport" content="width=device-width, initial-scale=1.0">
    <title>HTML Skeleton template </title>
    {
   {block 'link'}} {
   {/block}}
</head>

<body>
    {
   {block 'content'}} {
   {/block}}
</body>

</html>
This part is the pit filling part :
{
   {extend './common/layout.art'}}
{
   {block 'content'}}
<p>{
   { msg }}</p>
{
   {/block}}

{
   {block 'link'}}
<link rel="stylesheet" href="./main.css">
{
   {/block}}
2.8 Template configuration
- Import variables into the template
template.defaults.imports. Variable name = A variable's value ; - Set the template root directory
template.defaults.root = The template directory; - Configure the default suffix of the template
template.defaults.extname = Suffix name
The sample code is as follows :
//  Import template engine
const template = require('art-template');
const path = require('path');
const dateformat = require('dateformat')

//  Set the root directory of the template
template.defaults.root = path.join(__dirname, 'views');

//  Import template variables
template.defaults.imports.dateformat = dateformat;

//  Configure the default suffix of the template
template.defaults.extname = '.html';

//  After setting the root directory of the template , Just fill in the file name to be rendered here : for example 06
const html = template('06.art', {

    time : new Date()
});
//  Rendering 07.html file , write in 07 The automatic query file name is 07.html The file of
console.log(template('07', {
    }))
console.log(html);
版权声明
本文为[Different 213]所创,转载请带上原文链接,感谢
https://yzsam.com/2022/04/202204210550451054.html
边栏推荐
- Rédaction de thèses 19: différences entre les thèses de conférence et les thèses périodiques
- 2022DASCTF Apr X FATE 防疫挑战赛 CRYPTO easy_real
- Customize timeline component styles
- Development of Matlab GUI bridge auxiliary Designer (functional introduction)
- Leetcode 1337. Row K with the weakest combat effectiveness in the matrix
- 2022dasctf APR x fat epidemic prevention challenge crypto easy_ real
- 论文写作 19: 会议论文与期刊论文的区别
- Change the material of unity model as a whole
- ABAQUS script email auto notification
- [latex] 5 how to quickly write out the latex formula corresponding to the formula
猜你喜欢
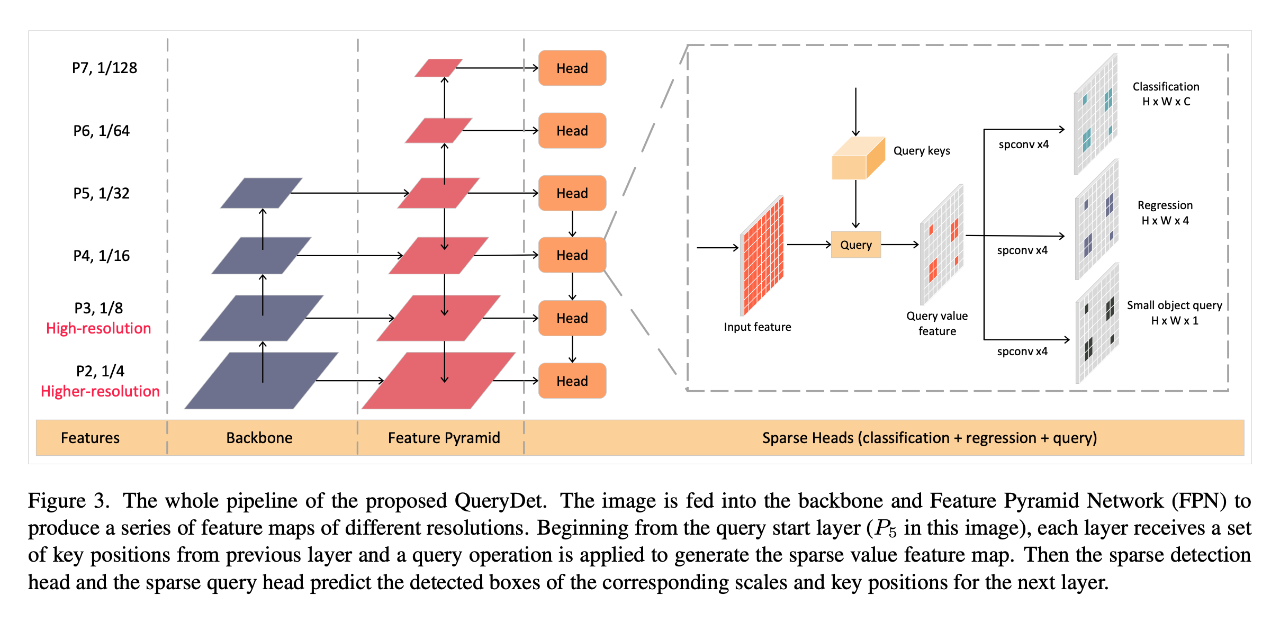
CVPR 2022 | querydet: use cascaded sparse query to accelerate small target detection under high resolution

Mysql database backup scheme

Leetcode 994, rotten orange
DNS cloud school | analysis of hidden tunnel attacks in the hidden corner of DNS
![[PTA] get rid of singles](/img/ab/b5d49f336cbfbede23b3377a9314ad.png)
[PTA] get rid of singles
Install MySQL 5.0 under Linux 64bit 6 - the root password cannot be modified
Browser - learning notes

内网渗透之DOS命令
ArcGIS JS version military landmark drawing (dovetail arrow, pincer arrow, assembly area) fan and other custom graphics

Some basic knowledge of devexpress report development
随机推荐
Identification of bolt points in aerial photography based on perception
Three. Based on ply format point cloud voxel model JS upload interface writing
三十.什么是vm和vc?
Operation of numpy array
2022 - Data Warehouse - [time dimension table] - year, week and holiday
内网渗透之DOS命令
上海回應“面粉官網是非法網站”:疏於運維被“黑”,警方已立案
內網滲透之DOS命令
Monte Carlo py solves the area problem! (save pupils Series)
Leetcode 1346. Check whether integers and their multiples exist
上海回应“面粉官网是非法网站”:疏于运维被“黑”,警方已立案
Alicloud: could not connect to SMTP host: SMTP 163.com, port: 25
SQL Server connectors by thread pool 𞓜 instructions for dtsqlservertp plug-in
Recognition of high-speed road signs by Matlab using alexnet
Confusion about thread blocking after calling the read () method of wrapper flow
Leetcode 232, queue with stack
ArcGIS JS version military landmark drawing (dovetail arrow, pincer arrow, assembly area) fan and other custom graphics
The market share of the financial industry exceeds 50%, and zdns has built a solid foundation for the financial technology network
Leetcode 74. Search two-dimensional matrix
Thirty What are VM and VC?