当前位置:网站首页>云原生 · 镜像详解
云原生 · 镜像详解
2022-08-11 10:54:00 【Code Writers】
- 镜像简介
Docker 镜像(Image)是用于创建 Docker 容器的模板。Docker 镜像相当于一个 root 文件系统,比如官方镜像 ubuntu:16.04 就包含了完整的一套 Ubuntu16.04 最小系统的 root 文件系统。在实际使用中,它包含运行某个软件所需的所有内容,我们把应用程序和配置依赖打包好形成一个可交付的运行环境(包括代码、运行时需要的库、环境变量和配置文件等),这个打包好的运行环境就是image镜像文件。
镜像仓库服务(Image Registry)包含多个镜像仓库(Image Repository),一个镜像仓库中可以包含多个镜像。
对于用户来说,镜像操作一般是指docker的客户端操作,包括镜像获取,创建,修改,运行,删除,搜索,查看等一系列操作。docker最重要的操作命令是docker build,docker pull和docker run。
- 获取镜像
Docker使用镜像仓库来集中存放Docker镜像,如同代码库一样,我们可以自建私有Registry和使用公用Registry。
通常在仓库中存放有多个镜像,而每个仓库可以包含多个标签(Tag),每个标签对应着一个镜像。我们可以通过<仓库名>:<标签>的格式来指定具体是哪个软件哪个版本的镜像,如果不给出标签,将以 Latest 作为默认标签。
通过docker pull命令可以从仓库下载镜像,其完整格式为:
docker pull [OPTIONS] NAME[:TAG]
OPTIONS:
-a:–all-tags=true|false: 是否获取仓库中的所有镜像,默认为否
–disable-content-trust:忽略镜像的校验,默认开启
NAME:镜像仓库名(用来区分镜像)
TAG:镜像标签(通常表示软件版本信息)
对于Docker镜像来说, 如果不显式指定TAG, 则默认会选择latest标签,此时会下载仓库中最新版本的镜像。
一般来说, 镜像的latest 标签意味着该镜像的内容会跟踪最新版本的变更而变化, 内容是不稳定的。因此,如果需要从稳定性上考虑,则不要在生产环境中忽略镜像的TAG使用默认的latest 来标记镜像。
可以直接从官方Docker Hub 镜像源来下载镜像,例如:
$ docker pull ubuntu:16.04
16.04: Pulling from library/ubuntu
58690f9b18fc: Pull complete
b51569e7c507: Pull complete
da8ef40b9eca: Pull complete
fb15d46c38dc: Pull complete
Digest: sha256:0f71fa8d4d2d4292c3c617fda2b36f6dabe5c8b6e34c3dc5b0d17d4e704bd39c
Status: Downloaded newer image for ubuntu:16.04
docker.io/library/ubuntu:16.04
1
2
3
4
5
6
7
8
9
如果从非官方的仓库下载,则需要在仓库名称前指定完整的仓库地址,例如:
$ docker pull hub.c.163.com/public/ubuntu:16.04
1
另外,有时需要使用镜像代理服务来加速Docker 镜像获取 过程 ,在前面《Docker安装及加速》一文中已经讲述。
- 查看镜像信息
使用docker images或docker image ls命令可以列出本地主机上已有镜像的基本信息。
$ docker image ls
REPOSITORY TAG IMAGE ID CREATED SIZE
ubuntu 18.04 5a214d77f5d7 10 months ago 63.1MB
hello-world latest feb5d9fea6a5 10 months ago 13.3kB
ubuntu 16.04 b6f507652425 11 months ago 135MB
1
2
3
4
5
参数说明:
REPOSITORY:镜像仓库,比如ubuntu表示ubuntu系列的基础镜像;
TAG:镜像标签,比如 18.04是以ubuntu版本号作为了镜像标签;
IMAGE ID:镜像ID,每个镜像的ID事唯一的,如果两个镜像的ID相同,说明它们实际上指向了同一个镜像,只是具有不同标签名称而已;
CREATED:创建时间,显示的是镜像最后更新时间;
SIZE:镜像大小。
使用docker inspect命令获取镜像的详细信息,其中,包括创建者,各层的数字摘要等,其格式为:
docker inspect [IMAGE_NAME|ID
例如:
$ docker inspect ubuntu:18.04
[
{
“Id”: “sha256:5a214d77f5d747e6ed81632310baa6190301feeb875cf6bf9da560108fa09972”,
“RepoTags”: [
“ubuntu:18.04”
],
“RepoDigests”: [
“[email protected]:0fedbd5bd9fb72089c7bbca476949e10593cebed9b1fb9edf5b79dbbacddd7d6”
],
“Parent”: “”,
“Comment”: “”,
“Created”: “2021-10-01T02:23:24.179667784Z”,
“Container”: “20d614d2eca1b5a9ad6d5a56a80efce44096b87ca76a98256eb51f8dbaf7a8d2”,
“ContainerConfig”: {
“Hostname”: “20d614d2eca1”,
…
1
2
3
4
5
6
7
8
9
10
11
12
13
14
15
16
17
- 搜索镜像
使用 docker search 命令可以搜索Docker Hub 官方仓库中的镜像,显示信息包括镜像名字、描述、收藏数、是否官方创建、是否自动创建等,命令格式为:
docker search [option] keyword
option选项主要包括:
-f,–filter filter: 过滤输出内容;
–format string: 格式化输出内容;
–limit int:限制输出结果个数, 默认为 25 个;
–automated :只列出 automated build类型的镜像;
–no-trunc :显示完整的镜像描述.
例如从官方库中搜索mysql相关镜像:
$ docker search -f stars=10 mysql
NAME DESCRIPTION STARS OFFICIAL AUTOMATED
mysql MySQL is a widely used, open-source relation… 12976 [OK]
mariadb MariaDB Server is a high performing open sou… 4972 [OK]
phpmyadmin phpMyAdmin - A web interface for MySQL and M… 594 [OK]
percona Percona Server is a fork of the MySQL relati… 583 [OK]
bitnami/mysql Bitnami MySQL Docker Image 72 [OK]
linuxserver/mysql-workbench 40
ubuntu/mysql MySQL open source fast, stable, multi-thread… 36
linuxserver/mysql A Mysql container, brought to you by LinuxSe… 36
circleci/mysql MySQL is a widely used, open-source relation… 26
google/mysql MySQL server for Google Compute Engine 21 [OK]
rapidfort/mysql RapidFort optimized, hardened image for MySQL 13
1
2
3
4
5
6
7
8
9
10
11
12
13
参数说明:
NAME: 镜像仓库源的名称
DESCRIPTION: 镜像的描述
OFFICIAL: 是否 docker 官方发布
stars: 类似 Github 里面的 star,表示点赞、喜欢的意思。
AUTOMATED: 自动构建。
- 创建镜像
镜像的来源有两种,其一是从镜像库下载镜像,其二是我们创建一个新的镜像。创建镜像也分为两种,其一是基于已有镜像创建,其二是使用 Dockerfile 来创建一个新的镜像。
5.1 基于已有镜像创建
首先,我们需要使用镜像来创建一个容器,以运行目标镜像,并在容器内创建一个测试文件test.txt。在完成操作之后,输入 exit 命令来退出这个容器。
$ docker run -t -i ubuntu:18.04 /bin/bash
[email protected]:/# touch test.txt
[email protected]:/# exit
1
2
3
此时 ID 为 49152c044299 的容器,就是我们完成更改的容器,可以通过命令 docker commit 来提交容器副本。
$ docker container commit -m “add test.txt” -a “testdocker” 49152c044299 testdocker/ubuntu:test
sha256:9c44392a137352f2b22acbe322543eb6f30970b9bd2edf9145d19c28d5fe21fc
1
2
参数说明:
-m: 提交的描述信息
-a: 指定镜像作者
49152c044299:容器 ID
testdocker/ubuntu:test : 指定要创建的目标镜像名
我们可以使用 docker image ls命令来查看我们的新镜像 testdocker/ubuntu:test:
$ docker image ls
REPOSITORY TAG IMAGE ID CREATED SIZE
testdocker/ubuntu test 9c44392a1373 19 seconds ago 63.1MB
ubuntu 18.04 5a214d77f5d7 10 months ago 63.1MB
hello-world latest feb5d9fea6a5 10 months ago 13.3kB
ubuntu 16.04 b6f507652425 11 months ago 135MB
1
2
3
4
5
6
5.2 使用Dockerfile 新建镜像
使用命令 docker build 可以从零开始创建一个新的镜像。为此,我们需要创建一个 Dockerfile 文件,其中包含一组指令来告诉 Docker 如何构建镜像。
首先使用vim编写一个Dockerfile文件:
FROM ubuntu:18.04
MAINTAINER test [email protected]
WORKDIR /home
RUN touch testImage.txt
EXPOSE 80
1
2
3
4
5
6
内部指令:
FROM:指定使用哪个镜像源
RUN :告诉docker 在镜像内执行什么命令
然后,使用 Dockerfile 文件,通过 docker build 命令来构建一个镜像:
$ docker build -t testimage/ubuntu:testimage1 .
Sending build context to Docker daemon 2.048kB
Step 1/5 : FROM ubuntu:18.04
—> 5a214d77f5d7
Step 2/5 : MAINTAINER test [email protected]
—> Running in 92f0afdaf3bf
Removing intermediate container 92f0afdaf3bf
—> 88d4b9bc0c0e
Step 3/5 : WORKDIR /home
—> Running in ec9fd2b1cbcc
Removing intermediate container ec9fd2b1cbcc
—> 6a91a52c5589
Step 4/5 : RUN touch testImage.txt
—> Running in d60d6a8de1db
Removing intermediate container d60d6a8de1db
—> 1a7c4f1cd570
Step 5/5 : EXPOSE 80
—> Running in 7c2922e1bb55
Removing intermediate container 7c2922e1bb55
—> f3fdbec0b0f9
Successfully built f3fdbec0b0f9
Successfully tagged testimage/ubuntu:testimage1
1
2
3
4
5
6
7
8
9
10
11
12
13
14
15
16
17
18
19
20
21
22
参数说明:
-t :指定要创建的目标镜像名
. :Dockerfile 文件所在目录,可以指定Dockerfile 的绝对路径
使用docker images 查看创建的镜像已经在列表中存在,镜像ID为f3fdbec0b0f9:
$ docker image ls
REPOSITORY TAG IMAGE ID CREATED SIZE
testimage/ubuntu testimage1 f3fdbec0b0f9 38 seconds ago 63.1MB
testdocker/ubuntu test 9c44392a1373 45 minutes ago 63.1MB
ubuntu 18.04 5a214d77f5d7 10 months ago 63.1MB
hello-world latest feb5d9fea6a5 10 months ago 13.3kB
ubuntu 16.04 b6f507652425 11 months ago 135MB
1
2
3
4
5
6
7
运行新的镜像,可以看到/home目录下已经创建了测试文件testImage.txt:
$ docker run -t -i testimage/ubuntu:testimage1 /bin/bash
[email protected]:/home# ls
testImage.txt
1
2
3
- 删除镜像
当我们不再需要某个镜像的时候,可以通过 docker image rm 或者docker rmi 命令从 Docker 主机删除该镜像。其格式为:
docker rmi [image]
docker image rm [image]
删除操作会在当前主机上删除该镜像以及相关的镜像层。这意味着无法通过 docker image ls 命令看到删除后的镜像,并且对应的包含镜像层数据的目录会被删除。但是,如果某个镜像层被多个镜像共享,那只有当全部依赖该镜像层的镜像都被删除后,该镜像层才会被删除。
例如,删除掉前面创建的测试镜像testimage/ubuntu:testimage1:
$ docker rmi testimage/ubuntu:testimage1
Untagged: testimage/ubuntu:testimage1
Deleted: sha256:f3fdbec0b0f96a8f3bb2e6a4b07ba04dc45b9c59618c2b376ebea7b68ed53971
Deleted: sha256:1a7c4f1cd57038116b7a5eff05a323fc244a135741c2fd69ad89f21569f00afb
Deleted: sha256:22997b7cad7e4294d4eb9b02bc475e2bcc94c2dd168b8a8499adb02cfc4cb573
Deleted: sha256:6a91a52c5589c29f6439bf6c7def37942037a5346a2fd8520f3d8a1fc3d49ccb
Deleted: sha256:88d4b9bc0c0ee678efad3b8192d3c0cf017dfae142dbc7e87af4fecaafb4f847
1
2
3
4
5
6
7
删除完成后,docker image ls查看一下当前镜像列表,可以看到testimage/ubuntu:testimage1已不在列表内:
$ docker image ls
REPOSITORY TAG IMAGE ID CREATED SIZE
testdocker/ubuntu test 9c44392a1373 About an hour ago 63.1MB
ubuntu 18.04 5a214d77f5d7 10 months ago 63.1MB
hello-world latest feb5d9fea6a5 10 months ago 13.3kB
ubuntu 16.04 b6f507652425 11 months ago 135MB
1
2
3
4
5
6
如果被删除的镜像上存在运行状态的容器,那么删除操作不会被允许。再次执行删除镜像命令之前,需要停止并删除该镜像相关的全部容器。例如删除时遇到如下错误:
$ docker rmi testimage/ubuntu:testimage1
Error response from daemon: conflict: unable to remove repository reference “testimage/ubuntu:testimage1” (must force) - container 952d273dc630 is using its referenced image f3fdbec0b0f9
1
2
可以先使用docker ps -a查看依赖的容器id,然后docker rm [容器ID]删除容器后,最后执行docker rmi [镜像名]来删除镜像。
边栏推荐
- 深度解析佛萨奇,Forsage魔豹联盟系统开发方案(源码部署)
- BAT "exclusive" Internet giant Android senior engineer interview questions: 174 questions allow you to do the interview
- a-upload上传图片
- 1. 类与对象——什么是对象
- 人是怎么废掉的?人是怎么变强的?
- Six functions of enterprise exhibition hall production
- fetch请求设置请求头错误导致无法跨域
- 全新FIDE 编译简单评测
- 阿里二面:JVM调优你会吗?
- 不可思议,全靠这份Android面试题,斩获多家互联网大厂offer
猜你喜欢
Database indexes and their underlying data structures
『独家』互联网 BAT 大厂 Android高级工程师面试题:174道题目让你做到面试无忧
【中央任务调度系统—通信开发】
C语言手写魂斗罗(一)
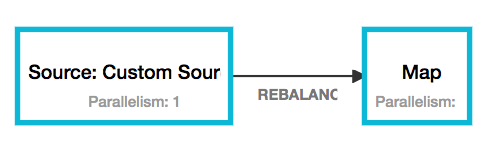
分析 Flink 任务如何超过 YARN 容器内存限制
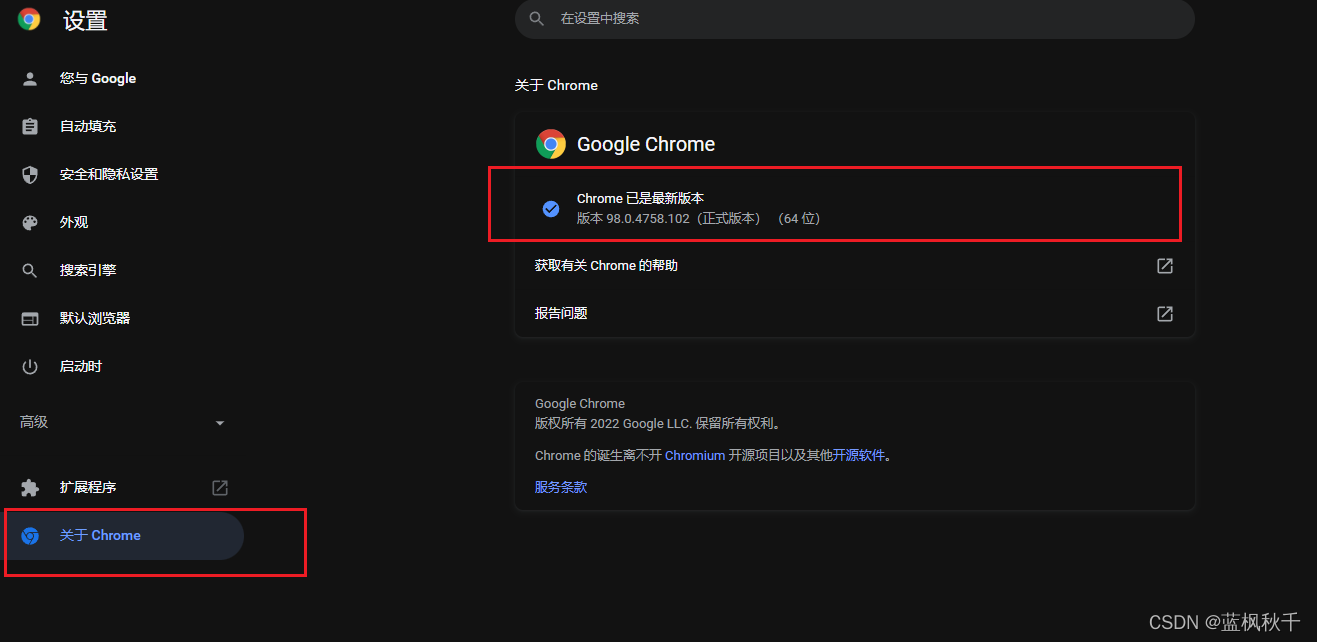
chrome设置为深色模式(包括整个网页)
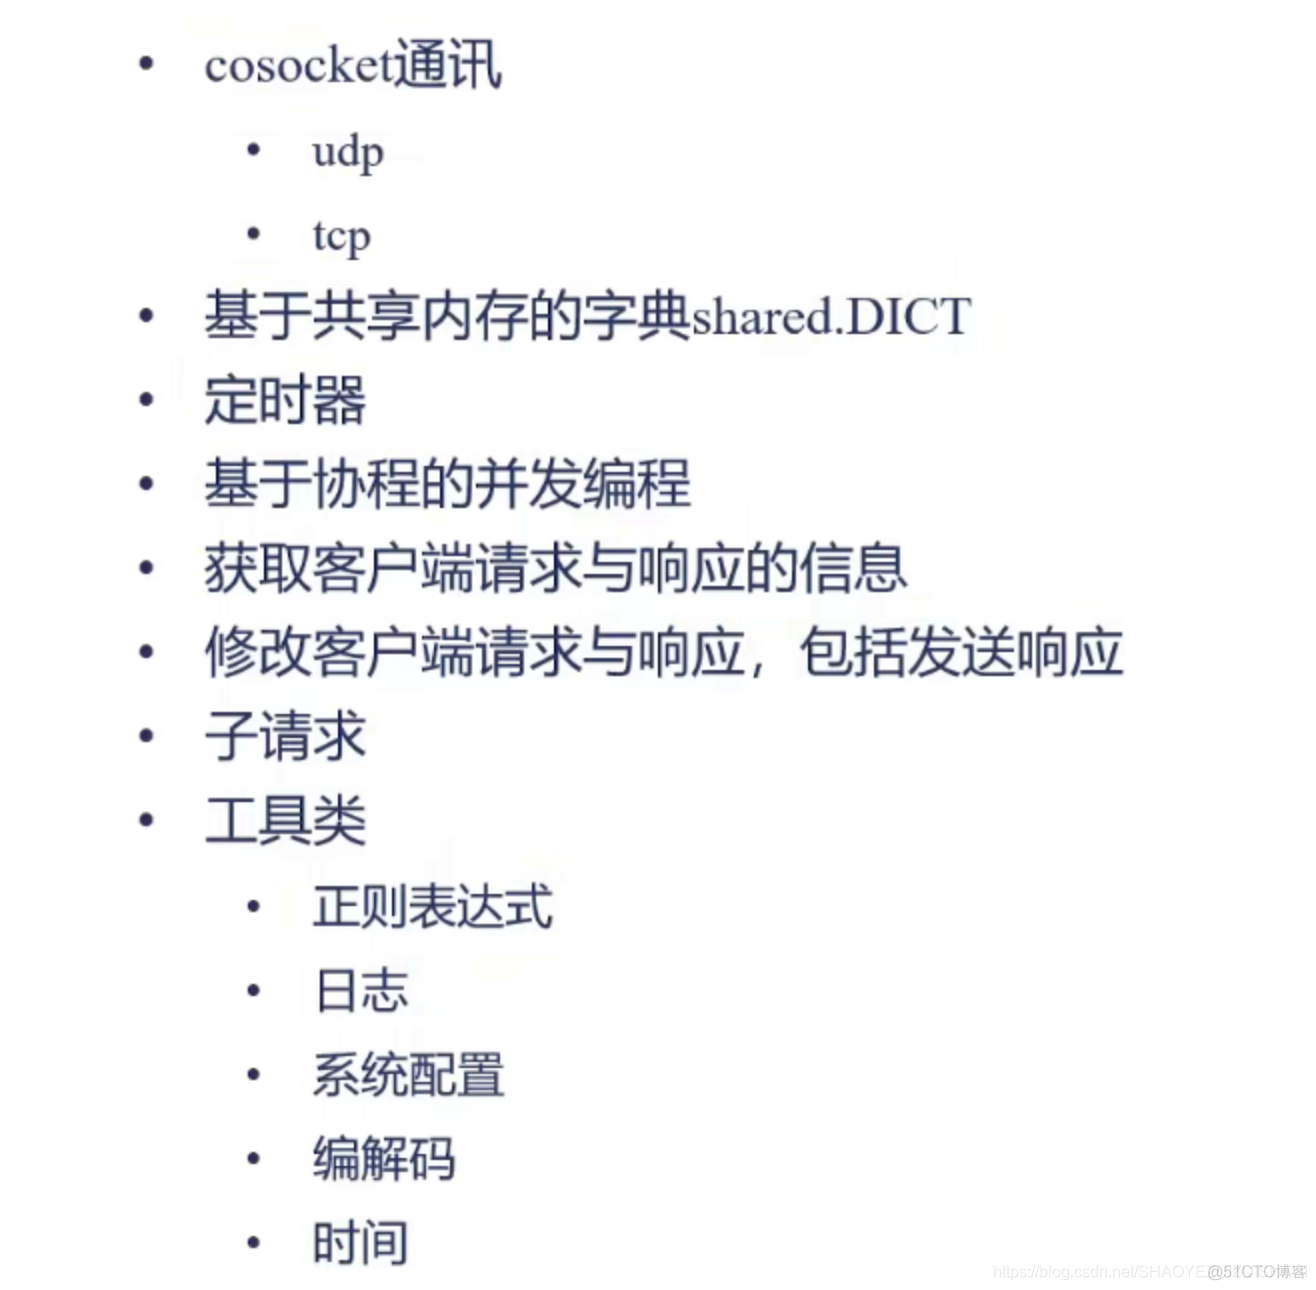
openresty概述及Lua语言的嵌入
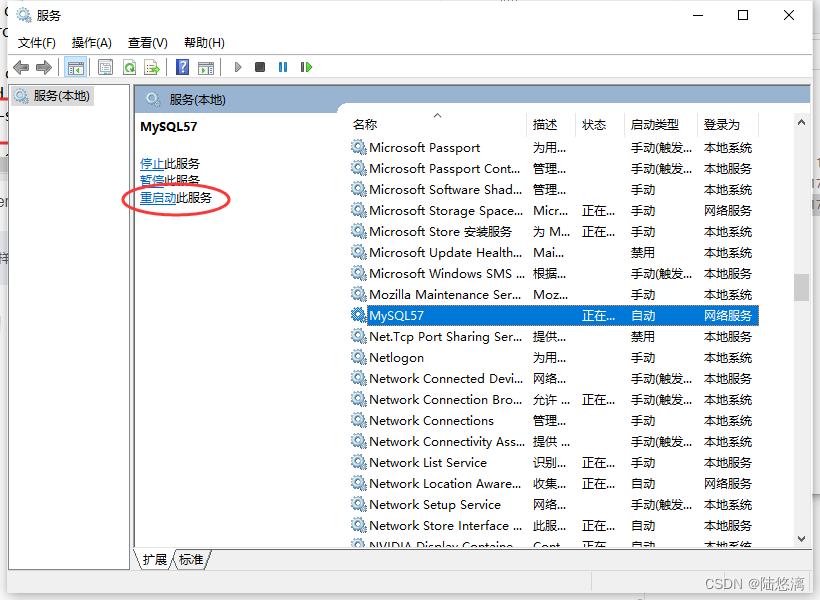
2.MySQL ---- 修改数据库的字符集(日常小技巧)
小目标绝技 | 用最简单的方式完成Yolov5的小目标检测升级!

I got the P8 "top" distributed architecture manual that went viral on Ali's intranet
随机推荐
27岁了,目前从事软件测试,听些老一辈的人说测试前途是IT里最差的,是这样吗?
打印时间的各种格式
力扣打卡----打家劫舍
SDUT数据库 SQL语句练习(MySQL)
【2022】【论文笔记】基于激光直写氧化石墨烯纸的超薄THz偏转——
MySQL表sql语句增删查改_查询
Incredible, thanks to this Android interview question, I have won offers from many Internet companies
Are there any foreign application cases for domestic databases?
安装nodejs
杰理AC632N蓝牙芯片iokey使用解析(通用MCU版)
【Daily Question】640. Solving Equations
rem如何使用
a-upload上传图片去掉预览icon
【Mask2Former】 解决代码中一些问题
爆料!前华为微服务专家纯手打500页落地架构实战笔记,已开源
如何给女朋友解释什么是缓存穿透、缓存击穿、缓存雪崩?
chrome无痕浏览模式中使用插件
使用.NET简单实现一个Redis的高性能克隆版(七-完结)
放苹果
突破次元壁垒,让身边的玩偶手办在屏幕上动起来!