当前位置:网站首页>如何利用qemu搭建SOC protoype:80行代码实现一个Cortex M4 模拟器
如何利用qemu搭建SOC protoype:80行代码实现一个Cortex M4 模拟器
2022-04-23 06:13:00 【MyeDy】
随着国内芯片公司越来越多,越来越多的底层程序员需要在pre silicon阶段就要开发代码。而在pre silicon阶段测试方式有多种:
| 方式 | 优点 | 缺点 |
|---|---|---|
| RTL simulation | 可以验证最准确的硬件行为,可以测试SOC相关代码 | 仿真速度非常慢,且rtl freeze之前硬件有bug |
| FPGA/ZEBU emulation | 可以验证部分硬件行为,速度相对RTL simulation快 | 价格昂贵,难以布署大量测试,且有些硬件没法仿真 |
| 软件模拟器,如QEMU | 速度最快,可以布署大量测试 | 没有现成的模拟器对应正在开发的SOC |
很明显软件模拟器的优点缺点显而易见,如果开发人员可以在芯片开发前期定制出一个软件模拟器对应SOC 原型,那么可以大大提高pre silicon的效率。本文以一个小demo来演示如何在qemu源码基础上搭建一个最简单的Cortex M4的SOC。 这里就不讲如何编译qemu-system-arm了,网上有很多教程教学如何编译qemu-system-arm。后文简称该SOC为MY_SOC
1. MY_SOC Memory Map
Cortex M自带的system peripheral的地址这里就不列出来了,比如systick,nvic这些都是arm规定的,没法改,也没必要改。这里定义了最简单三个外设。一段FLASH用来跑代码,一段SRAM用来存数据,一个UART来打印。
| 起始地址 | 结束地址 | |
|---|---|---|
| FLASH(定义了一段4M 的FLASH) | 0x00000000 | 0x003FFFFF |
| SRAM(定义了一段16M的SRAM) | 0x20000000 | 0x20FFFFFF |
| UART0(使用ARM PL011 IP) | 0x40000000 | 0x40000FFF |
2. MY_SOC 源码
将my_soc.c 放在qemu/hw/arm目录下并且加入arm的makefile编译即可。先贴出全部代码再逐行解释。加上头文件include和宏定义一共77行代码,可见利用qemu能够很方便地搭出一个SOC模拟器原型。
#include "qemu/osdep.h"
  2 #include "qapi/error.h"
  3 #include "hw/arm/boot.h"
  4 #include "hw/boards.h"
  5 #include "qemu/log.h"
  6 #include "exec/address-spaces.h"
  7 #include "sysemu/sysemu.h"
  8 #include "hw/arm/armv7m.h"
  9 #include "hw/char/pl011.h"
 10 #include "hw/irq.h"
 11 #include "cpu.h"
 12
 13 #define MY_SOC_FLASH_START  (0x0)
 14 #define MY_SOC_FLASH_SIZE   (4 * 1024 * 1024) //< 4M
 15
 16 #define MY_SOC_SRAM_START    (0x20000000)
 17 #define MY_SOC_SRAM_SIZE     (16 * 1024 * 1024) //<16M
 18
 19 #define PL011_UART0_START   (0x40000000)
 20 #define PL011_UART0_IRQn    (0)
 21
 22 #define NUM_IRQ_LINES 64
 23
 24 static void mysoc_init(MachineState *ms)
 25 {

 26     DeviceState *nvic;
 27
 28     MemoryRegion *sram = g_new(MemoryRegion, 1);
 29     MemoryRegion *flash = g_new(MemoryRegion, 1);
 30     MemoryRegion *system_memory = get_system_memory();
 31
 32     /* Flash programming is done via the SCU, so pretend it is ROM. */
 33     memory_region_init_ram(flash, NULL, "mysoc.flash", MY_SOC_FLASH_SIZE, &error_fatal);
 34     memory_region_set_readonly(flash, true);
 35     memory_region_add_subregion(system_memory, MY_SOC_FLASH_START, flash);
 36
 37     memory_region_init_ram(sram, NULL, "mysoc.sram", MY_SOC_SRAM_SIZE, &error_fatal);
 38     memory_region_add_subregion(system_memory, MY_SOC_SRAM_START, sram);
 39
 40     nvic = qdev_create(NULL, TYPE_ARMV7M);
 41     qdev_prop_set_uint32(nvic, "num-irq", NUM_IRQ_LINES);
 42     qdev_prop_set_string(nvic, "cpu-type", ms->cpu_type);
 43     qdev_prop_set_bit(nvic, "enable-bitband", true);
 44     object_property_set_link(OBJECT(nvic), OBJECT(get_system_memory()), "memory", &error_abort);
 45
 46     /* This will exit with an error if the user passed us a bad cpu_type */
 47     qdev_init_nofail(nvic);
 48
 49     pl011_luminary_create(PL011_UART0_START , qdev_get_gpio_in(nvic, PL011_UART0_IRQn), serial_hd(0));
 50     armv7m_load_kernel(ARM_CPU(first_cpu), ms->kernel_filename, MY_SOC_FLASH_SIZE);
 51 }
 52
 53
 54 static void mysoc_class_init(ObjectClass *oc, void *data)
 55 {

 56     MachineClass *mc = MACHINE_CLASS(oc);
 57     printf("%s entry\n", __func__);
 58
 59     mc->desc = "My SOC Cortex M4";
 60     mc->init = mysoc_init;
 61     mc->ignore_memory_transaction_failures = true;
 62     mc->default_cpu_type = ARM_CPU_TYPE_NAME("cortex-m4");
 63 }
 64
 65 static const TypeInfo mysoc_type = {

 66     .name = MACHINE_TYPE_NAME("mysoc_evb"),
 67     .parent = TYPE_MACHINE,
 68     .class_init = mysoc_class_init,
 69 };
 70
 71 static void mysoc_evb_init(void)
 72 {

 73     type_register_static(&mysoc_type);
 74 }
 75
 76 type_init(mysoc_evb_init)
 77
代码很简单,从下往上看。这里定义了一块板子叫mysoc_evb,通过type_init宏上报给qemu,之后qemu在启动地时候就能自动地调用mysoc_init初始化soc外设。
这里定义了描述字符串为My SOC Cortex M4,cpu类型是cortex-m4,板子名字是mysoc_evb。当这些结构体初始化完后,运行qemu-system-arm -machine help 就会出现我们自己地设备。

 54 static void mysoc_class_init(ObjectClass *oc, void *data)
 55 {

 56     MachineClass *mc = MACHINE_CLASS(oc);
 57     printf("%s entry\n", __func__);
 58
 59     mc->desc = "My SOC Cortex M4";
 60     mc->init = mysoc_init;
 61     mc->ignore_memory_transaction_failures = true;
 62     mc->default_cpu_type = ARM_CPU_TYPE_NAME("cortex-m4");
 63 }
 64
 65 static const TypeInfo mysoc_type = {

 66     .name = MACHINE_TYPE_NAME("mysoc_evb"),
 67     .parent = TYPE_MACHINE,
 68     .class_init = mysoc_class_init,
 69 };
 70
 71 static void mysoc_evb_init(void)
 72 {

 73     type_register_static(&mysoc_type);
 74 }
 75
 76 type_init(mysoc_evb_init)
所以最关键地函数就是mysoc_init这个函数,这个函数里做的事情非常简单,就是调用qemu的API创建相应的memory map以及设备就可以了。
- 创建4M flash并设置为只读,定义了一个默认的加载文件mysoc.flash。如果mysoc.flash存在。那么qemu就会把该文件的数据读到这段flash中
 33     memory_region_init_ram(flash, NULL, "mysoc.flash", MY_SOC_FLASH_SIZE, &error_fatal);
 34     memory_region_set_readonly(flash, true);
 35     memory_region_add_subregion(system_memory, MY_SOC_FLASH_START, flash);
- 创建一段16M的SRAM, 并定义默认文件mysoc.sram
 37     memory_region_init_ram(sram, NULL, "mysoc.sram", MY_SOC_SRAM_SIZE, &error_fatal);
 38     memory_region_add_subregion(system_memory, MY_SOC_SRAM_START, sram);
- 配置NVIC, 设置64个外部中断槽,使能bitband。
 40     nvic = qdev_create(NULL, TYPE_ARMV7M);
 41     qdev_prop_set_uint32(nvic, "num-irq", NUM_IRQ_LINES);
 42     qdev_prop_set_string(nvic, "cpu-type", ms->cpu_type);
 43     qdev_prop_set_bit(nvic, "enable-bitband", true);
 44     object_property_set_link(OBJECT(nvic), OBJECT(get_system_memory()), "memory", &error_abort);
- 添加一个PL011 UART,地址为0x40000000, 中断号为0。
49 pl011_luminary_create(PL011_UART0_START , qdev_get_gpio_in(nvic, PL011_UART0_IRQn), serial_hd(0));
- 设置kernel加载到flash中
50 armv7m_load_kernel(ARM_CPU(first_cpu), ms->kernel_filename, MY_SOC_FLASH_SIZE);
至此MY_SOC就配置完了。我们写一段测试代码来测试这个模拟器能不能运行。
3. 测试代码
链接文件,把代码段放在FLASH中,data,bss段放在SRAM中
MEMORY
{

    FLASH (rx) : ORIGIN = 0x00000000, LENGTH = 4M
    SRAM (rwx) : ORIGIN = 0x20000000, LENGTH = 16M
}

SECTIONS
{

    .text :
    {

        _text = .;
        KEEP(*(.isr_vector))
        *(.text*)
        *(.rodata*)
        _etext = .;
    } > FLASH

    /DISCARD/ :
    {

        *(.ARM.exidx*)
        *(.gnu.linkonce.armexidx.*)
    }

    .data : AT(ADDR(.text) + SIZEOF(.text))
    {

        _data = .;
        *(vtable)
        *(.data*)
        _edata = .;
    } > SRAM

    .bss :
    {

        _bss = .;
        *(.bss*)
        *(COMMON)
        _ebss = .;
    } > SRAM

    . = ALIGN(32);           /*Not sure if this needs to be done, but why not.*/
    _stack_bottom = .;       /*Address of the bottom of the stack.*/
    . = . + 0x4000;          /*Allocate 4K for the Stack.*/
    _stack_top = 0x20008000;  /*Address of the top of the heap, also end of RAM.*/
}
startup.c 定义了栈指针和函数入口main
__attribute__ ((section(".isr_vector")))void (*g_pfnVectors[])(void) =
{

    0x20008000,                                      // StackPtr, set in RestetISR
    main,                               // The reset handler
    NmiSR,                                  // The NMI handl
main函数里就是往UART0里输出了Hello My SOC
#include <stdint.h>

static volatile uint32_t * const UART0_DR = (uint32_t *)0x40000000;

void puts(char *str)
{

    while(*str != 0) {

        *UART0_DR = *str;
        str++;
    }
}

int main()
{


    puts("Hello My SOC\n");
    while(1);
    return 0;
}
编译运行看结果

4 创建自己的IP
qemu/hw下面已经内置了许多可用的外设IP,如果有就可以简单地直接在像搭积木一样地配置一下就行。但如果在SOC开发中加入了一些自研的IP, 而此时在hw下面并没有,这个时候就需要自己加入IP的模拟器代码。本小节以一个最简单的读写寄存器来示范如何在qemu模拟器中加入自己的IP。
4.1 memory map
| register | offset | reset_value | R/W |
|---|---|---|---|
| ID0 | 0x0 | 0x54 (T) | RO |
| ID1 | 0x4 | 0045 (E) | RO |
| ID2 | 0x8 | 0x53 (S) | RO |
| ID3 | 0xc | 0x54 (T) | RO |
| ID4 | 0x10 | 0x20 (Space) | RO |
| ID5 | 0x14 | 0x40 (I) | RO |
| ID6 | 0x18 | 0x50 § | RO |
| Test Reg | 0x1c | 0 | RO |
寄存器功能很简单,前面7个是只读ID寄存器,最后一个是可读写的寄存器,没什么实际作用,就是demo用。没有中断产生。
4.2 my_test_ip源码
 25 #define MY_TEST_IP_START    (0x40001000)
 26
 27 #define NUM_IRQ_LINES 64
 28
 29 typedef struct {

 30     SysBusDevice parent_obj;
 31
 32     qemu_irq irq;
 33     MemoryRegion iomem;
 34     uint32_t id0;       //T
 35     uint32_t id1;       //E
 36     uint32_t id2;       //S
 37     uint32_t id3;       //T
 38     uint32_t id4;       //
 39     uint32_t id5;       //I
 40     uint32_t id6;       //P
 41     uint32_t test_reg;
 42 } my_test_ip_state;
106 #define TEST_IP(obj) \
107     OBJECT_CHECK(my_test_ip_state, (obj), TYPE_TEST_IP)
108
109
110 static const VMStateDescription my_test_ip_vm = {

111     .name = "my_test_ip",
112     .version_id = 1,
113     .minimum_version_id = 1,
114     .fields = (VMStateField[]) {

115         VMSTATE_UINT32(id0, my_test_ip_state),
116         VMSTATE_UINT32(id1, my_test_ip_state),
117         VMSTATE_UINT32(id2, my_test_ip_state),
118         VMSTATE_UINT32(id3, my_test_ip_state),
119         VMSTATE_UINT32(id4, my_test_ip_state),
120         VMSTATE_UINT32(id5, my_test_ip_state),
121         VMSTATE_UINT32(id6, my_test_ip_state),
122         VMSTATE_UINT32(test_reg, my_test_ip_state),
123         VMSTATE_END_OF_LIST()
124     }
125 };
126
127 static uint64_t my_test_ip_read(void *opaque, hwaddr offset,
128                                    unsigned size)
129 {

130     uint64_t ret = 0;
131     my_test_ip_state *s = (my_test_ip_state *)opaque;
132     printf("%s hwaddr:%lx, size:%x\n", __func__, offset, size);
133     switch (offset) {

134     case 0x0:
135         ret = s->id0;
136         break;
137     case 0x4:
138         ret = s->id1;
139         break;
140     case 0x8:
141         ret = s->id2;
142         break;
143     case 0xc:
144         ret = s->id3;
145         break;
146     case 0x10:
147         ret = s->id4;
148         break;
149     case 0x14:
150         ret = s->id5;
151         break;
152     case 0x18:
153         ret = s->id6;
154         break;
155     case 0x1c:
156         ret = s->test_reg;
157         break;
158     }
159     return ret;
160 }
161
162 static void my_test_ip_write(void *opaque, hwaddr offset,
163                                 uint64_t value, unsigned size)
164 {

165
166     my_test_ip_state *s = (my_test_ip_state *)opaque;
167     printf("%s hwaddr:%lx, size:%x, value:%lx\n", __func__, offset, size, value);
168     switch(offset){

169     case 0x0:
170     case 0x4:
171     case 0x8:
172     case 0xc:
173     case 0x10:
174     case 0x14:
175     case 0x18:
176         printf("%s: cannot write the read only register\n", __func__);
177         break;
178     case 0x1c:
179         s->test_reg = value;
180         break;
181     }
182 }
183
184 static const MemoryRegionOps my_test_ip_ops = {

185     .read = my_test_ip_read,
186     .write = my_test_ip_write,
187     .endianness = DEVICE_NATIVE_ENDIAN,
188 };
189
190 static void my_test_ip_init(Object *obj)
191 {

192     printf("%s \n", __func__);
193
194     my_test_ip_state *s = TEST_IP(obj);
195
196     memory_region_init_io(&s->iomem, obj, &my_test_ip_ops, s, TYPE_TEST_IP, 0x1000);
197     sysbus_init_mmio(SYS_BUS_DEVICE(obj), &s->iomem);
198
199     s->id0 = 0x54;
200     s->id1 = 0x45;
201     s->id2 = 0x53;
202     s->id3 = 0x54;
203     s->id4 = 0x20;
204     s->id5 = 0x49;
205     s->id6 = 0x50;
206     s->test_reg = 0;
207 }
208
209 static void my_test_ip_class_init(ObjectClass *klass, void *data)
210 {

211     printf("%s \n", __func__);
212     DeviceClass *dc = DEVICE_CLASS(klass);
213     dc->vmsd = &my_test_ip_vm;
214 }
215
216 static const TypeInfo my_test_ip = {

217     .name          = TYPE_TEST_IP,
218     .parent        = TYPE_SYS_BUS_DEVICE,
219     .instance_size = sizeof(my_test_ip_state),
220     .instance_init = my_test_ip_init,
221     .class_init    = my_test_ip_class_init,
222 };
223
224 static void my_test_ip_types(void)
225 {

226     printf("%s \n", __func__);
227     type_register_static(&my_test_ip);
228 }
229
230 type_init(my_test_ip_types)
4.3 测试代码
#define MY_TEST_IP_START 0x40001000
typedef struct my_ip_tag {

    volatile uint32_t id0;
    volatile uint32_t id1;
    volatile uint32_t id2;
    volatile uint32_t id3;
    volatile uint32_t id4;
    volatile uint32_t id5;
    volatile uint32_t id6;
    volatile uint32_t test_reg;
} my_test_ip_t;

void my_test_ip_sample()
{

    my_test_ip_t *ip = (my_test_ip_t *)MY_TEST_IP_START;
    char id[8];
    id[0] = (char) ip->id0;
    id[1] = (char) ip->id1;
    id[2] = (char) ip->id2;
    id[3] = (char) ip->id3;
    id[4] = (char) ip->id4;
    id[5] = (char) ip->id5;
    id[6] = (char) ip->id6;
    id[7] = 0;

    puts(id);
    puts("\n");

    ip->test_reg = 0x00414141;
    id [0] = ip->test_reg & 0xff;
    id [1] = (ip->test_reg & 0xff00) >> 8;
    id [2] = (ip->test_reg & 0xff0000) >> 16;
    id [3] = (ip->test_reg & 0xff000000) >> 24;
    puts(id);
    puts("\n");
}
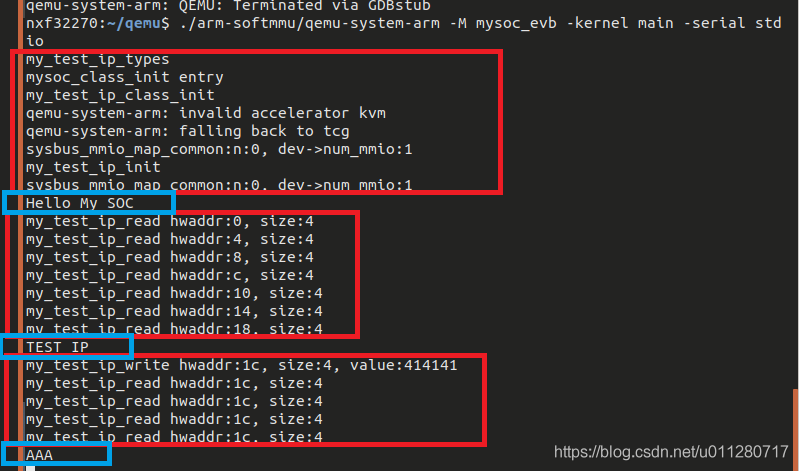
运行结果: 红框内是qemu打印的,蓝框是测试程序打印出来的,可以看到能顺利读出ID,同时能读写test reg。
版权声明
本文为[MyeDy]所创,转载请带上原文链接,感谢
https://blog.csdn.net/u011280717/article/details/112983720
边栏推荐
猜你喜欢

Paddleocr image text extraction

主流 RTOS 评估

Face_ Recognition face detection

Chapter 8 generative deep learning

【点云系列】SG-GAN: Adversarial Self-Attention GCN for Point Cloud Topological Parts Generation

PyTorch 10. 学习率

【点云系列】Learning Representations and Generative Models for 3D pointclouds

Modifying a column with the 'identity' pattern is not supported

Infrared sensor control switch

Machine learning III: classification prediction based on logistic regression
随机推荐
【点云系列】Learning Representations and Generative Models for 3D pointclouds
【点云系列】Neural Opacity Point Cloud(NOPC)
torch.where能否传递梯度
c语言编写一个猜数字游戏编写
PyTorch 11.正则化
[dynamic programming] different paths 2
[Point Cloud Series] SG - Gan: Adversarial Self - attachment GCN for Point Cloud Topological parts Generation
机器学习 二:基于鸢尾花(iris)数据集的逻辑回归分类
【动态规划】杨辉三角
【点云系列】Fully-Convolutional geometric features
Gephi教程【1】安装
Pytorch model pruning example tutorial III. multi parameter and global pruning
Machine learning II: logistic regression classification based on Iris data set
torch. mm() torch. sparse. mm() torch. bmm() torch. Mul () torch The difference between matmul()
Mysql database installation and configuration details
ArcGIS license server administrator cannot start the workaround
Pytoch model saving and loading (example)
PyTorch 模型剪枝实例教程三、多参数与全局剪枝
【動態規劃】不同路徑2
Pytorch best practices and coding style guide