当前位置:网站首页>Seven cattle upload pictures (foreground JS + background C API get token)
Seven cattle upload pictures (foreground JS + background C API get token)
2022-04-23 17:10:00 【Tomato Warrior】
This article is 2017 Year written , If you are trying to find seven cows JS Upload file related tutorials , Please check the latest official documents of qiniu directly I'll fill in the latest JS Upload instructions !
Try to simplify , download demo After filling in the corresponding parameters, you can directly use .
One : Get it backstage token
Things to prepare :
1、AccessKey(AK): In seven cattle - Personal panel - Key management - see ;
2、SecretKey(SK) : In seven cattle - Personal panel - Key management - see ;
3、 Destination space name (bucket); In object store - Storage space list view ;
4、 introduce Newtonsoft.Json.dll : Put it in the last download link ( problem 1: Version of the problem , The article concludes with );
5、 introduce Qiniu.dll : Put it in the last download link ;
Here is C# Complete code , All you need to fill in is 3 Parts of AK、SK、bucket
using System.Web.Http;
using Qiniu.Util;

namespace qiniutest001.Controllers
{
    public class TokenController : ApiController
    {
        [HttpGet]
        public string GetToken()
        {
            string AK = " Fill in your AK";
            string SK = " Fill in your SK";
            //  Destination space name
            string bucket = " Fill in the name of your target space ";

            //  Upload strategy
            PutPolicy putPolicy = new PutPolicy();

            putPolicy.Scope = bucket;
            //  Expiration time of upload strategy ( Company : second )
            putPolicy.SetExpires(3600);

            //  When the file is uploaded , Automatically deleted after how many days
            putPolicy.DeleteAfterDays = 1;

            Mac mac = new Mac(AK, SK);

            // Use AK & SK here
            //  Generate upload credentials
            string uploadToken = Auth.createUploadToken(putPolicy, mac);
            return uploadToken;
        }
    }
}
Two 、 Front desk request URI The address for token Upload files
Things to prepare :
1、ajax request token Of url Address ;( problem 2: Cross domain , Explain in detail at the end of the article !)
2、 Seven cattle bound domain name ( Download files using );
3、plupload.full.min.js Put it in the last download link
4、qiniu.js Put it in the last download link
5、jquery.js Put it in the last download link
The following is the full code of the page (html)
<!DOCTYPE html>
<html>

    <head>
        <meta charset="utf-8" />
        <title></title>
        <script type="text/javascript" src="js/jquery.js"></script>
        <script type="text/javascript" src="js/plupload.full.min.js"></script>
        <script type="text/javascript" src="js/qiniu.js"></script>
        <script type="text/javascript" src="js/Upimg.js"></script>
    </head>

    <body>
        <div class="item clear" style="border-bottom: solid 1px #cccccc">
            <div id="container1" style="position: relative;">
                <div class="item-lee"></div>
                <a class="Btn" id="pickfiles1" href="#" style="position: relative; z-index: 1;">
                    <i class="glyphicon glyphicon-plus"></i>
                    <span> Select File </span>
                </a>
                <!-- Displays the size of the picture -->
                <div id="Size1" style="display: inline; margin-left: 20px"></div>
                <!-- Reserved display information part -->
                <div id="msg1" style="display: inline; margin-left: 20px"></div>
                <!-- The name of the uploaded file -->
                <div style="display: inline; margin-left: 20px" id="fileName1"></div>
            </div>
        </div>
    </body>

</html>
The next step is to upload files JS part , I put it in Upimg.js in , It looks like a lot , There are only two parts to fill in url and domain
I revised the document here at seven o'clock , Put some parameters that need to be modified in the method , Pass... In the form of method parameters .
Finally, there are two ways to check the image format The method of converting units with bytes , It's not necessary to use it .
var token;// Store what we get from the background token
var url = " Fill in here ajax Request address "
var domain = " Here fill in the domain name you bind under qiniu ( There will be a default domain name )"

// The page load starts to get token, In obtaining token Of ajax in , If you get token success , Start uploading files !
$(document).ready(function () {

    // obtain token
    getToken();

    // Initialize the upload program
    //UpLoadImg(“ Select the of the file button ID”,“ Display information after uploading successfully ID”,“ After the upload is successful, the size of the file area will be displayed ID”,“ Display the name of the file after uploading the file successfully ID”)
    UpLoadImg('pickfiles1', 'container1', '#msg1', '#Size1', '#fileName1');
});

// obtain token
function getToken() {

    $.ajax({
        type: "GET",
        url: url,
        async:false,
        success: function(data) {

            token = data;
        },
        error: function() {
    },
        beforeSend: function() {
    }
    });
    return token;
}

//UpLoadImg(“ Select the of the file button ID”,“ Display information after uploading successfully ID”,“ After the upload is successful, the size of the file area will be displayed ID”,“ Display the name of the file after uploading the file successfully ID”)
function UpLoadImg(button,father,msg,size,fileName) {

   var uploader = Qiniu.uploader({
        runtimes: 'html5,flash,html4', // Upload mode , Degenerate in turn
        browse_button: button, // Click the button to upload the selection ,** It's necessary **
        //uptoken_url: '/token', //Ajax request upToken Of Url,** It is highly recommended to set **( Provided by the server )
        uptoken: token, // If not specified uptoken_url, Must be specified  uptoken ,uptoken Generated by other programs
        // unique_names: true, //  Default  false,key For the file name . If this option is enabled ,SDK It is automatically generated after successful upload key( file name ).
        // save_key: true, //  Default  false. If generated on the server side uptoken The upload policy of specifies  `sava_key`, The open ,SDK Will ignore the right key To deal with
        domain: domain, //bucket  domain name , When downloading resources ,** It's necessary **
        get_new_uptoken: false, // Whether to get new files every time you upload them token
        container: father, // Upload area DOM ID, The default is browser_button Parent element of ,
        max_file_size: '100mb', // Maximum file size limit
        flash_swf_url: 'js/plupload/Moxie.swf', // introduce flash, Relative paths
        max_retries: 3, // Upload failed. Maximum retries
        dragdrop: true, // Enable drag upload
        drop_element: 'container1', // Drag the of the upload area element ID, Dragging a file or folder triggers an upload
        chunk_size: '4mb', // When uploading in blocks , The volume of each piece
        auto_start: true, // Select the file and upload it automatically , If it is closed, you need to bind the event to trigger the upload
        init: {
            'FilesAdded': function (up, files) {

                plupload.each(files, function (file) {

                    //  After the file is added to the queue , Deal with related matters
                    //if (checkImg(file.name) == false)
                    //{
                    // alert(" The type of picture must be .gif,jpeg,jpg,png One of the ");
                    // return;
                    console.log(" Add queue ");
                    var testImgSrc = file.getNative();
                });
            },
            'BeforeUpload': function (up, file) {

                //  Before each file is uploaded , Deal with related matters
                console.log(" Before uploading ");
            },
            'UploadProgress': function (up, file) {

                //  When each file is uploaded , Deal with related matters

                console.log(" Upload time ");
                $(msg).text(' Uploading ···');
            },
            'FileUploaded': function (up, file, info) {

                //  After each file is uploaded successfully , Deal with related matters
                //  among  info  After the file is uploaded successfully , Returned by the server json, In the form of
                // {

                // "hash": "Fh8xVqod2MQ1mocfI4S4KpRL6D98",
                // "key": "gogopher.jpg"
                // }
                //  Reference resources http://developer.qiniu.com/docs/v6/api/overview/up/response/simple-response.html
                var domain = up.getOption('domain');
                var res = JSON.parse(info);
                var sourceLink = domain + res.key; // Get the of files uploaded successfully Url

                console.log(" Upload successful :" + sourceLink);

                $(msg).text(' Upload successful !!');
                $(size).text(bytesToSize(file.size));
                $(fileName).text(' file name :' + file.name);

            },
            'Error': function (up, err, errTip) {

                // Error uploading , Deal with related matters
                console.log(" Upload error ");
                alert(err);
            },
            'UploadComplete': function () {

                // After the queue file is processed , Deal with related matters
            },
            'Key': function (up, file) {

                //  If you want to check the of each file at the front end key Personalize , This function can be configured
                //  The configuration must be in  unique_names: false , save_key: false  When it comes into effect
                //var key = "";
                // do something with key here
                //return key
            }
        }
    });
}

//function checkImg(url) {

//
// if (!/\.(gif|jpg|jpeg|png|GIF|JPG|PNG)$/.test(url)) {

// return false;
// }
// else {

// return true;
// }
//}
//----------------------
// introduce Plupload 、qiniu.js after
// domain  Space for seven cows (bucket) Corresponding domain name , After selecting a space , It can be done by " Space settings -> Basic settings -> Domain name settings " Check to get


// Convert size
function bytesToSize(bytes) {

    if (bytes === 0) return '0 B';
    var k = 1024;
    sizes = ['B', 'KB', 'MB', 'GB', 'TB', 'PB', 'EB', 'ZB', 'YB'];
    i = Math.floor(Math.log(bytes) / Math.log(k));
    return (Math.ceil(bytes / Math.pow(k, i))) + ' ' + sizes[i];
    //toPrecision(3)  Leave one decimal place behind , Such as 1.0GB //return (bytes / Math.pow(k, i)).toPrecision(3) + ' ' + sizes[i];
}
So far, all the code is over .
3、 ... and 、 Demonstration mode
1、 The first is the background acquisition token, After opening the project , stay Controllers-TokenController.cs Fill in the corresponding parameters , Then start , You can view... On the web page .
2、 After starting in the background , Don't close the program , The front desk fills in the corresponding parameters , Click on ” Upload files “.
problem 1: because webAPi Brought by the project Newtonsoft.Json.dll, Need to be in webcofig Modify the version number in ;
problem 2: Because it is a local demonstration ,ajax The request will have cross domain problems , stay webconfig Add
Only need web.config Just add the following content to
<system.webServer>
<httpProtocol>
    <customHeaders>
        <add name="Access-Control-Allow-Origin" value="*" />
        <add name="Access-Control-Allow-Headers" value="Content-Type" />
        <add name="Access-Control-Allow-Methods" value="GET, POST, PUT, DELETE, OPTIONS" />
    </customHeaders>
    </httpProtocol>

</system.webServer>
Complete project download chain ( A little waste of you 1 integral ) Pick up :http://download.csdn.net/download/tomato2313/9763445
版权声明
本文为[Tomato Warrior]所创,转载请带上原文链接,感谢
https://yzsam.com/2022/04/202204230553458154.html
边栏推荐
- [PROJECT] small hat takeout (8)
- The new MySQL table has a self increasing ID of 20 bits. The reason is
- Wiper component encapsulation
- 如何用Redis实现分布式锁?
- TypeError: set_ figure_ params() got an unexpected keyword argument ‘figsize‘
- Milvus 2.0 détails du système d'assurance de la qualité
- freeCodeCamp----prob_ Calculator exercise
- AIOT产业技术全景结构-数字化架构设计(8)
- Milvus 2.0 質量保障系統詳解
- EF core in ASP Generate core priority database based on net entity model
猜你喜欢
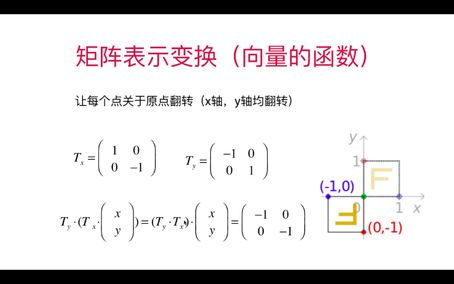
Perception of linear algebra 2

Lock锁

TypeError: set_ figure_ params() got an unexpected keyword argument ‘figsize‘
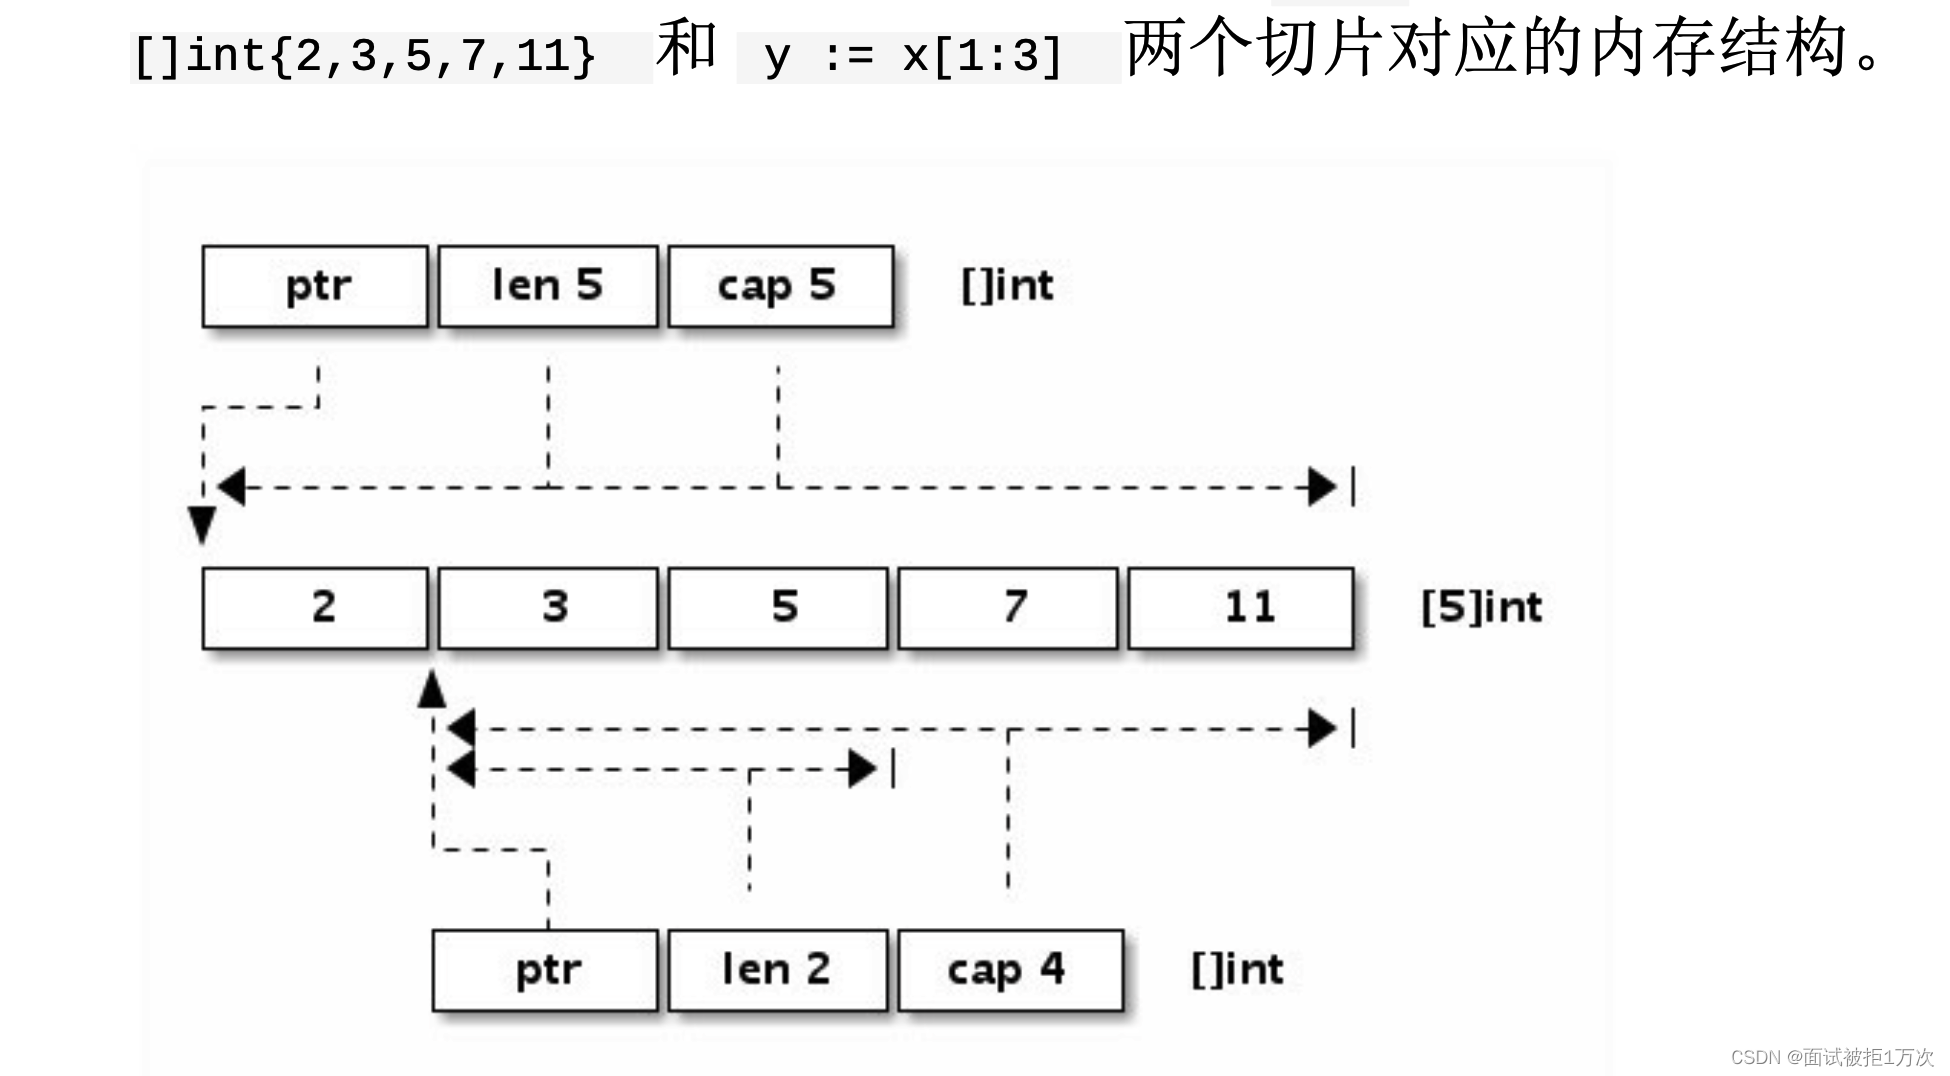
Go language, array, string, slice
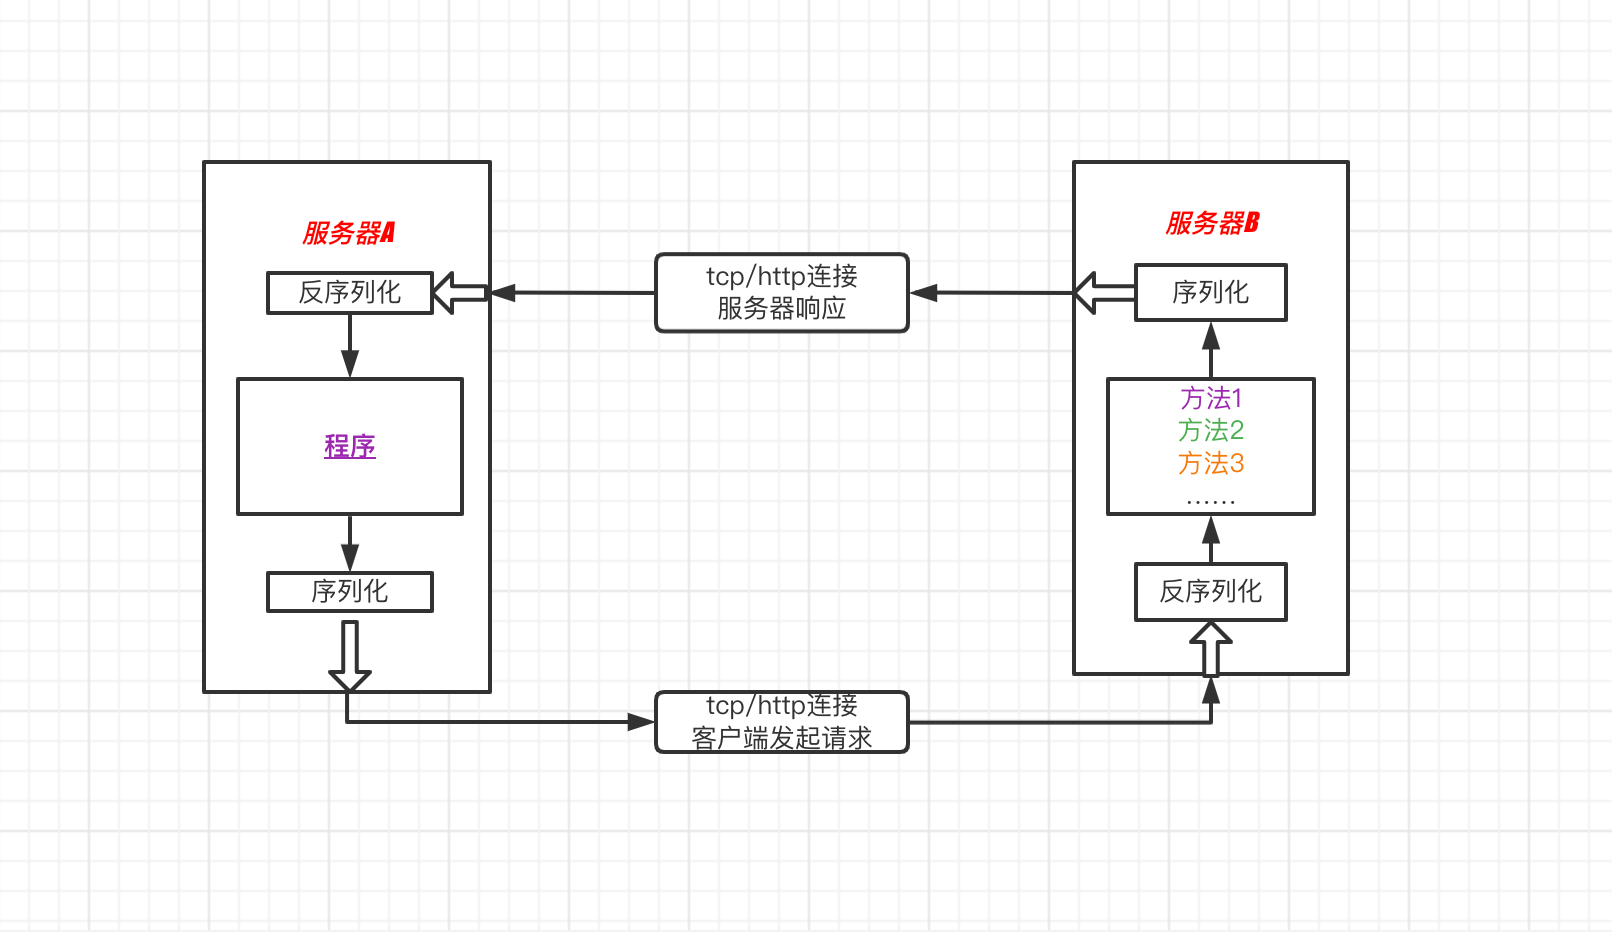
RPC核心概念理解

线性代数感悟之1

Nodejs installation and environment configuration
On lambda powertools typescript

ACL 2022 | dialogved: a pre trained implicit variable encoding decoding model for dialogue reply generation

Scope and scope chain in JS
随机推荐
freeCodeCamp----prob_ Calculator exercise
Getting started with JDBC
Shell-awk命令的使用
[PROJECT] small hat takeout (8)
On lambda powertools typescript
ClickHouse-表引擎
EF core in ASP Generate core priority database based on net entity model
VLAN高级技术,VLAN聚合,超级Super VLAN ,Sub VLAN
Solution architect's small bag - 5 types of architecture diagrams
AIOT产业技术全景结构-数字化架构设计(8)
PHP高效读大文件处理数据
groutine
Customize my_ Strcpy and library strcpy [analog implementation of string related functions]
Net standard
[pimf] openharmony paper Club - what is the experience of wandering in ACM survey
Clickhouse table engine
Clickhouse - data type
Devexpress GridView add select all columns
1-4 configuration executable script of nodejs installation
Aiot industrial technology panoramic structure - Digital Architecture Design (8)