当前位置:网站首页>Case of the third day of go language development fresh every day project - news release system II
Case of the third day of go language development fresh every day project - news release system II
2022-04-23 20:29:00 【Game programming】
1. Type related content
Before implementing type related business , Let's create the type table first . Here we add a one to many to many relationship .
There are many articles under one type , But an article belongs to only one type , So articles and types belong to one to many .
At the same time, we analyze , One user can read multiple articles , An article can also be read by multiple users , Therefore, the relationship between articles and users belongs to many to many .
thus , Let's start building tables , The table code is as follows , We analyze one to many based on the code , How to set many to many :
type User struct { Id int Name string `orm:"unique"` Passwd string `orm:"size(20)"` Articles []*Article `orm:"rel(m2m)"` // Set up many to many relationships }// Article structure type Article struct { Id int `orm:"pk;auto"` ArtiName string `orm:"size(20)"` Atime time.Time `orm:"auto_now"` Acount int `orm:"default(0);null"` Acontent string `orm:"size(500)"` Aimg string `orm:"size(100)"` ArticleType*ArticleType `orm:"rel(fk)"` // Set up a one to many relationship Users []*User `orm:"reverse(many)"` // Set the inverse relationship of many to many }// Type table type ArticleType struct { Id int Tname string `orm:"size(20)"` Articles []*Article `orm:"reverse(many)"` // Set up a one to many inverse relationship }func init(){ //1. Connect to database orm.RegisterDataBase("default","mysql","root:[email protected](127.0.0.1:3306)/test?charset=utf8") //2. The registry orm.RegisterModel(new(User),new(Article),new(ArticleType)) //3. To generate table //1. Database alias //2. Force update //3. Whether the process of creating a table is visible orm.RunSyncdb("default",false,true)} According to the database knowledge we have learned before , There are several relationships between tables ? There are generally three kinds , one-on-one , One to many , Many to many , But we often use one to many and many to many in our development , Here we focus on these two , Just know one-on-one .
orm How to set the relationship between two tables in ?
If there is a relationship between two tables ,ORM Associate the two tables by adding object pointers or object pointer arrays to the corresponding structures of the two tables , And add corresponding attributes to the object pointer and object pointer array fields , For example, the article table and type table above belong to one to many , You need to add an object pointer of type in the article structure , Then set up a one to many relationship ( orm:“rel(fk)” ), alike , In the type table, there needs to be an object pointer array of the article , And set a one to many reverse relationship ( orm:“reverse(many)” ).
- ** one-on-one ** Relationship settings : Add each other's structure pointer to two corresponding structures , Then set up a one-to-one relationship ( orm:“rel(one)” ), The reverse relationship is set to orm:“rel(one)”
** One to many ** Relationship settings : The relationship between two tables in one to many is not interchangeable , Take the article table and type table as an example , When creating tables stay Add the object pointer of the type table to the article structure corresponding to the article table , And set up a one to many relationship ( orm:“rel(fk)” ), stay Add the object pointer array of the article table to the structure corresponding to the type table , And set a one to many reverse relationship ( orm:“reverse(many)” ) When generating tables , The database will be automatically displayed in Add type table to the article table Id As the foreign key of the article table . Pictured :

One to many insertion operation : Just insert the type object in the article table . The code is as follows :
o := orm.NewOrm()article := models.Article{}artiType := models.ArticleType{Id:id}o.Read(&artiType)article.ArticleType = &artiTypeo.Insert(&article)One-to-many query : ORM Lazy query is used by default in multi table query , That is, it is not explicitly pointed out that multi table query should be done , Even if there is a relationship between two tables ,ORM It will not associate two tables . The function that specifies the multi table query is RelatedSel(). The parameter is the name of the table to be associated , There can be multiple . The code is as follows :
count,err = o.QueryTable("Article").RelatedSel("ArticleType").Count()If the field in the associated table has no value , So the data can't be found
- Many to many Relationship settings : The relationship between many to many tables is equal , So their property settings can call , Take the article table and user table as an example , When creating tables stay Add the object pointer array of the user table to the article structure corresponding to the article table , And set up many to many relationships ( orm:“rel(m2m)” ), Add the object pointer array of the article table to the structure corresponding to the user table , And set the reverse relationship of many to many ( orm:“reverse(many)” ) When generating tables , The database will generate a relationship table between users and articles , There are three fields ,Id, User table Id, Article table ID. Here's the picture :

Many to many insert operation :
o := orm.NewOrm()//1. Get the operation object arti:= Article{Id: 1}// obtain article Many to many operands m2m := o.QueryM2M(&arti, "users")// The first parameter object must have a primary key , The second parameter is the field name // Get the object to insert user := &User{Id:1}o.Read(&user)// Many to many object insertion num, err := m2m.Add(user)// Parameters can be objects , The pointer , An array of objects , Pointer array Many-to-many queries : There are two ways : The first one is : Direct use read Inquire about , And then add LoadRelated () Function to associate two tables . The code is as follows :
post := Post{Id: 1}err := o.Read(&post)num, err := o.LoadRelated(&post, "Tags") The advantage is simplicity , quick . The disadvantage is that the return value is not queryseter, You cannot call other advanced queries . The second method , Query through filter , After specifying the table , use Filter() Filter the corresponding conditions , The first parameter is Another field of... Represents another table __ The name of another table __ Compared fields ( Notice the double underline ), The second field is the value to compare , Note that the order in which the table is inserted is the opposite of the order in which the table is inserted . The code is as follows :
1.1 Add type
After analyzing operations between too many tables , Let's implement type related business , First, we need to add types .
1.1.1 The add type page displays
- Confirm that the request path displayed by the add type is
/AddArticleType Add relevant codes to the routing file .
beego.Router("/addArticleType",&controllers.ArticleController{},"get:ShowAddType")- Then go to the controller to realize ShowAddType function , First, simply specify the view . The code is as follows :
// Show the page of adding article type func(this*ArticleController)ShowAddType(){ this.TplName = "addType.html"}- Then enter the request in the browser http://192.168.110.74:8080/addArticleType, The page is as follows :

As you can see from the page , Let's add the article type interface , In two , One is to display all types in the form of a table above , One is to add classification below . Let's deal with adding categories first .
1.1.2 Add type data processing
Adding business types is relatively simple , The first is to modify the content of our view page , to form Tag request mode and request path , The code is as follows :
<form method="post" action="/HandleAddType">Then we need to modify the routing file , Assign a controller to the request , Specify the method :
beego.Router("/addArticleType",&controllers.ArticleController{},"get:ShowAddType;post:HandleAddType")Then we implement the background processing function , The implementation steps of this function are the same as those of adding articles in the previous implementation , Code processing is simpler , No detailed analysis , Let's look directly at the code :
// Handle adding article type data func(this*ArticleController)HandleAddType(){ // get data typeName := this.GetString("typeName") // data verification if typeName == ""{ beego.Info(" Failed to add data ") return } // Insert database o := orm.NewOrm() var articleType models.ArticleType articleType.Tname = typeName if _,err :=o.Insert(&articleType);err != nil{ beego.Info(" Failed to add data ") return } // Back to view this.TplName = "addType.html"}Here we use the rendering method to return the view, whether it is appropriate or not , Think about it !
1.1.3 Query type data
Now we have data in the type table , You can fill the data on the page when displaying the page
- Background code
// Show the page of adding article type func(this*ArticleController)ShowAddType(){ // Query data o := orm.NewOrm() var articleTypes []models.ArticleType o.QueryTable("ArticleType").All(&articleTypes) // Pass data to the view and specify the view this.Data["articleTypes"] = articleTypes this.TplName = "addType.html"}- View code In the view page , The array passed by our loop controller , Get the data we need
{{range .articleTypes}} <tr> <td>{{.Id}}</td> <td>{{.Tname}}</td> <td><a href="javascript:;" class="edit"> Delete </a></td> </tr>{{end}} At this time, we enter the address in the browser http://192.168.110.75:8080/addArticleType , Get the following page :

Add a type test , Then I found that the page still has no type display , This shows that there is something wrong with our code processing , What's the problem ? Remember the thinking questions left for you earlier ? After we add the article type , It is a direct rendering that loads the view , At this time, no data is passed to the view , So there is no type display . Such a result and our business Do not conform to the , So we need to change the way to jump to the page after adding types to redirect , Then look at the results , It is found that the type display is normal .
1.2 The home page is different according to the drop-down box options , Get different types of data
Now there is type data , When we add articles, we also need to add types .
1.2.1 Add articles with types
- Add the data type to the drop-down box when the page type needs to be bound Getting data in the background ( Write relevant code in the function that shows the interface of adding articles )
// Show the interface of adding articles func (this*ArticleController)ShowAddArticle(){ // Query data o := orm.NewOrm() var articleTypes []models.ArticleType o.QueryTable("ArticleType").All(&articleTypes) // Pass data to the view and specify the view this.Data["articleTypes"] = articleTypes this.TplName = "add.html"}The view shows the data Loop data , Display the type name in the drop-down box
<select class="sel_opt" name="select"> {{range .articleTypes}} <option>{{.Tname}}</option> {{end}}</select>- When adding an article, specify the article type , The code is as follows :
// Assign the article type to the article object var articleType models.ArticleType articleType.Tname = typeName o.Read(&articleType,"Tname") article.ArticleType = &articleType // Insert o.Insert(&article)1.2.2 When the list page shows the article , Display type information .
- Check all the questions , Associated article type table ( Add... When querying RelatedSel(“ArticleType”)), The code is as follows :
qs.Limit(pageSize,start).RelatedSel("ArticleType").All(&articles)When displayed, it will be displayed
{{range .articles}} <tr> <td>{{.ArtiName}}</td> <td><a href="ShowArticleDetail?id={{.Id}}"> Check the details </a></td> <td> {{.Atime.Format "2006-01-02-15-04-05"}}</td> <td>{{.Acount}}</td> <td><a href="/DeleteArticle?id={{.Id}}" class="dels"> Delete </a></td> <td><a href="UpdateArticle?id={{.Id}}"> edit </a></td> <td>{{.ArticleType.Tname}}</td> </tr>{{end}}At this time you find , Previously added articles are not displayed , Remember when we introduced multi table operation earlier , add RelatedSel after , If the corresponding field has no data , Will not find out .
1.2.3 Depending on the drop-down box options , Get different types of data
- Query type data , And bind the data to the drop-down box This business code is the same as the business code added to the article , We won't do a detailed analysis , Look directly at the code :
// Query data var articleTypes []models.ArticleType o.QueryTable("ArticleType").All(&articleTypes) this.Data["articleTypes"] = articleTypesView code :
<select name="select" id="select" class="sel_opt"> {{range .articleTypes}} <option selected="true">{{.Tname}}</option> {{end}}</select>- Select the type according to the drop-down box , Get articles of the same type Pass the selected type data to the background We used to transfer data with form Forms , Here we still use form The form wraps the drop-down box , Then pass the selected data to the background . The code is as follows :
<form method="get" action="/ShowArticleList"> <select name="select" id="select" class="sel_opt"> {{range .articleTypes}} <option selected="true">{{.Tname}}</option> {{end}} </select></form>reflection , Why do we use get Request no post request
There is no send request button ( Try not to change the page of art design ), We go through js Code send request ,js The code is as follows :
$("#select").change(function () { $("#form").submit()})According to the type of acquisition , Query how many pieces of data there are , And show articles of the same type Get the data from the front end
// Get type name typeName := this.GetString("select")According to the type , Query how many pieces of qualified data , however , It should be noted that the request without passing the type name should be considered , So you need to make a judgment , The code is as follows :
// Get type name typeName := this.GetString("select")// Query data , And pagination display o := orm.NewOrm()qs := o.QueryTable("Article")var count int64// data verification if typeName == ""{ count,_ =qs.RelatedSel("ArticleType").Filter("ArticleType__Tname",typeName).Count()}else { count,_ =qs.RelatedSel("ArticleType").Filter("ArticleType__Tname",typeName).Count()}Other business codes dealing with paging remain unchanged , The code is as follows :
// Determine the number of displays per page pageSize := 2// Get total pages pageCount :=math.Ceil(float64(count) / float64(pageSize))// Get page number pageIndex,err := this.GetInt("pageIndex")if err != nil{ pageIndex = 1}// Determine the starting position of the data start := (pageIndex - 1) * pageSizeQuery data of the same type according to the type , Also need to make a judgment . The code is as follows :
// Query the corresponding type of data var articles []models.Articleif typeName ==""{ qs.RelatedSel("ArticleType").Limit(pageSize,start).All(&articles)}else { qs.RelatedSel("ArticleType").Filter("ArticleType__Tname",typeName).Limit(pageSize,start).All(&articles)}The rest of the code doesn't change , Get the complete code of the list page as follows :
func(this*ArticleController)ShowArticleList(){ // Get type name typeName := this.GetString("select") // Query data , And pagination display o := orm.NewOrm() qs := o.QueryTable("Article") var count int64 // data verification s if typeName == ""{ count,_ =qs.RelatedSel("ArticleType").Filter("ArticleType__Tname",typeName).Count() }else { count,_ =qs.RelatedSel("ArticleType").Filter("ArticleType__Tname",typeName).Count() } // Determine the number of displays per page pageSize := 2 // Get total pages pageCount :=math.Ceil(float64(count) / float64(pageSize)) // Get page number pageIndex,err := this.GetInt("pageIndex") if err != nil{ pageIndex = 1 } // Determine the starting position of the data start := (pageIndex - 1) * pageSize // Query the corresponding type of data var articles []models.Article if typeName ==""{ qs.RelatedSel("ArticleType").Limit(pageSize,start).All(&articles) }else { qs.RelatedSel("ArticleType").Filter("ArticleType__Tname",typeName).Limit(pageSize,start).All(&articles) } // Query some data in the database // Get type data // Query data var articleTypes []models.ArticleType o.QueryTable("ArticleType").All(&articleTypes) this.Data["articleTypes"] = articleTypes this.Data["count"] = count this.Data["pageCount"] = int(pageCount) this.Data["pageIndex"] = pageIndex // Pass the data and specify the view this.Data["articles"] = articles this.TplName = "index.html"}Then you look at the page , There's a problem , There is an option that cannot be selected all the time . Why? ?
Because , Every time we change the options of the drop-down box , Can make js issue get Request to the background , The background will re query all the type table binding drop-down boxes , So every time a data is displayed , In this case , We select the data displayed , You can't trigger js Send a request , because js I don't think the content of the drop-down box has changed . At this time, there is also a problem with the display of the drop-down box , How to solve this problem ?
1.2.4 Solve the problem of the drop-down box option display
Through the previous analysis , We know that every time the drop-down box is bound by getting the type data from the database again , Here, we need to add a judgment to the selected type , When the data taken from the database is the selected type , Just give the drop-down box options properties selected Set to true. First, the background should pass the currently selected type name to the view , The code is as follows :
// Pass the type name selected in the drop-down box to the view this.Data["typeName"] = typeName- Front end code processing In the view, we receive the currently selected type passed by the controller , Then compare it with the type name in the database , If the same setting is selected, the different setting will not be set , The code is as follows :
<select name="select" id="select" class="sel_opt"> {{range .articleTypes}} {{if compare .Tname $.typeName}} <option selected="true">{{.Tname}}</option> {{else}} <option>{{.Tname}}</option> {{end}} {{end}}</select>It should be noted that , If you get the data passed by the controller in the loop , Can't be used directly
., Use$.
And then refresh the page , We found that the problem could be solved .
2.Session and Cookie
Then let's take another look at what functions of our project have not been realized ?1. We opened the login interface and found , The login interface has an option to record the user name , We haven't implemented this function yet .2. In fact, our functions are similar to a news class APP The background of , This kind of page certainly needs to make login judgment , So we still need to make landing judgment .3. There is login judgment , To achieve the exit login function .4. Open the article details page , We found that browsing this line recently did not realize , Here we also need to realize .
Before realizing these four functions, the teacher will introduce you to a new knowledge point ,Session and Cookie, We need to use these four functions for these four functions . that Session and Cookie And what is it ?Session and Cookie The effect is the same sometimes , They are all used to save user data . But some of their characteristics are very different , Their application scenarios are different . Next, let's take a detailed look at these two technologies .
Cookie
Used to save user data for a certain period of time , Data stored on client ( The client of the website is the browser ), When enabled, you can set Cookie Effective time of , When the time comes to an end ,Cookie invalid .
Beego Chinese vs Cookie Access delete
Beego Store data in Cookie The code in is as follows :
this.Ctx.SetCookie(key,value,time)// The first parameter is Cookie Of key value , The second parameter is Cookie Of value value , The third parameter is set Cookie Effective time of .take Cookie The code for is as follows :
this.Ctx.GetCookie(key)// Parameter is Cookie Of key value , The return value is corresponding value value . When there is no corresponding Cookie perhaps Cookie Has lapsed , Returns an empty string Delete Cookie The code for is as follows :
this.Ctx.SetCookie(key,value,0)// The first parameter is Cookie Of key value , The second parameter has an arbitrary value , The third parameter is Cookie The value of is set to less than 0, It will fail immediately . Session
It is also used to save user data for a certain period of time , But the data is stored on the server ,Beego Enable Sesssion You need to open... In the configuration file Session function . stay Beego In the use , Generally not set Session Time for , When the browser is closed ,Session invalid .
**Beego Chinese vs Session The access **
If you want to use Session function , You need to set... In the configuration file first Sessionon=true
Beego Storage Session Code for :
this.SetSession(key,value)// Two parameters , One is Session Of key, The second is Session Of Valueobtain Session The code for is as follows :
this.GetSession(key)// Parameter is Session Of key value , The return value is Session Corresponding value value , The type is interface{}Delete Session The code for is as follows :
this.DelSession(key)// Parameter is Session Of key value We use tables to analyze their differences
| Difference | Cookie | Session |
|---|---|---|
| Data storage location | client | The server |
| Data security ( By comparison ) | low | high |
| Life cycle | With the end of the set time , End of life cycle | When the browser is closed , End of life cycle |
| Applicable scenario | Those who do not require high safety , Data that needs to be stored for a long time | Security requirements , No need for long-term storage of data |
After a brief understanding of these two knowledge points , Let's take a look , How to realize the remaining four functions of our project .
2.1 Remember the user name
On the login page, if we check the box to remember the user name , Next time you log in , The user name column displays the last stored user name by default . And remember that the user name is checked by default , If we uncheck remember user name , The next time you visit the login page, the user name will not be displayed , Remember that the user name is not checked by default . In general , Remember the user name can remember for a long time , The requirement for safety factor is not very high , Here we use Cookie To achieve this function .
We looked at the view code and found that , When you land ,form The form submits the data of the remember user name radio box , use beego.Info() Print the obtained data , It is found that when the user name is selected, we will get the string in the background "on", If it is not selected, you can't get , According to this phenomenon , We can use it to judge whether Deng Li , When you land , We can use Cookie Store user name , Delete when not selected Cookie. The code is as follows :
// Process registered user name data // get data remember := this.GetString("remember")beego.Info(remember)if remember == "on"{ beego.Info(remember) this.Ctx.SetCookie("userName",userName,1000)}else { this.Ctx.SetCookie("userName",userName,-1)}When displaying the landing page , We need to get Cookie Value , And then determine , If you get Cookie Value , It's displayed in the user name , And set the remembered user name to the selected state , If not Cookie Set the user name to null , Remember to set the user name to unchecked , The code is as follows :
// get data userName := this.Ctx.GetCookie("userName")// Judge the data , Then the setting data is passed to the view if userName != ""{ this.Data["userName"] = userName this.Data["checked"] = "checked"}else{ this.Data["userName"] = "" this.Data["checked"] = ""}Receive data in view :
<form class="login_form" name = "login" action="/login" method="post"> <h1 class="login_title"> The user login </h1> <input type="text" class="input_txt" name = "userName" value="{{.userName}}"> <input type="password" name = "passwd" class="input_txt"> <div class="remember"><input type="checkbox" name="remember" {{.checked}} ><label> Remember the user name </label></div> <input type="submit" value=" deng record " class="input_sub"></form>Be careful , When checkbox Add one checked Attribute ,checkbox It is selected
2.2 Landing judgment
Because we operate the background management interface , So we need to make landing judgment . We use... Here Session To achieve this function .
In the use of Session Remember to set... In the configuration file before sessionon=true
When the login is successful, set Session, The code is as follows :
// Set up sessionthis.SetSession("userName",userName)The functions of several display pages in the background need to obtain session, And then determine , The code is as follows :
// obtain session, And judge whether it is empty , If it is empty, jump to the login page userName := this.GetSession("userName")if userName == nil{ this.Redirect("/ShowLogin",302) return}2.3 Exit login
Quitting login is actually deleting login session, Then jump back to the login interface .
- There is an exit login on the article list page , We need to add one to him href, Here, we specify that the request path to exit the login is
/logout:
<a href="/logout" class="logout fr"> refund Out </a>- Then we specify the controller and method corresponding to the request in the route
beego.Router("/logout",&controllers.ArticleController{},"get:Logout")- Then we implement a Logout function , The business logic is simple , Let's look directly at the code
// Log out func(this*ArticleController)Logout(){ // Delete session this.DelSession("userName") // Jump this.Redirect("/login",302)}2.4 Browse recently
Recent browsing is to add user information to the article when we browse the article , Then query the information again , Show... On the page .
- Add browsing information We are here to add browsing user information to the article table . The code is as follows :
// obtain ORM object o := orm.NewOrm()// Get the object to insert data var article models.Articlearticle.Id = ido.Read(&article)// Get the many to many operation object , Using a function QueryM2M(), The first parameter is the object to insert data , The second parameter is the name of the field to insert data , The return value is a many to many operation object m2m := o.QueryM2M(&article,"Users")// Get the object to insert user := models.User{Name:userName.(string)}o.Read(&user,"Name")// Many to many insertion m2m.Add(user)- Display browsing information There are two ways to display many to many information The first one is , Directly load many to many relationships , The function used is LoadRelated(), The first parameter is the query object , The second parameter is the many to many relationship field , The code is as follows :
num,err := o.LoadRelated(&article,"Users")At this time, we can cycle the user information we have browsed recently on the front end , Here we use the second view loop syntax :
<label> Browse recently :</label><p class="detail">{{range .article.Users}}{{.Name}} | {{end}}</p>At this time, if we check the details more times, we will find a problem , When we add relationships, we add them once after browsing , Then when we display it, the user name of the same user will be displayed repeatedly , The effect is as follows :

But we usually browse the web , After a user has browsed, the user information can be displayed only once , So we need to go inside , Remember the advanced query de duplication method we introduced earlier ? Distinct() duplicate removal , But this function must be queryseter Objects can be manipulated , So our first many to many query method doesn't work . Here we use the second many to many query . The code is as follows :
var users []models.Usero.QueryTable("User").Filter("Articles__Article__Id",article.Id).Distinct().All(&users)Be careful : What we insert here is to article Insert user, But the query is from user To get .
3. Project optimization
3.1 Routing filter
When we realize the project , Only add login judgment to the article list page and details page , Let's think about it , Our case is actually the whole background management , So each page needs to add login judgment , Then we need to add login judgment everywhere , There's a lot of repetitive code . Here is a new technology , Routing filter , Add a filter at the routing level , Realize login judgment . Let's see what the filter is .
effect : According to the specified matching rules stay Specific project operation phase Go to Execute custom function , Functions are usually placed in beego.router() Before .
Let's take a look at the format of the routing filter function :
beego.InsertFilter(pattern string, position int, filter FilterFunc) The first parameter is the route matching rule , Support regular
The second parameter is to specify the operation phase of the project , stay beego During the operation of the project , The framework divides us into five stages , Namely :
a) BeforeStatic Before static address
b) BeforeRouter Before looking for a route
c) BeforeExec After finding the route , Start executing the corresponding Controller Before
d) AfterExec After execution Controller Filter executed after logic
e) FinishRouter Filter executed after executing logic
The specific correspondence is the time point of the following figure :

The third parameter , Is to specify the filter function .
Routing filters are generally placed in beego.Router() Before .
Then let's take a look at the format of the filter function :
type FilterFunc func(*context.Context)Parameter must be context.Context
Sample code :
var BeforeExecFunc = func(ctx * context.Context) { userName:=ctx.Input.Session("userName") if userName == nil{ ctx.Redirect(302,"/login") }}beego.InsertFilter("/index",beego.BeforeExec,BeforeExecFunc)3.2 View layout
After implementing the filter function , Let's look at our whole project , The page is as follows :

You will find that some content is displayed in every page , Can we avoid these repetitive operations ? Here is a new knowledge , View layout :
** effect :** By setting the template page , Other pages can call the template directly , Avoid dealing with duplicate code again .
View layout is essentially two html Interface splicing , For example, we now have a with repeating parts html Interface layout.html, There is also an interface that only contains the business of adding articles , We can realize the splicing of two pages according to the following .
The operation is as follows :
The controller code is as follows :
this.Layout = "layout.html"this.TplName = "add.html"layout.html The code in :
<!DOCTYPE html><html lang="en"><head> <meta charset="UTF-8"> <title> Background management page </title> <link rel="stylesheet" type="text/css" href="/static/css/reset.css"> <link rel="stylesheet" type="text/css" href="/static/css/main.css"> <script type="text/javascript" src="/static/js/jquery-1.12.4.min.js"></script></head><body><div class="header"> <a href="#" class="logo fl"><img src="/static/img/logo.png" alt="logo"></a> <a href="/logout" class="logout fr"> refund Out </a></div><div class="side_bar"> <div class="user_info"> <img src="/static/img/person.png" alt=" Zhang Dashan "> <p> Welcome <em> Li lei </em></p> </div> <div class="menu_con"> <div class="first_menu active"><a href="javascript:;" class="icon02"> Article management </a></div> <ul class="sub_menu show"> <li><a href="#" class="icon031"> The article lists </a></li> <li><a href="/addArticle" class="icon032"> Add the article </a></li> <li><a href="#" class="icon034"> Add categories </a></li> </ul> </div></div>{{.LayoutContent}}</body></html>Pay attention to the {{.LayoutContent}}, This label is used to store add.html The place of .
add.html You can delete the same code in , The code is as follows :
<div class="main_body" id="main_body"> <div class="breadcrub"> The current position : Article management > Add the article </div> <div class="pannel"> <form method="post" action="/addArticle" enctype="multipart/form-data"> <h3 class="review_title"> Add the article </h3> <div class="form_group"> <label> Article title :</label> <input type="text" class="input_txt2" name="articleName" > </div> <div class="form_group"> <label> Type of article :</label> <select class="sel_opt" name="select"> {{range .articleTypes}} <option>{{.Tname}}</option> {{end}} </select> </div> <div class="form_group"> <label> Article content :</label> <textarea class="input_multxt" name="content"></textarea> </div> <div class="form_group"> <label> To upload pictures :</label> <input type="file" class="input_file" name="uploadname"> </div> <div class="form_group indent_group line_top"> <input type="submit" value=" add Add " class="confirm"> <span>{{.errmsg}}</span> </div> </form> </div></div>Enter the web address in the browser , At this time, you may find a problem , Our label This small part can't be changed . Here we can go through this.Data to layout Pass value .
- js Code passing Careful students will also find , We need to add... On some pages js Code , This How can the content be delivered to the page , Here is another function LayoutSection. **LayoutSection ** effect :this.Layout Template file specified , It can realize the splicing of two pages , Then sometimes some js Or is it css style , How to deliver ? We can use LayoutSection Pass on . **LayoutSection **: usage : Controller code :
this.Layout = " layout.html"this.LayoutSections = make(map[string]string)this.LayoutSections["Scripts"] = "scripts.html"stay layout.html Add the following corresponding content to :
<!DOCTYPE html><html lang="en"><head> <meta charset="UTF-8"> <title> Background management page </title> <link rel="stylesheet" type="text/css" href="/static/css/reset.css"> <link rel="stylesheet" type="text/css" href="/static/css/main.css"> <script type="text/javascript" src="/static/js/jquery-1.12.4.min.js"></script></head><body><div class="header"> <a href="#" class="logo fl"><img src="/static/img/logo.png" alt="logo"></a> <a href="/logout" class="logout fr"> refund Out </a></div><div class="side_bar"> <div class="user_info"> <img src="/static/img/person.png" alt=" Zhang Dashan "> <p> Welcome <em> Li lei </em></p> </div> <div class="menu_con"> <div class="first_menu active"><a href="javascript:;" class="icon02"> Article management </a></div> <ul class="sub_menu show"> <li><a href="#" class="icon031"> The article lists </a></li> <li><a href="/addArticle" class="icon032"> Add the article </a></li> <li><a href="#" class="icon034"> Add categories </a></li> </ul> </div></div>{{.LayoutContent}}</body></html>{{.Scripts}}3.3 Add
Let's review , Let's see what we haven't achieved in our project ? Whether the deletion of type has not been realized , Maybe some students will say , Teacher, this deletion is the same as the deletion of the article , Just delete it soon ! Here, the teacher should remind you :** Type is related to multi table operation , The deletion effect is different from that of a single table article **
Let's take a look at the deletion of types :
There are also four steps :** request -> route -> controller -> View **
- request Deleting a type is implemented in the add type page , There is a deleted tag in this page , As shown in the figure below :

Let's add the request path to this tag , alike , We need to add type to the request path Id. The code is as follows :
<a href="/deleteType?id={{.Id}}" class="edit"> Delete </a>- route Add the corresponding route , Specify the controller and method
beego.Router("/deleteType",&controllers.ArticleController{},"get:DeleteType")- controller With the method name , Just implement the relevant code :
// delete type func(this*ArticleController)DeleteType(){ // get data id,err:=this.GetInt("id") // Check the data if err != nil{ beego.Info(err) return } // Processing data var articleType models.ArticleType articleType.Id = id o := orm.NewOrm() o.Delete(&articleType) // Back to view this.Redirect("/addArticleType",302)}- View After deleting , We returned to the page and found , The type is indeed deleted . But here's the thing , We also have related articles on type binding , At this point, we return to the article list page , Find out , delete type , Articles related to this type have also been deleted , This is because ,beego Cascade deletion is performed by default , Can this cascade deletion be set ? stay beego Settings for deleting intermediate links , The settings added during table creation are as follows : Set the corresponding rel When deleting a relationship , How to handle relation fields .
cascade cascading deletion ( The default value is )set_null Set to NULL, Need to set up null = trueset_default Set to default , Need to set up default value do_nothing Do nothing , Ignore Example :
// Article structure type Article struct { Id int `orm:"pk;auto"` ArtiName string `orm:"size(20)"` Atime time.Time `orm:"auto_now"` Acount int `orm:"default(0);null"` Acontent string `orm:"size(500)"` Aimg string `orm:"size(100)"` ArticleType*ArticleType `orm:"rel(fk);null;on_delete(set_null)"` Users []*User `orm:"reverse(many)"`}4.Beego summary
err:=this.GetInt(“id”)
// Check the data
if err != nil{
beego.Info(err)
return
}
// Processing data
var articleType models.ArticleType
articleType.Id = id
o := orm.NewOrm()
o.Delete(&articleType)
// Back to view
this.Redirect(“/addArticleType”,302)
}
+ After deleting the view , We returned to the page and found , The type is indeed deleted . But here's the thing , We also have related articles on type binding , At this point, we return to the article list page , Find out ,** delete type , Articles related to this type have also been deleted **, This is because ,beego Cascade deletion is performed by default , Can this cascade deletion be set ? stay beego Settings for deleting intermediate links , The settings added during table creation are as follows : Set the corresponding rel When deleting a relationship , How to handle relation fields . Set cascading properties
cascade cascading deletion ( The default value is )
set_null Set to NULL, Need to set up null = true
set_default Set to default , Need to set up default value
do_nothing Do nothing , Ignore
Example :```go// Article structure type Article struct { Id int `orm:"pk;auto"` ArtiName string `orm:"size(20)"` Atime time.Time `orm:"auto_now"` Acount int `orm:"default(0);null"` Acontent string `orm:"size(500)"` Aimg string `orm:"size(100)"` ArticleType*ArticleType `orm:"rel(fk);null;on_delete(set_null)"` Users []*User `orm:"reverse(many)"`}4.Beego summary
Grand summary , We do in class , You can also summarize it by yourself
author : Office template library Material frog
Game programming ️, A game development favorite ~
If the picture is not displayed for a long time , Please use Chrome Kernel browser .
版权声明
本文为[Game programming]所创,转载请带上原文链接,感谢
https://yzsam.com/2022/04/202204232027530795.html
边栏推荐
- 堡垒机、跳板机JumpServer的搭建,以及使用,图文详细
- Zdns was invited to attend the annual conference of Tencent cloud basic resources and share the 2020 domain name industry development report
- CVPR 2022 | querydet: use cascaded sparse query to accelerate small target detection under high resolution
- I JS deep copy and shallow copy
- Change the material of unity model as a whole
- Commande dos pour la pénétration de l'Intranet
- bounding box iou
- The ODB model calculates the data and outputs it to excel
- Cadence OrCAD capture batch change component packaging function introduction graphic tutorial and video demonstration
- Confusion about thread blocking after calling the read () method of wrapper flow
猜你喜欢
LeetCode 116. 填充每个节点的下一个右侧节点指针
The construction and use of Fortress machine and springboard machine jumpserver are detailed in pictures and texts
SQL Server Connectors By Thread Pool | DTSQLServerTP plugin instructions
![[stack and queue topics] - sliding window](/img/65/a2ce87f1401d7a28d4cce0cc85175f.png)
[stack and queue topics] - sliding window
Development of Matlab GUI bridge auxiliary Designer (functional introduction)

Devexpress 14.1 installation record
缓存淘汰算法初步认识(LRU和LFU)

PIP installation package reports an error. Could not find a version that satisfies the requirement pymysql (from versions: none)
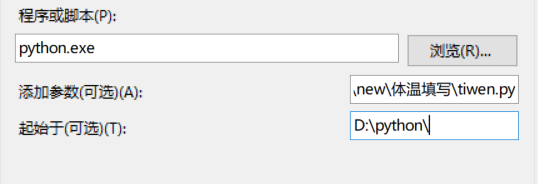
Automatically fill in body temperature and win10 task plan

Rt-1052 learning notes - GPIO architecture analysis
随机推荐
LeetCode 542、01 矩阵
SQL: query duplicate data and delete duplicate data
[PTA] l1-006 continuity factor
bounding box iou
WordPress plug-in: WP CHINA Yes solution to slow domestic access to the official website
Mathematical modeling column | Part 5: MATLAB optimization model solving method (Part I): Standard Model
Leetcode 542, 01 matrix
Recognition of high-speed road signs by Matlab using alexnet
Matlab analytic hierarchy process to quickly calculate the weight
CVPR 2022 | querydet: use cascaded sparse query to accelerate small target detection under high resolution
go-zero框架数据库方面避坑指南
DNS cloud school rising posture! Three advanced uses of authoritative DNS
缓存淘汰算法初步认识(LRU和LFU)
【PTA】整除光棍
黑客的入侵方式你知道几种?
Customize timeline component styles
RT-1052学习笔记 - GPIO架构分析
Three. Based on ply format point cloud voxel model JS upload interface writing
Vscode download speed up
After route link navigation, the sub page does not display the navigation style problem