当前位置:网站首页>Simple use of navigation in jetpack
Simple use of navigation in jetpack
2022-04-23 18:43:00 【KIDD-4869】
To configure
introduce Navigation( other Kotlin You need to introduce yourself , Then there are Kotlin The presentation of )
def nav_version = "2.3.2"
implementation "androidx.navigation:navigation-fragment-ktx:$nav_version"
implementation "androidx.navigation:navigation-ui-ktx:$nav_version"
The following is the project structure diagram , It's more clear to list , Although it is only a brief introduction to the use of . What is unfolded is where it can be used

Navigation
Next is the step-by-step operation , Direct column code will make people bigger , To be added later .
First, in the res Create files under folders
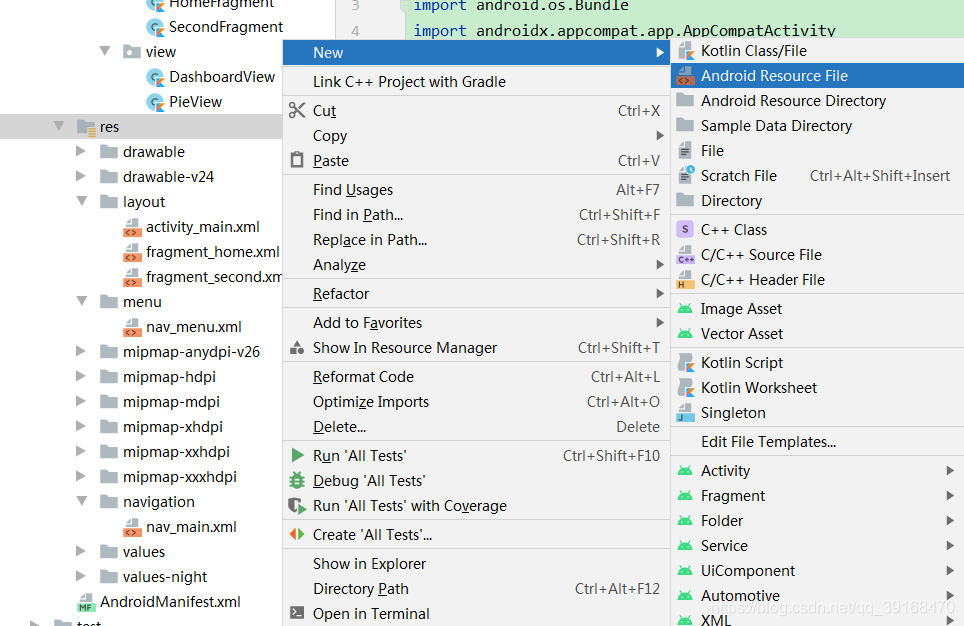
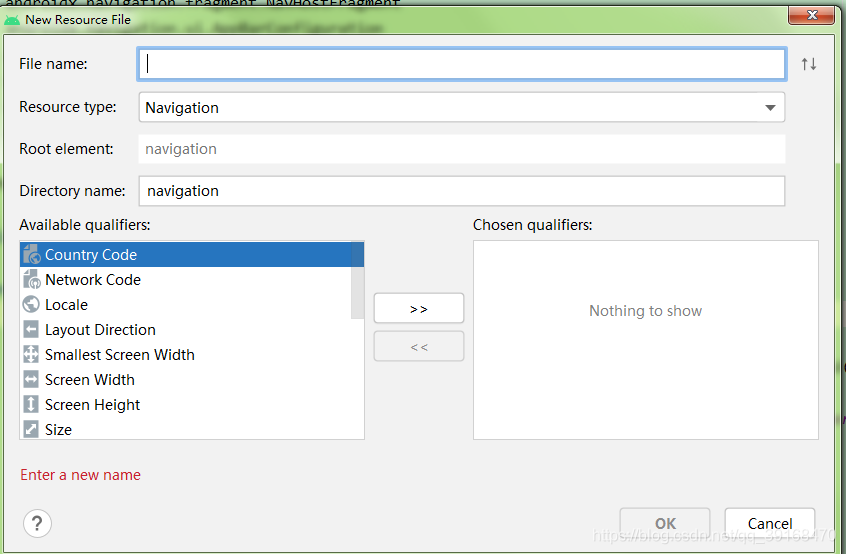
Fill in your name , choice Navigation, If you haven't created such a file , This folder will be automatically generated to store .
Next, write the generated file , I am here nav_main.xml.
<?xml version="1.0" encoding="utf-8"?>
<navigation xmlns:android="http://schemas.android.com/apk/res/android"
    xmlns:app="http://schemas.android.com/apk/res-auto"
    xmlns:tools="http://schemas.android.com/tools"
    android:id="@+id/nav_main"
    // The initial... Defined here Fragment
    app:startDestination="@id/homeFragment">

    <fragment
        android:id="@+id/homeFragment"
        android:name="com.kxqin.myapplication.fragment.HomeFragment"
        android:label="fragment_home"
        tools:layout="@layout/fragment_home">
        // Jump is defined here , Using small arrows directly in the view will automatically generate
        <action
            android:id="@+id/action_homeFragment_to_secondFragment"
            app:destination="@id/secondFragment"
            // You can add your own animation
            app:enterAnim="@anim/fragment_fade_enter"
            app:exitAnim="@anim/fragment_fade_exit" />
    </fragment>

    <fragment
        android:id="@+id/secondFragment"
        android:name="com.kxqin.myapplication.fragment.SecondFragment"
        android:label="fragment_second"
        tools:layout="@layout/fragment_second" />
</navigation>
Use this button to quickly add components , Here is the visual operation platform , Well, don't feel low ah , In fact, it's very useful .

Using this arrow to pull it is a quick action Jump operation , But this action You need to define the specified operation in the subsequent code to take effect .( This is bullshit , This article does not do this operation .)

Next is the main page code
<?xml version="1.0" encoding="utf-8"?>
<LinearLayout xmlns:android="http://schemas.android.com/apk/res/android"
    xmlns:app="http://schemas.android.com/apk/res-auto"
    xmlns:tools="http://schemas.android.com/tools"
    android:layout_width="match_parent"
    android:layout_height="match_parent"
    tools:context=".activity.MainActivity"
    android:orientation="vertical">

    <com.google.android.material.bottomnavigation.BottomNavigationView
        android:id="@+id/navView"
        android:layout_width="match_parent"
        android:layout_height="wrap_content"
        app:menu="@menu/nav_menu" />

    <!-- here name Fixed to this class !-->
    <androidx.fragment.app.FragmentContainerView
        android:id="@+id/nav_host_fragment_container"
        android:layout_width="match_parent"
        android:layout_height="match_parent"
        android:name="androidx.navigation.fragment.NavHostFragment"
        app:navGraph="@navigation/nav_main"
        app:defaultNavHost="true" />

</LinearLayout>
We need to put a container FragmentContainerView To hold our Fragment,id There must be a definition of , Otherwise, an error will be reported when compiling .app:navGraph="@navigation/nav_main" It was just built Navigation The files under the .
I used BottomNavigationView, It's the bottom bar , I just put it on it .
Also generate a Menu Files of type , Here I define as nav_menu.xml.
<?xml version="1.0" encoding="utf-8"?>
<menu xmlns:android="http://schemas.android.com/apk/res/android"
    xmlns:app="http://schemas.android.com/apk/res-auto">
    <item
        android:id="@+id/homeFragment"
        android:title=" Home page " />
    <item
        android:id="@+id/secondFragment"
        android:title=" The pie chart " />
</menu>
Be careful ! here item Of id And just now nav_main.xml Medium Fragment Of id Agreement , Otherwise, there will be no effect when clicking later !
Let's have a look MainActivity Code for
class MainActivity : AppCompatActivity() {


    private val binding: ActivityMainBinding by viewbind()

    override fun onCreate(savedInstanceState: Bundle?) {

        super.onCreate(savedInstanceState)
        setContentView(binding.root)
        val appBarConfig = AppBarConfiguration.Builder(R.id.homeFragment, R.id.secondFragment).build()
        // use fragment Container build navigation controller
        val navController = (supportFragmentManager.findFragmentById(R.id.nav_host_fragment_container) as NavHostFragment).navController
        // Set the configuration for the navigation controller
        NavigationUI.setupActionBarWithNavController(this, navController, appBarConfig)
        // relation NavigationView And navigation controller
        NavigationUI.setupWithNavController(binding.navView, navController)
    }
}
Here we use ViewBinding, If you don't know, you can have a look Last article Oh , There is a simple introduction to use .

Click on tab You can switch Fragment La , Go and have a try !
版权声明
本文为[KIDD-4869]所创,转载请带上原文链接,感谢
https://yzsam.com/2022/04/202204210603464515.html
边栏推荐
- 根据快递单号查询物流查询更新量
- Fundamentals of machine learning theory -- some terms about machine learning
- kettle庖丁解牛第17篇之文本文件输出
- MVVM模型
- Use of regular expressions in QT
- Implementation of TCP UDP communication with golang language
- CISSP certified daily knowledge points (April 14, 2022)
- 机器学习理论基础篇--关于机器学习的一些术语
- Sentinel规则持久化进Nacos
- Résolution: cnpm: impossible de charger le fichier... Cnpm. PS1 parce que l'exécution de scripts est désactivée sur ce système
猜你喜欢
ctfshow-web362(SSTI)
Esp32 (UART receiving and sending) - receiving and sending communication of serial port (4)
os_authent_prefix
Creation and use of QT dynamic link library

Eight bit binary multiplier VHDL

Machine learning practice - naive Bayes
ESP32 LVGL8. 1 - bar progress bar (bar 21)
Use stm32cube MX / stm32cube ide to generate FatFs code and operate SPI flash
PyGame tank battle

On iptables
随机推荐
#yyds干货盘点#stringprep --- 因特网字符串预备
Daily CISSP certification common mistakes (April 18, 2022)
机器学习理论之(7):核函数 Kernels —— 一种帮助 SVM 实现非线性化决策边界的方式
CANopen STM32 transplantation
昇腾 AI 开发者创享日全国巡回首站在西安成功举行
Fundamentals of machine learning theory -- some terms about machine learning
Query the logistics update quantity according to the express order number
Treatment of incomplete display of listview height
C language simulates entering and leaving the stack, first in first out, first in first out, shared memory
【数学建模】—— 层次分析法(AHP)
Imx6 debugging LVDS screen technical notes
kettle庖丁解牛第17篇之文本文件输出
CISSP certified daily knowledge points (April 14, 2022)
ctfshow-web361(SSTI)
Introduction to ROS learning notes (II)
7、 DOM (Part 2) - chapter after class exercises and answers
os_authent_prefix
纠结
[mathematical modeling] - analytic hierarchy process (AHP)
Esp32 (UART 485 communication) - 485 communication of serial port (3)