当前位置:网站首页>Oak-d raspberry pie cloud project [with detailed code]
Oak-d raspberry pie cloud project [with detailed code]
2022-04-23 16:04:00 【Oak China_ official】
edit :OAK China
First episode :oakchina.cn
Like it , Please do more ️
Preface
Hello, Hello everyone , Here is OAK China , I'm your assistant .
This article is from IBM The engineer Richard Hopkins A tutorial for , from OAK China reorganizes and updates .
Part 1

OAK-D It's a great depth camera and AI Accelerator , The default depth stream it creates is 1280 x 800 Pixels . Each depth measurement is a 16 Bit unsigned integer , Represents the depth in millimeters (65535 Indicates that no depth information is available for this pixel ). On a powerful computer , Combine this data with a color camera , I believe it is possible to generate some very amazing point clouds !
I am right. K9( The author's robot project ) The first application is to study how to use the camera to enhance his collision detection ability ; So , I don't need colored point clouds —— A point cloud that generates 10 million points per second will undoubtedly overload my raspberry pie . As I learn more about using OAK-D, Maybe it's possible to go directly to OAK-D Generate point cloud on , But for now, let's see if I can do something simple .
Reduce the minimum depth detection distance
The first task is to reduce OAK-D The minimum distance that can detect the depth . By default , This means that the minimum depth is 69 centimeter , And the camera can focus on 19.6 centimeter . The reason for this difference is , The biggest difference between the two images that the camera can detect is 96 Pixels . Of course , If you make the image smaller , this 96 The difference between pixels will become more significant , The potential minimum depth of the camera will also decrease .
therefore , The easiest way to improve depth detection to avoid collisions is to set OAK-D Reduce the resolution of the black-and-white depth camera when piping . There's an added benefit to this , Is to reduce the amount of image data to be processed by raspberry pie . As you can see in the video , My rapid prototyping is less than 30 It works well in the range of CM !
Remove and reduce resolution “ No depth ” data
The second step is to further reduce the resolution , send K9 Ability to convert data into point clouds . At last I decided to use skimage.measure.blockreduce To reduce the resolution of the image . I didn't average the pixel values of the whole block , Instead, choose to use the minimum value in the block ( That is, the nearest distance measured ). This gives a " The worst case scenario ", The block reduction algorithm can automatically delete pixels without depth information .
Remove instantaneous noise
On the image 20 Multiple extraction , It can well remove the unknown depth information in the image . It also changes its volume from... Per second 1000 10000 points reduced to more manageable 6400 spot . However , There is still some evidence of random noise in the image , So I decided to average the value of the last two frames with a few remaining points . The final result is quite reliable , You can see in the video . next step , Generate a point cloud !
Part 2
At the end of this article Part 1, I started from OAK-D 3D The depth information from the camera flows into the raspberry pie , And through the 640 x 400 Data feed for extraction , Select each 20x20 The closest depth measurement of a pixel , Greatly reduce the amount of data . This gives me a 32x20 Depth map of , For... Per second 10 Second point cloud conversion . Point clouds will make K9 Be able to understand the things in front of it with finer texture and greater distance than at present .
Why use point clouds ?
Although from OAK-D The resolution ratio of the depth data K9 On the ear 11 The dollar lidar is much higher , And the working distance is much longer , But just measuring the depth of everything doesn't help the robot immediately understand its surroundings . Why not ? Um. , Because if you think about it , When the floor starts to get close to the robot , Then retreat to the distance , But the floor is not an obstacle ! How can a robot tell the difference between the floor and what it's going to hit ?
One way might be to place the robot on a completely flat and open floor , Measure the depth of the floor , And subtract these depth measurements from the sensor readings as he moves . If the measurement is incorrect where you expect to see the floor , Then this will indicate that there are obstacles to avoid . The disadvantage of this technology is , A slope may cause the entire floor to be identified as an obstacle . Besides , It doesn't solve another important problem —— If there is an obstacle in the distance , There is a gap between them , How does the robot judge whether it can pass through this gap ?
A better solution is to use trigonometry , According to the position of the depth measurement in the camera picture , Measure the depth measurement “ Projection ” Into memory 3D In the map . If we know the location of the robot's camera ( Or to be more precise , Survey location of depth map ), Then all depth measurements can be projected from this point according to their position in the picture . for example , Measurements from below the middle of the image are projected downward , The farther the measured value is from the middle , The greater the angle of projection .
If the measurement quality is good , The math is correct , So when the robot sees the ground , The point will be projected , Its height is exactly the height of the camera , But it's negative . If you add the height of the projection point to the height of the camera , You should get a number very close to zero —— This means that the robot can safely cross the point . If the height you get is a significantly positive number , Then there may be obstacles at the depth from the camera . in addition , If you get a significantly negative number , Then your robot may be approaching a staircase or a large hole .
In our case , According to the differentiation degree of the original depth image , This leads to the need to 25 ten thousand (640 x 400) or (32 x 20)640 The depth measurements are projected onto " Point cloud " in , Per second 10 Time . This is probably more than... Per second 200 10000 points , Or maybe it's just 7000 A little bit . Now? , On a powerful computer ,250 Ten thousand may be possible , But on raspberry pie , I think we may have to go to the low end !
that , What is the quickest way to do this ? When I see a problem that I have to process image data quickly , I always choose the name numpy Of Python library .Numpy Very effective in multidimensional array processing —— The picture is just a large two-dimensional array .
Use numpy, I can develop some fairly efficient Python Code , take OAK-D All the complex content seen by the camera is transformed into a simple digital string , For transmission to K9 Short term memory . There? ,K9 These rapidly changing but simple data can be used to determine which directions are safe for it .
How it works ?
Numpy It's an excellent Python library , It enables you to quickly process multidimensional arrays . This is a magical 、 Powerful 、 The ability to be fast —— And it works on raspberry pie .
Developing this code is a challenge , Because I know I need to use numpy Make your code efficient , This means avoiding loops . Use numpy Directly convert an array and use several for Loop to iterate over a numpy The performance difference between arrays is like day and night . Native "numpy Than numpy/ Loop mixing is fast 100 Times are not uncommon . On raspberry pie , Every machine cycle is important , under these circumstances , This may mean giving him the difference between slow and rough environmental induction and fine and highly reactive induction . If numpy The code is very efficient , I may be able to handle 100 Times the data , therefore , Instead of subtracting... From the sensor flow 20 times , We may just need to subtract 2 Times .
Calibration code
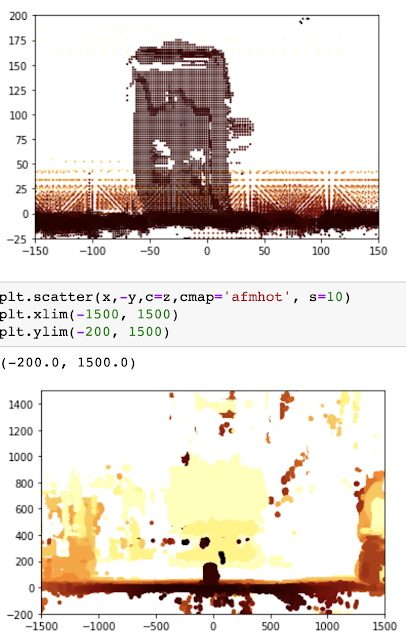
I am for K9 Raspberry pie 4 Strong enough , So that I can use the... Hosted on raspberry pie Jupyter Notebook To develop code iteratively and incrementally . Jupyter Notebook It's a Python Interpreter , Enables you to write repeatedly at the same time 、 Record and test code . Through the appropriate library , You can also display graphics and images in your notebook . I use this function to generate the following image , And when programming, use the real-time stream of the camera to create code .
That means raspberry pie and OAK-D The camera can be put in the lounge ( There is a large flat floor ), And I can be on the sofa Mac Notebook development on . Use Notebook It's using numpy A quick way to develop . You can see what you are doing in your notebook . The following series of images show the incremental approach I use to develop code .
To develop code , I basically emptied the floor of our lounge , In this way, I have a good open and flat space . The camera is placed on a tripod , Consistent with its height on the robot . To enable me to calibrate the algorithm , I used three tea cans , I know they have 150 Mm high and 100 Mm wide . In order to speed up , I put the drink coaster on the floor , Form a large grid . This enables me to move the tea can quickly , Instead of measuring their distance from the camera every time .
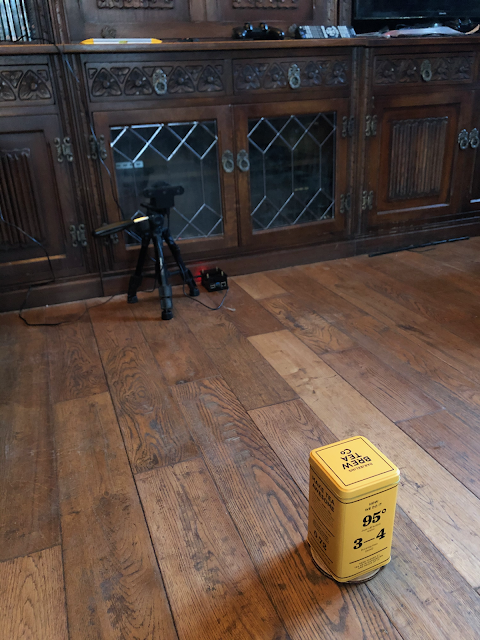
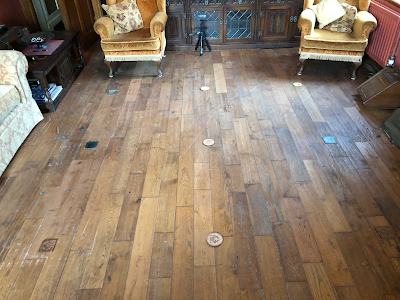
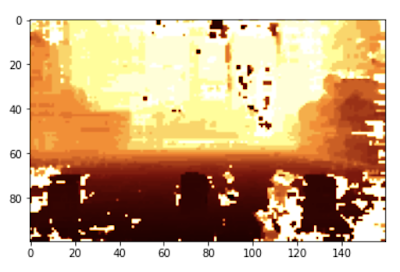
If I can convert what the camera sees into three cans of the right size , In the right place on my Grid , I knew my point cloud algorithm was effective . This is the picture I started using . There are three cans in the picture , But even people are not easy to pick them out —— Also notice how the floor retreats into the distance .
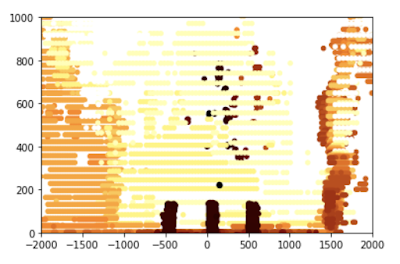
After considerable adjustment , I can calculate this point cloud version —— As you can see , The floor has disappeared , We can only see three cans , They were obviously sitting on the floor . This is for robots , It's much easier to deal with .
To fine tune the robot's feel , I can use my notebook to separate only one jar in the picture ; Since I know the size of this jar , I can fine tune the algorithm .
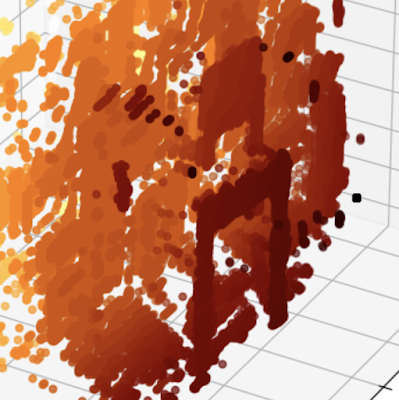
once Jupyter Notebook Works well on simple cans 、 It's accurate , It's time to try in a more random environment , So point it at me , And in the notebook with 3D To draw the generated point cloud ( Not what I used to calibrate the algorithm 2D visualization ). This code is not in K9 Use in , But it gives people a good feeling of calculation results .
Code
The code is very short , But it's dense -- Most of the processing is in 25 Within the line . K9 It's a fairly simple robot model -- He has about 50 Centimeter wide ,80 Centimeter high . Avoid him in any meaningful way , So for the purpose of route planning and collision detection , What we need to know is where the nearest obstacle is at each point in front of the robot . K9 It is safe to ignore heights less than 5 Cm obstacle , Or those who start to surpass in the air 80 Cm obstacle . therefore , To keep it simple , Code will K9 The area of two meters on both sides translates into 10 Centimeter resolution grid . For each of these 10 Centimeter pieces , The distance from the nearest obstacle is recorded .
If you have a more complex robot or drone , Then the grid ( In the next step 5 Reached in ) Octree means , You don't need steps 6 了 . If K9 Become complex enough , You need to start assembling a complete picture of its surroundings , Then I'll use his short-term memory Redis Database to store octree .
This code has comments , But the following exercise may help you understand what it's doing :
- front 45 OK, just will OAK-D The camera is set to lower resolution depth mode and per second 10 frame . This is done to reduce the amount of data , Also to reduce the minimum depth that the camera can detect .
- The first 51 Row extraction input depth map ( Extracted variables describe the extent to which this happens , from 1 To 20 The number of has been tested , Work well )
- The first 54 To 64 The line completes each point in the depth map image ( Be regarded as 2D array ) Convert to 3D points (x,y and z) Hard work .
- The first 65 to 71 Filter the result points into the points that the robot needs to worry about ( The robot is more than two meters on both sides and higher than 800 Mm points are ignored —— This is because K9 high 80 centimeter )
- then , Line 72 to 80 take x、y、z The dots are arranged in a 40×8 Of 10 Centimeter square two-dimensional grid (400 centimeter ×80 centimeter ). Then calculate the average distance of all points in each segment of the grid .
- The first 83 Go to the first place 87 OK, use 40×8 The grid of , And further simplified to one-dimensional 40 Digit group ; This is done by simply deciding 40 Which block in each column in the column is the most recent to complete .
From the first 50 All processing that starts with the line can only work effectively on raspberry pie , This is because of the use of numpy And related libraries , Process the two-dimensional depth map into a three-dimensional array , And then back to the one-dimensional array . One dimensional depth array makes K9 It's easy to know where he can try to travel , Where not .
!/usr/bin/env python3
# coding: utf-8

import cv2
import depthai
import numpy as np
import pandas as pd

device = depthai.Device('', False)
body_cam = device.create_pipeline(config={
    "streams": ["depth"],
    "ai": {
        "blob_file": "/home/pi/depthai/resources/nn/face-detection-retail-0004/face-detection-retail-0004.blob.sh14cmx14NCE1",
        "blob_file_config": "/home/pi/depthai/resources/nn/face-detection-retail-0004/face-detection-retail-0004.json",
        'shaves' : 14,
        'cmx_slices' : 14,
        'NN_engines' : 1,
    },
    "camera": {
        "mono": {
            # 1280x720, 1280x800, 640x400 (binning enabled)
            # reducing resolution decreases min depth as
            # relative disparity is decreased
            'resolution_h': 400,
            'fps': 10
        }
    }
})

if body_cam is None:
    raise RuntimeError("Error initializing body camera")

decimate = 5
max_dist = 4000.0
height = 400.0
width = 640.0
cx = width/decimate/2
cy = height/decimate/2
fx = 1.4 # values found by measuring known sized objects at known distances
fy = 2.05

x_bins = pd.interval_range(start = -2000, end = 2000, periods = 40)
y_bins = pd.interval_range(start= 0, end = 800, periods = 8)

data_packets = body_cam.get_available_data_packets()

for packet in data_packets:
    if packet.stream_name == 'depth':
        frame = packet.getData()
        # Reduce size of depth map
        frame = skim.block_reduce(frame,(decimate,decimate),np.min)
        height, width = frame.shape
        # Convert depth map to point cloud with valid depths
        column, row = np.meshgrid(np.arange(width), np.arange(height), sparse=True)
        valid = (frame > 200) & (frame < max_dist)
        z = np.where(valid, frame, 0)
        x = np.where(valid, (z * (column - cx) /cx / fx) + 120 , max_dist)
        y = np.where(valid, 325 - (z * (row - cy) / cy / fy) , max_dist)
        # Flatten point cloud axes
        z2 = z.flatten()
        x2 = x.flatten()
        y2 = y.flatten()
        # Stack the x, y and z co-ordinates into a single 2D array
        cloud = np.column_stack((x2,y2,z2))
        # Filter the array by x and y co-ordinates
        in_scope = (cloud[:,1]<800) & (cloud[:,1] > 0) & (cloud[:,0]<2000) & (cloud[:,0] > -2000)
        in_scope = np.repeat(in_scope, 3)
        in_scope = in_scope.reshape(-1, 3)
        scope = np.where(in_scope, cloud, np.nan)
        # Remove invalid rows from array
        scope = scope[~np.isnan(scope).any(axis=1)]
        # Index each point into 10cm x and y bins (40 x 8)
        x_index = pd.cut(scope[:,0], x_bins)
        y_index = pd.cut(scope[:,1], y_bins)
        # Place the depth values into the corresponding bin
        binned_depths = pd.Series(scope[:,2])
        # Average the depth measures in each bin
        totals = binned_depths.groupby([y_index, x_index]).mean()
        # Reshape the bins into a 8 x 40 matrix
        totals = totals.values.reshape(8,40)
        # Determine the nearest segment for each of the 40
        # horizontal segments
        closest = np.amin(totals, axis = 0 )
        # Round the to the nearest 10cm
        closest = np.around(closest,-2)
        # Turn into a 1D array
        closest = closest.reshape(1,-1)
        print(closest)

    if cv2.waitKey(1) == ord('q'):
        break

del body_cam
del device
Reference material
https://docs.oakchina.cn/en/latest/
https://www.oakchina.cn/selection-guide/
OAK China
| OpenCV AI Kit Official agents and technical service providers in China
| track AI New developments in technology and products
stamp 「+ Focus on 」 Get the latest information
版权声明
本文为[Oak China_ official]所创,转载请带上原文链接,感谢
https://yzsam.com/2022/04/202204231557395475.html
边栏推荐
- ESP32_ Arduino
- Extract non duplicate integers
- Day (2) of picking up matlab
- js正則判斷域名或者IP的端口路徑是否正確
- CVPR 2022 quality paper sharing
- Pgpool II 4.3 Chinese Manual - introductory tutorial
- Day (8) of picking up matlab
- JS regular determines whether the port path of the domain name or IP is correct
- Spark 算子之交集、并集、差集
- Use bitnami PostgreSQL docker image to quickly set up stream replication clusters
猜你喜欢

MetaLife与ESTV建立战略合作伙伴关系并任命其首席执行官Eric Yoon为顾问
C language --- string + memory function
New developments: new trends in cooperation between smartmesh and meshbox
![[open source tool sharing] MCU debugging assistant (oscillograph / modification / log) - linkscope](/img/39/4d37c381f16dbe11acc64c92d0a1e5.png)
[open source tool sharing] MCU debugging assistant (oscillograph / modification / log) - linkscope
腾讯Offer已拿,这99道算法高频面试题别漏了,80%都败在算法上
Filter usage of spark operator
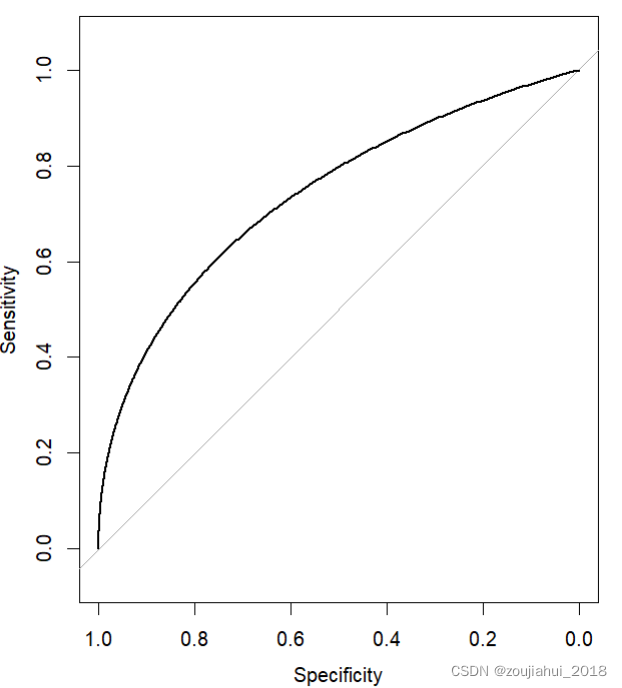
Method 2 of drawing ROC curve in R language: proc package
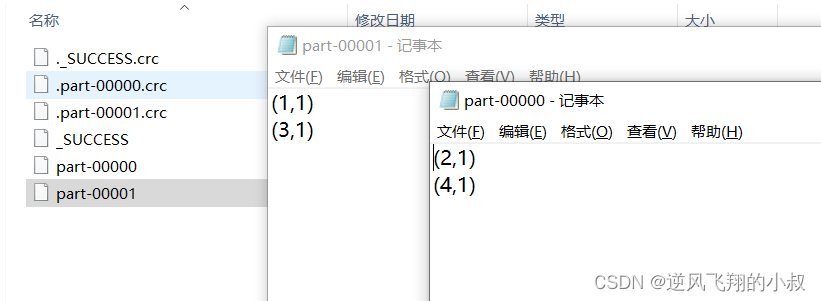
Partitionby of spark operator
C语言自编字符串处理函数——字符串分割、字符串填充等
Day (6) of picking up matlab
随机推荐
API IX JWT auth plug-in has an error. Risk announcement of information disclosure in response (cve-2022-29266)
Go language slice, range, set
通过Feign在服务之间传递header请求头信息
ESP32_ Arduino
C language --- string + memory function
Filter usage of spark operator
gps北斗高精度卫星时间同步系统应用案例
Vision of building interstellar computing network
Intersection, union and difference sets of spark operators
Spark 算子之交集、并集、差集
5分钟,把你的Excel变成在线数据库,神奇的魔方网表excel数据库
捡起MATLAB的第(10)天
Spark 算子之coalesce与repartition
leetcode-396 旋转函数
Day (2) of picking up matlab
Cloudy data flow? Disaster recovery on cloud? Last value content sharing years ago
运维流程有多重要,听说一年能省下200万?
Meaning and usage of volatile
如何进行应用安全测试(AST)
Coalesce and repartition of spark operators