当前位置:网站首页>STM32__03—初识定时器
STM32__03—初识定时器
2022-04-23 16:41:00 【c语言的神】
一,TIM简介
TIM的本质就是计数器,对输入的时钟进行计数,基准时钟为主频72MHZ,不分频时每秒可以产生72M个脉冲。TIM分高级,通用,基础定时器,我使用的是f102c8t6只有TIM1~TIM4四个定时器,其中TIM1为高级定时器,其他为通用定时器,本次主要围绕通用定时器。
1,通用定时器内部结构
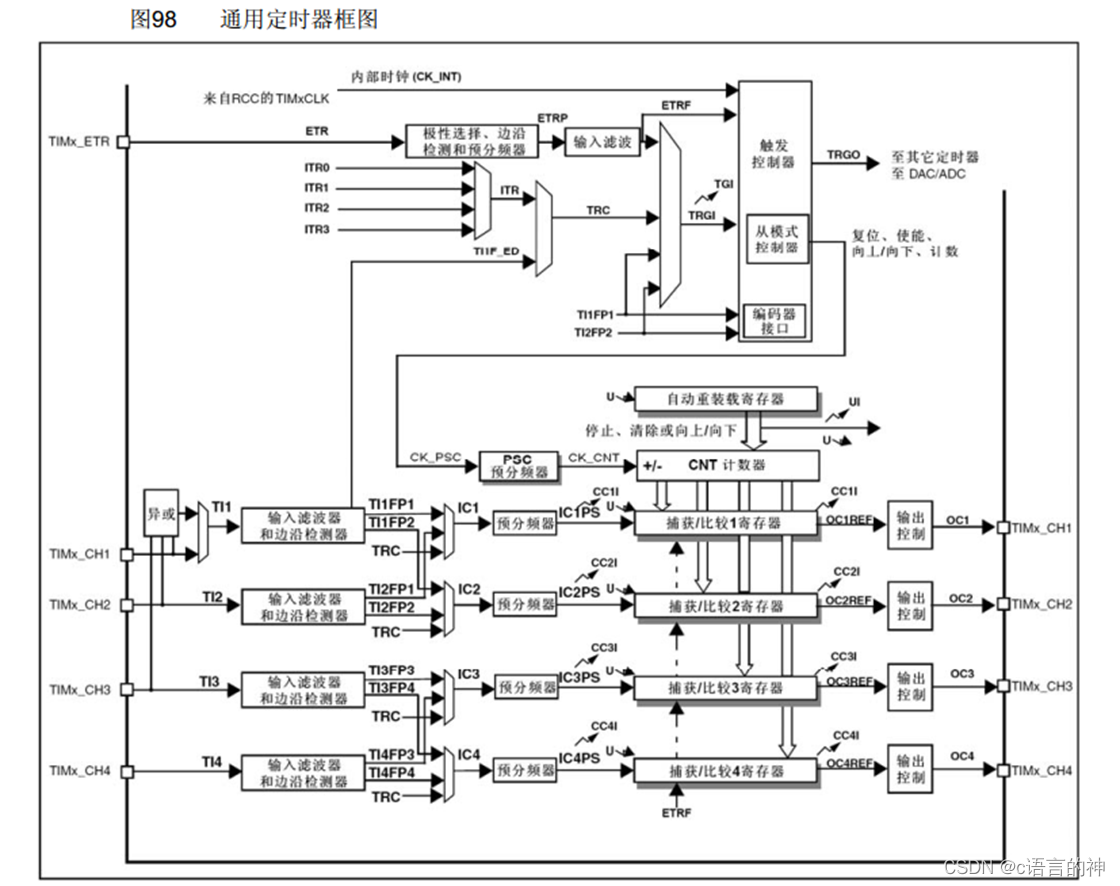
左侧为时钟输入,这次我们主要了解TIMx_ETR外部时钟与内部时钟TIMxCLK,TIMx_CH1,为输入捕获,本次不涉及。
上面结构过于复杂这里引用B站江科大做的一张图
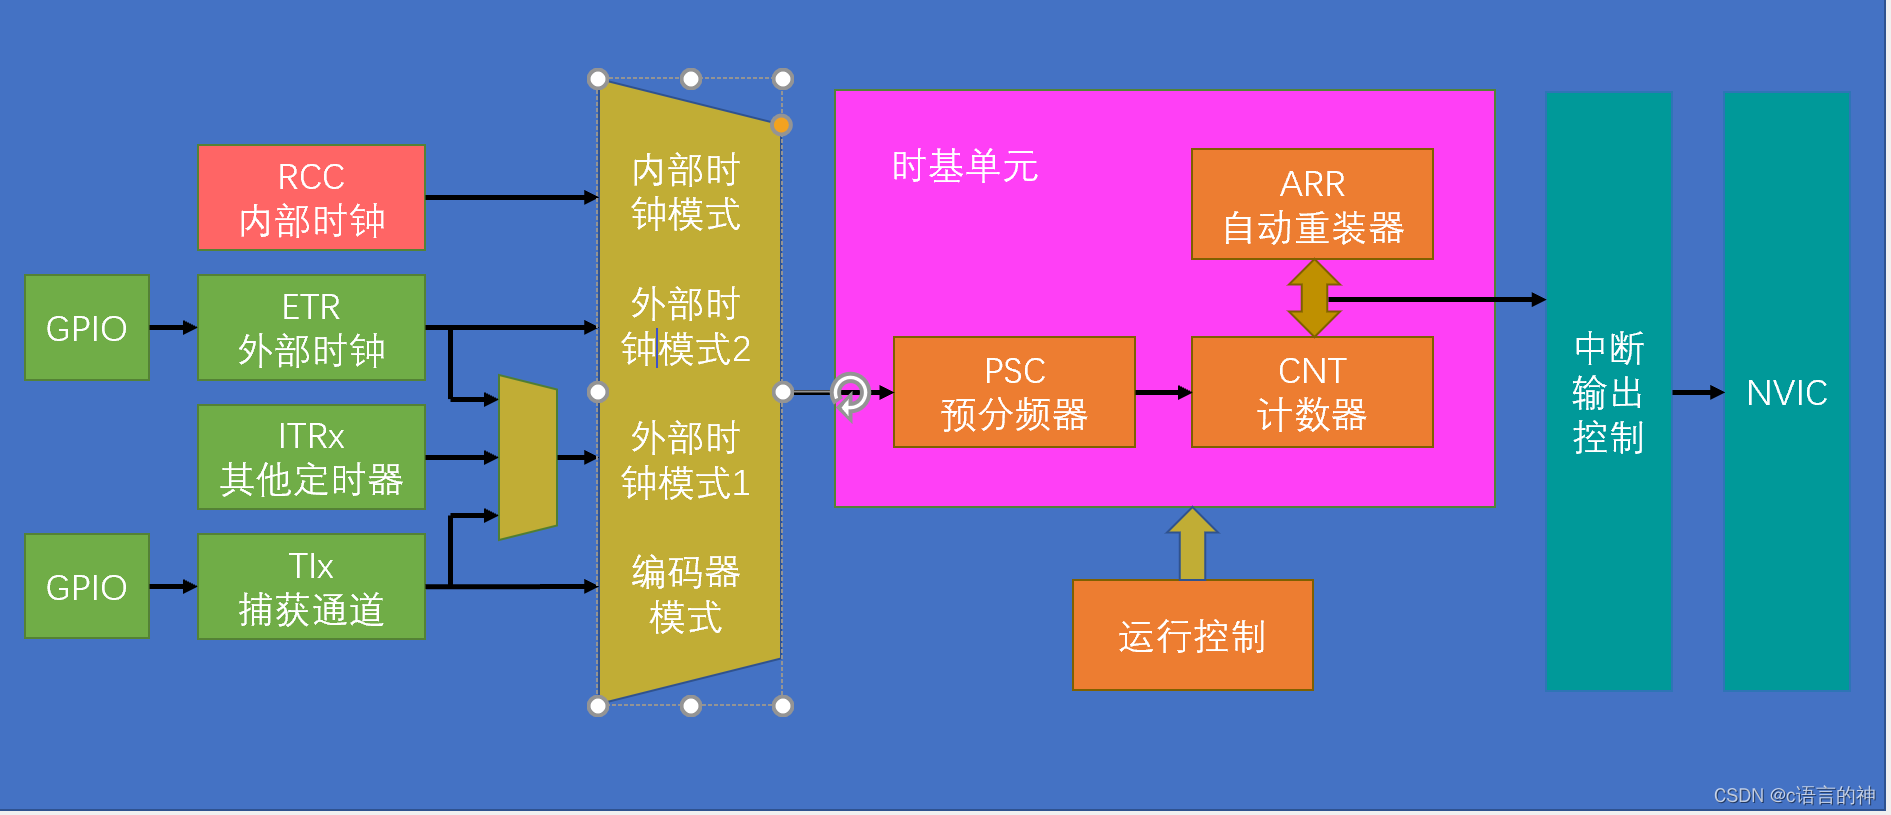
对于这张图,我们只需要从左到右对定时器进行初始就可以
2,初始化定时器
1)首先要启用内部时钟。开启TIM2(本次使用的为TIM)时钟,使用内部时钟模式。
使用的函数有:
RCC_APB1PeriphClockCmd(RCC_APB1Periph_TIM2,ENABLE);
基础与通用定时器都连接在APB1总线,高级定时器连接在APB2总线。
TIM_InternalClockConfig(TIM2);
使用内部时钟,就算没有调用这个函数系统默认使用内部时钟。
2)时基单元的配置,与配置GPIO相似,都是对结构体变量进行配置
TIM_TimeBaseInitTypeDef TIM_TimerBaseStructure;
定义结构体变量名
TIM_TimerBaseStructure.TIM_ClockDivision=TIM_CKD_DIV1;
时钟分频,这里不使用。
TIM_TimerBaseStructure.TIM_CounterMode=TIM_CounterMode_Up ;
计数器模式,这里选择常规的向上计数
TIM_TimerBaseStructure.TIM_Period=10000-1;
对ARR自动重装器进行配置
TIM_TimerBaseStructure.TIM_Prescaler=7200-1;
对PSC预分频器进行配置
注意:这里使用我们这里使用了定时一秒的操作,可以参考公式

-1是为了消除误差,我们可以这么理解,内部时钟的频率为72MHZ,先用预分频器分成7200份,这样每份就是10000HZ,然后我们用一个容量为10000的计数器去计算脉冲,10000HZ为一秒产生10000个脉冲,这样一秒之后就把计数器装满,产生溢出。
TIM_TimerBaseStructure.TIM_RepetitionCounter=0;
重复计数器,高级定时器才有,我们这里置0。
TIM_TimeBaseInit(TIM2,&TIM_TimerBaseStructure);
调用初始化函数,完成对时基单元的配置
3)中断使能
TIM_ClearFlag(TIM2,TIM_FLAG_Update);
这个函数为清除中断标志位,为什么多了这一步呢?我们可以看一下TIM_TimeBaseInit()的定义

立即生成更新事件以重新加载预分器和重复计数器值,可以理解为,在初始化时基单元后会立即生成更新事件,导致中断标志位置1,复位完就立即进入中断函数,会导致程序提前一步运行,所以初始化完时基单元不要忘了这一步。
TIM_ITConfig(TIM2,TIM_IT_Update,ENABLE);
更新中断到NVIC
4)NVIC的配置
NVIC_PriorityGroupConfig(NVIC_PriorityGroup_2);
NVIC优先级分组
NVIC_InitTypeDef NVIC_InitStructure;
结构体变量命名
NVIC_InitStructure.NVIC_IRQChannel=TIM2_IRQn ;
定时器TIM2在NCIV的中断通道
NVIC_InitStructure.NVIC_IRQChannelCmd=ENABLE;
通道使能
NVIC_InitStructure.NVIC_IRQChannelPreemptionPriority=2;
优先级
NVIC_InitStructure.NVIC_IRQChannelSubPriority=1;
优先级
NVIC_Init(&NVIC_InitStructure);
NVIC初始化函数
TIM_Cmd(TIM2,ENABLE);
启用或禁用指定的TIM外设
5)中断服务函数的调用
void TIM2_IRQHandler();
一个完整的定时器初始化完成。
二,代码部分
1,Timer.c
#include "stm32f10x.h"                  // Device header


void Timer_Init()
{
	RCC_APB1PeriphClockCmd(RCC_APB1Periph_TIM2,ENABLE);//开启TIM2时钟,注意是APB1Z总线

	TIM_InternalClockConfig(TIM2);//上电后默认使用内部时钟,但是为了程序的完整性,还是调用了这个函数

	//时基单元的初始化
	TIM_TimeBaseInitTypeDef TIM_TimerBaseStructure;
	TIM_TimerBaseStructure.TIM_ClockDivision=TIM_CKD_DIV1;//时钟分频,滤波使用
	TIM_TimerBaseStructure.TIM_CounterMode=TIM_CounterMode_Up ;//向上计数
	TIM_TimerBaseStructure.TIM_Period=10000-1;//ARR自动重装器的值
	TIM_TimerBaseStructure.TIM_Prescaler=7200-1;//PSC预分频率的值
	//这里可以理解为给72MHZ的信号分7200份,每一份就是10000hz,然后用一个容量为10000的容器
	//去装,每装满一次为1S
	TIM_TimerBaseStructure.TIM_RepetitionCounter=0;//重复计数器,高级定时器才有
	TIM_TimeBaseInit(TIM2,&TIM_TimerBaseStructure);
	//使能中断
	TIM_ClearFlag(TIM2,TIM_FLAG_Update);
	TIM_ITConfig(TIM2,TIM_IT_Update,ENABLE);//更新中断到NVIC
	//NVIC配置
	NVIC_PriorityGroupConfig(NVIC_PriorityGroup_2);//NVIC优先级分组
	NVIC_InitTypeDef NVIC_InitStructure;
	NVIC_InitStructure.NVIC_IRQChannel=TIM2_IRQn ;//定时器TIM2在NCIV的中断通道
	NVIC_InitStructure.NVIC_IRQChannelCmd=ENABLE;
	NVIC_InitStructure.NVIC_IRQChannelPreemptionPriority=2;//优先级
	NVIC_InitStructure.NVIC_IRQChannelSubPriority=1;//优先级
	NVIC_Init(&NVIC_InitStructure);
	//启动定时器
	TIM_Cmd(TIM2,ENABLE);
}
//中断服务函数
//void TIM2_IRQHandler()
//{
//	if(TIM_GetITStatus(TIM2,TIM_IT_Update)==SET)
//	{
//		TIM_ClearITPendingBit(TIM2,TIM_IT_Update);
//	}
//}
2,oled.c
#include "stm32f10x.h"                  // Device header
void LED_Init()
{
	RCC_APB2PeriphClockCmd(RCC_APB2Periph_GPIOA,ENABLE);
	GPIO_InitTypeDef GPIO_InitStructure;
	GPIO_InitStructure.GPIO_Mode=GPIO_Mode_Out_PP;
	GPIO_InitStructure.GPIO_Pin=GPIO_Pin_1 | GPIO_Pin_2;
	GPIO_InitStructure.GPIO_Speed=GPIO_Speed_50MHz;
	GPIO_Init(GPIOA,&GPIO_InitStructure);
	GPIO_SetBits(GPIOA,GPIO_Pin_1 | GPIO_Pin_2);
}
void LED1_ON()
{
	GPIO_ResetBits(GPIOA,GPIO_Pin_1);
}
void LED1_OFF()
{
	GPIO_SetBits(GPIOA,GPIO_Pin_1);
}
void LED1_Turn()
{
	if(GPIO_ReadOutputDataBit(GPIOA,GPIO_Pin_1)==0)
	{
		GPIO_SetBits(GPIOA,GPIO_Pin_1);
	}
	else
	{
		GPIO_ResetBits(GPIOA,GPIO_Pin_1);
	}
}
void LED2_Turn()
{
	if(GPIO_ReadOutputDataBit(GPIOA,GPIO_Pin_2)==0)
	{
		GPIO_SetBits(GPIOA,GPIO_Pin_2);
	}
	else
	{
		GPIO_ResetBits(GPIOA,GPIO_Pin_2);
	}
}
void LED2_ON()
{
	GPIO_ResetBits(GPIOA,GPIO_Pin_2);
}
void LED2_OFF()
{
	GPIO_SetBits(GPIOA,GPIO_Pin_2);
}
3,main.c
#include "stm32f10x.h"                  // Device header
#include "Delay.h"
#include "LED.h"
#include "Key.h"
#include "Buzzer.h"
#include "OLED.h "
#include "Timer.h"

uint16_t Num;

int main()
{
	OLED_Init();

   Timer_Init();
	OLED_ShowString(1,1,"Num:");


	while(1)
	{

		OLED_ShowNum(1,5,Num,5);
		OLED_ShowNum(2,5,TIM_GetCounter(TIM2),5);
	}

}
void TIM2_IRQHandler()
{
	if(TIM_GetITStatus(TIM2,TIM_IT_Update)==SET)
	{
		Num++;
		TIM_ClearITPendingBit(TIM2,TIM_IT_Update);
	}
}
实现Num每秒加1,并在屏幕显示。
三,总结
stm32的定时器花了很长时间才搞懂。万事开头难,但是不知道会这么难。
版权声明
本文为[c语言的神]所创,转载请带上原文链接,感谢
https://blog.csdn.net/weixin_58931449/article/details/124360344
边栏推荐
- Force buckle-746 Climb stairs with minimum cost
- PHP 零基础入门笔记(13):数组相关函数
- Differences between MySQL BTREE index and hash index
- ByteVCharts可视化图表库,你想要的我都有
- New project of OMNeT learning
- 力扣-746.使用最小花费爬楼梯
- Zhongang Mining: Fluorite Flotation Process
- Xinwangda: HEV and Bev super fast charging fist products are shipped on a large scale
- Loading order of logback configuration file
- JSP learning 2
猜你喜欢
1959年高考数学真题

磁盘管理与文件系统
How to upgrade openstack across versions

OMNeT学习之新建工程
MySQL master-slave synchronization pit avoidance version tutorial

ACL 2022 | DialogVED:用于对话回复生成的预训练隐变量编码-解码模型
阿里研发三面,面试官一套组合拳让我当场懵逼
Xinwangda: HEV and Bev super fast charging fist products are shipped on a large scale
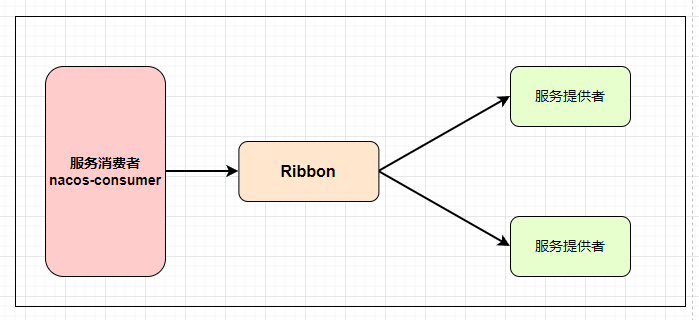
Nacos detailed explanation, something
Loggie source code analysis source file module backbone analysis

随机推荐
Introduction notes to PHP zero Foundation (13): array related functions
Force buckle-746 Climb stairs with minimum cost
Public variables of robotframework
Disk management and file system
Deepinv20 installation MariaDB
面试百分百问到的进程,你究竟了解多少
深入了解3D模型相关知识(建模、材质贴图、UV、法线),置换贴图、凹凸贴图与法线贴图的区别
欣旺达:HEV和BEV超快充拳头产品大规模出货
MySQL master-slave synchronization pit avoidance version tutorial
New project of OMNeT learning
How magical is the unsafe class used by all major frameworks?
Government cloud migration practice: Beiming digital division used hypermotion cloud migration products to implement the cloud migration project for a government unit, and completed the migration of n
04 Lua 运算符
Camtasia2022软件新增功能介绍
Download and install mongodb
Hypermotion cloud migration completes Alibaba cloud proprietary cloud product ecological integration certification
众昂矿业:萤石浮选工艺
NVIDIA显卡驱动报错
Detailed explanation of file operation (2)
On the value, breaking and harvest of NFT project