当前位置:网站首页>自定义形状seekbar学习
自定义形状seekbar学习
2022-08-11 05:24:00 【andylauren】
一直以来就很想学习自定义view,因为在做一些遥控类型的app时,有些组件用基本组件并不能完整的展示,自定义一个view就很重要。由于android开发学习还没有多久,自定义view就有点力不从心。刚好最近有些时间可以系统的学习一下,但是当我开始学习后发现和我想象还是有很大难度。
我的入门文章是《Carson带你学Android:手把手教你写一个完整的自定义View》
Carson带你学Android:手把手教你写一个完整的自定义View - 简书
非常有用,让我这样的门外汉知道了view的描画流程。这部分文章是一系列的文章,他把view的概念和相关的概念都讲解的很好,通俗易懂。
但是看过之后还是不能写出view,还需要真正的去动手写一个,在写的过程中进行查漏补缺,对号入座。
我在制作蓝牙遥控车app时有一个view组件,是一个模拟汽车档位的seekbar,如下图样子
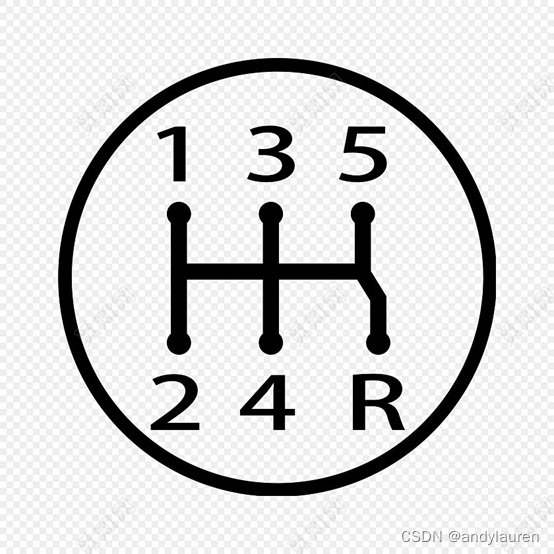
档位旋钮只能在黑色线中进行移动,在抬手时旋钮需要就近到档位,并通知app当前档位。
我观察我的这个需求实际上像是一个不规则图形的seekbar。
于是我就开始在网上查找不规则图形的seekbar的例子代码,毕竟从0开始写即使学完了我还是没有这个能力。
我在网上找到了两个不规则图形的seekbar。一个是弧形seekbar。
《Android自定义View实现弧形SeekBar》
http://lastwarmth.win/2016/04/27/seekbar/
源码:GitHub - LiJia92/CustomArcSeekBar: 自定义弧形SeekBar
还有一个月牙形seekbar
《android:自定义SeekBar月牙形状》
android:自定义SeekBar月牙形状_Jarry的博客-CSDN博客
源码:GitHub - runfengai/MySeekbar: 月牙形状的SeekBar
我是先看的弧形seekbar,发现基本能看懂,于是就在这个的基础上进行的修改成我自己的seekbar。
下面我根据我自己的工程讲解一下
先上一张我自己的类图
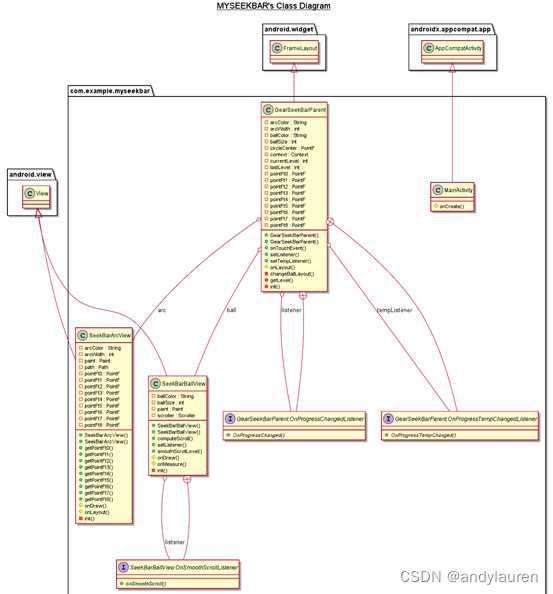
View控件主要有3个类,
SeekBarArcView.java画背景黑线类
SeekBarBallView.java画档把小球类
GearSeekBarParent.java触摸事件的处理,并提供对外接口
画线
首先是画线,要在android中画线需要调用path类接口,主要有
public void lineTo(float x, float y)画直线
public void quadTo(float x1, float y1, float x2, float y2)画二次贝塞尔曲线
public void cubicTo(float x1, float y1, float x2, float y2,
float x3, float y3) 三次贝塞尔曲线
public void arcTo(RectF oval, float startAngle, float sweepAngle,
boolean forceMoveTo)画圆弧
基本就这些了,Carson带你学Android:自定义View Path类全面解析 - 简书
这篇文章讲的很不错,想详细了解的可以看一下。
如果想心形啊,五角星啊,只能通过这些接口进行组合实现,所以需要一些数学知识,特别是在画一些不规则图形时。
我的档位线就是几个直线进行组合,所以比较简单。
先定义一些点,这些点是线段的端点
这些端点定义如下图
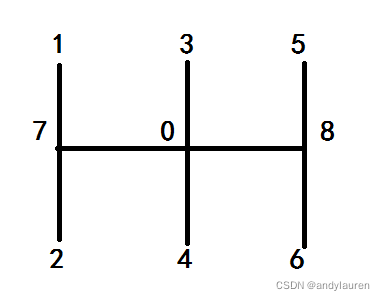
// 此处设置0-8点坐标,这个坐标边距是固定的30,最好完善重比例
pointFt1.set(30, 30);
pointFt2.set(30, bottom - top - 30);
pointFt3.set((float) (right - left) / 2, 30);
pointFt4.set((float) (right - left) / 2, bottom - top - 30);
pointFt5.set(right - left - 30, 30);
pointFt6.set(right - left - 30, bottom - top - 30);
pointFt7.set(30, (float) (bottom - top) / 2);
pointFt8.set(right - left - 30, (float) (bottom - top) / 2);
pointFt0.set((float) (right - left) / 2, (float) (bottom - top) / 2);
然后在调用moveTo和lineTo进行画线
// 画档位移动线
path.moveTo(pointFt1.x, pointFt1.y);
path.lineTo(pointFt2.x, pointFt2.y);
path.moveTo(pointFt3.x, pointFt3.y);
path.lineTo(pointFt4.x, pointFt4.y);
path.moveTo(pointFt5.x, pointFt5.y);
path.lineTo(pointFt6.x, pointFt6.y);
path.moveTo(pointFt7.x, pointFt7.y);
path.lineTo(pointFt8.x, pointFt8.y);
canvas.drawPath(path, paint);
在protected void onDraw(Canvas canvas)中调用画线方法,onDraw会在绘制过程时被调用,具体流程在《Carson带你学Android:自定义View 绘制过程(Draw)》中有讲解。
画圆球
画圆球就比较简单了,计算出圆心坐标直接画圆即可。并让圆心在黑色线的轨迹中运动就行了。
canvas.drawCircle((float) getMeasuredWidth() / 2, (float) getMeasuredWidth() / 2, (float) getMeasuredWidth() / 2, paint);具体在哪里画,就通过调用
ball.layout((int) (x - ball.getMeasuredWidth() / 2),
        (int) (y - ball.getMeasuredWidth() / 2),
        (int) (x + ball.getMeasuredWidth() / 2),
        (int) (y + ball.getMeasuredWidth() / 2));
进行描画。具体在什么地方能够描画是在public boolean onTouchEvent(MotionEvent event)的MotionEvent.ACTION_MOVE事件中进行的处理。为了在不同位置进行不同轨迹的移动,我把画图区域进行了划分,在不同的区域限制x或者y的坐标,这样就达到了在黑线内移动的要求。
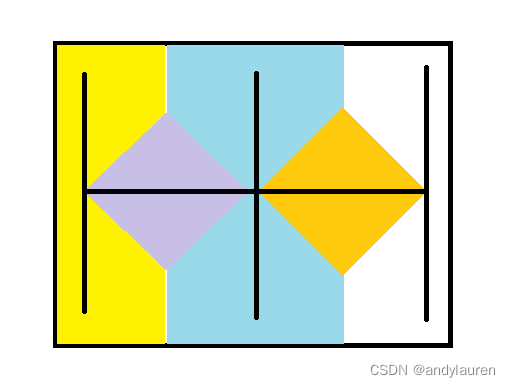
在黄色区域x为固定值,为point1的x值,只有y变化,在蓝色区域x为固定值,为point3的x值,y可以变化,在白色区域x为point5的x值,y可以变化。这几个区域可以直接使用x坐标值作为判断。
在紫色和橘色菱形中需要y固定为point7的y值,x可以变化。如何判断在菱形中就需要使用到一些数学知识推到,也不难。我的大概推到如下
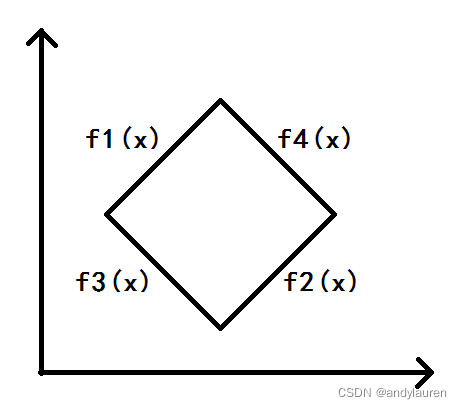
f1(x)和f2(x)用最基本的斜率为1的二元一次方程表达x+b=y,只需要带入其中一点坐标就可以得到b的值,(a1,b1)带入b=b1-a1
f3(x)和f4(x)用最基本的斜率为-1的二元一次方程表达-x+b=y,只需要带入其中一点坐标就可以得到b的值,(a1,b1)带入b=b1+a1
在菱形中需要满足f1(x)>y+a1-b1并且f2(x)<y+a2-b2并且f3(x)>a1+b1-y并且f4(x)<a2+b2-y
同时满足这四个条件就表明坐标点在菱形内。
以上图片代码实现如下
/**
 * 改变球的位置,将球在参数坐标处描画出来
 *
 * @param currentX 当前x坐标
 * @param currentY 当前Y坐标
 */
private void changeBallLayout(int currentX, int currentY) {
    float x = currentX;
    float y = currentY;
    if ((x > (y + pointFt7.x - pointFt7.y)) && (x < (y + pointFt0.x - pointFt0.y)) && (x > (pointFt7.x + pointFt7.y - y)) && (x < (pointFt0.x + pointFt0.y - y))) {
        y = pointFt7.y;
    } else if ((x > (y + pointFt0.x - pointFt0.y)) && (x < (y + pointFt8.x - pointFt8.y)) && (x > (pointFt0.x + pointFt0.y - y)) && (x < (pointFt8.x + pointFt8.y - y))) {
        y = pointFt0.y;
    } else if (x < ((pointFt1.x + pointFt3.x) / 2)) {
        x = pointFt1.x;
    } else if (x < ((pointFt3.x + pointFt5.x) / 2)) {
        x = pointFt3.x;
    } else {
        x = pointFt5.x;
    }
    if (y < pointFt1.y) {
        y = pointFt1.y;
    }
    if (y > pointFt2.y) {
        y = pointFt2.y;
    }
    circleCenter.set(x, y);
    ball.layout((int) (x - ball.getMeasuredWidth() / 2),
            (int) (y - ball.getMeasuredWidth() / 2),
            (int) (x + ball.getMeasuredWidth() / 2),
            (int) (y + ball.getMeasuredWidth() / 2));
}
到这里我们就能实现背景绘制,并且让小球在轨迹中运动。
我们还需要实现就近点吸附的效果,如果你的seekbar不需要这个功能,只想要像进度条那样的任意位置停靠,这个步骤就可以不做了。
我们需要判断小球坐标在哪个区域,这个区域属于哪个档位,在区域内进行档位设置。区域划分如下图。
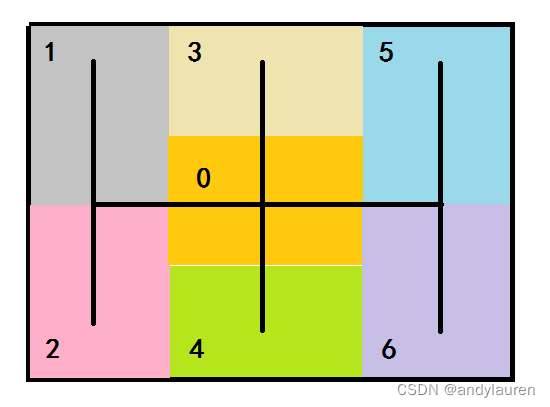
在不同的区域返回不同的档位,区域横平竖直,所以只需要使用x,y坐标进行区分即可。
/**
 * 计算档次
 *
 * @param event 事件,可以得到坐标
 * @return 档次
 */
private int getLevel(MotionEvent event) {
    float x = event.getX();
    float y = event.getY();
    int result;
    if (x < ((pointFt1.x + pointFt3.x) / 2)) {
        if (y < pointFt7.y) {
            result = 1;
        } else {
            result = 2;
        }
    } else if (x < ((pointFt3.x + pointFt5.x) / 2)) {
        if (y < ((pointFt3.y + pointFt0.y) / 2)) {
            result = 3;
        } else if (y < ((pointFt0.y + pointFt4.y) / 2)) {
            result = 0;
        } else {
            result = 4;
        }
    } else {
        if (y < pointFt8.y) {
            result = 5;
        } else {
            result = 6;
        }
    }
    return result;
}
如果我们在手指抬起时根据最后档位跳到对应point坐标是可以的,但是就会出现小球闪现的现象。我们使用了一个过渡效果,public void startScroll(int startX, int startY, int dx, int dy, int duration)这个函数是Scroller类的滑动效果,从起始点使用设置时间滑动一定距离。
/**
 * 平滑滑动
 *
 * @param startX 起始值X
 * @param startY 起始值Y
 * @param dx     X滑动距离
 * @param dy     Y滑动距离
 */
public void smoothScrollLevel(int startX, int startY, int dx, int dy) {
    scroller.startScroll(startX, startY, dx, dy, 500);
    postInvalidate();
}
这个函数设置后只是进行滑动坐标点的计算,并不会去重新绘制小球,所以需要在计算完成回调函数中不停的绘制小球,达到滑动效果展示。
// 使用之前设置的startScroll计算出的坐标,返给该函数,该函数调用回调描画小球
@Override
public void computeScroll() {
    if (scroller.computeScrollOffset()) {
        if (listener != null) {
            listener.onSmoothScroll(scroller.getCurrX(), scroller.getCurrY());
            postInvalidate();
        }
    }
}
这里是一个回调,回调在初始化时注册了
ball.setListener(this::changeBallLayout);就会不停地调用上面描画小球的方法。
然后是实现监听档位回调,需要两种,一种是在抬手时触发的最终档位回调,一种是在运动时触发的临时档位回调。
case MotionEvent.ACTION_MOVE:
    // 当手指移动时,使球跟手,不停地描画球的位置
    changeBallLayout((int) event.getX(), (int) event.getY());
    // 当手指移动时,计算经过的档位并更新经过档位
    currentLevel = getLevel(event);
    if (lastLevel != currentLevel) {
        lastLevel = currentLevel;
        if (tempListener != null) {
            tempListener.OnProgressTempChanged(currentLevel);
        }
    }
    break;
case MotionEvent.ACTION_UP:
    // 当手指离开View时,圆球平滑滑到最近的档次
    currentLevel = getLevel(event);
    int x;
    int y = (int) event.getY();
    if (currentLevel == 1) {
        x = (int) pointFt1.x;
        ball.smoothScrollLevel(x, y, 0, (int) (pointFt1.y - y));
    } else if (currentLevel == 2) {
        x = (int) pointFt1.x;
        ball.smoothScrollLevel(x, y, 0, (int) (pointFt2.y - y));
    } else if (currentLevel == 3) {
        x = (int) pointFt3.x;
        ball.smoothScrollLevel(x, y, 0, (int) (pointFt3.y - y));
    } else if (currentLevel == 0) {
        x = (int) pointFt3.x;
        ball.smoothScrollLevel(x, y, 0, (int) (pointFt0.y - y));
    } else if (currentLevel == 4) {
        x = (int) pointFt3.x;
        ball.smoothScrollLevel(x, y, 0, (int) (pointFt4.y - y));
    } else if (currentLevel == 5) {
        x = (int) pointFt5.x;
        ball.smoothScrollLevel(x, y, 0, (int) (pointFt5.y - y));
    } else if (currentLevel == 6) {
        x = (int) pointFt5.x;
        ball.smoothScrollLevel(x, y, 0, (int) (pointFt6.y - y));
    }
    if (listener != null) {
        listener.OnProgressChanged(currentLevel);
    }
    break;
至此,我们就把所有需要的完成了,只需要写一个demo测试一下。
xml如下
<?xml version="1.0" encoding="utf-8"?>
<FrameLayout xmlns:android="http://schemas.android.com/apk/res/android"
    xmlns:app="http://schemas.android.com/apk/res-auto"
    xmlns:tools="http://schemas.android.com/tools"
    android:layout_width="match_parent"
    android:layout_height="match_parent"
    tools:context=".MainActivity">

    <androidx.appcompat.widget.LinearLayoutCompat
        android:layout_width="match_parent"
        android:layout_height="match_parent"
        android:gravity="center_horizontal"
        android:orientation="vertical">


        <com.example.myseekbar.GearSeekBarParent
            android:id="@+id/seek_bar"
            android:layout_width="600dp"
            android:layout_height="300dp"
            android:layout_marginTop="40dp"
            android:background="@color/purple_200"
            app:arcColor="#000000"
            app:arcWidth="3dp"
            app:ballColor="#00ffff"
            app:ballSize="30dp" />

        <TextView
            android:layout_width="wrap_content"
            android:layout_height="wrap_content"
            android:gravity="center"
            android:text="有效档位"
            android:textSize="30sp" />

        <TextView
            android:id="@+id/seek_bar_progress"
            android:layout_width="wrap_content"
            android:layout_height="wrap_content"
            android:gravity="center"
            android:text="0"
            android:textSize="30sp" />

        <TextView
            android:layout_width="wrap_content"
            android:layout_height="wrap_content"
            android:gravity="center"
            android:text="临时档位"
            android:textSize="30sp" />

        <TextView
            android:id="@+id/seek_bar_temp_progress"
            android:layout_width="wrap_content"
            android:layout_height="wrap_content"
            android:gravity="center"
            android:text="0"
            android:textSize="30sp" />
    </androidx.appcompat.widget.LinearLayoutCompat>
</FrameLayout>
MainActivity如下
package com.example.myseekbar;

import androidx.appcompat.app.AppCompatActivity;

import android.os.Bundle;
import android.widget.TextView;

public class MainActivity extends AppCompatActivity {

    @Override
    protected void onCreate(Bundle savedInstanceState) {
        super.onCreate(savedInstanceState);
        setContentView(R.layout.activity_main);

        final TextView textView = findViewById(R.id.seek_bar_progress);
        final TextView textView1 = findViewById(R.id.seek_bar_temp_progress);

        GearSeekBarParent seekBar = findViewById(R.id.seek_bar);
        seekBar.setListener(level -> textView.setText(String.valueOf(level)));
        seekBar.setTempListener(level -> textView1.setText(String.valueOf(level)));
    }
}
效果如下

这里只讲述了一些算法和逻辑,具体流程需要学习上面的博文,一些代码细节还需要自己研究源码,源码如下
GearSeekBar: 自定义view学习,实现汽车档位的seekbar,对应博文https://blog.csdn.net/andylauren/article/details/122064101
希望通过这个代码的学习能够加深对自定义view的理解。
边栏推荐
- 梅科尔工作室-DjangoWeb 应用框架+MySQL数据库第三次培训
- Reconstruction and Synthesis of Lidar Point Clouds of Spray
- 微信小程序canvas画图,保存页面为海报
- 微信小程序部分功能细节
- Hard hat recognition algorithm
- 梅科尔工作室-HarmonyOS应用开发第三次培训
- 安全帽佩戴识别系统介绍
- Thread Handler
- Fragment 和 CardView
- Zhejiang University School of Software 2020 Guarantee Research Computer Real Question Practice
猜你喜欢
Joint 3D Instance Segmentation and Object Detection for Autonomous Driving

CVPR2022——Not All Points Are Equal : IA-SSD
LiDAR Snowfall Simulation for Robust 3D Object Detection

Mei cole studios - sixth DjangoWeb application framework + MySQL database training
小程序技术原理分析
梅科尔工作室-DjangoWeb 应用框架+MySQL数据库第四次培训
微信小程序-腾讯云即时通信 IM 小程序直播(一)

Redis主从复制的搭建

>>数据管理:DAMA简介
weex入门踩坑
随机推荐
对MySQL查询语句的分析
The latest safety helmet wearing recognition system in 2022
基于ijkplayer 0.8.8编译的完整so. libijkffmpeg.so等,支持ssl h265, rm, rmvb
C语言字节对齐,看这篇就够了
Node-2.垃圾回收机制
目标检测——Faster-RCNN 之 RCNN
Mysql导入UTF8编码数据库命令总结
Redis主从复制的搭建
梅科尔工作室-Pr第一次培训笔记(安装及项目创建)
Joint 3D Instance Segmentation and Object Detection for Autonomous Driving
TAMNet: A loss-balanced multi-task model for simultaneous detection and segmentation
通用的 kernel和 userspace Makefile
【转载】图表:数读2022年上半年国民经济
安全帽佩戴识别系统介绍
CVPR2020:Seeing Through Fog Without Seeing Fog
安全帽识别-施工安全的“监管者”
360° large field of view helmet recognition system-deep learning intelligent video analysis
安全帽识别
Maykel Studio - Django Web Application Framework + MySQL Database Fourth Training
关于mmdetection框架实用小工具说明