当前位置:网站首页>Mei cole studios - fifth training DjangoWeb application framework + MySQL database
Mei cole studios - fifth training DjangoWeb application framework + MySQL database
2022-08-11 06:17:00 【C_yyy89】
目录
前言
本文记录梅科尔工作室IoT组DjangoWeb 应用框架+MySQLDatabase of fifth training notes,Mainly including Hongmeng app 登录请求与实现(另外一种方式:不使用 model.py 文件,Table migration is not performed)And dynamically read the data content in the text box 2.Django 后端数据验证(MySQL 数据库数据查询)
这里感谢潘学姐的讲解!辛苦啦!
1.App 登录请求与实现
1.1.views.py连接数据库
代码如下:
try:
    ct = pymysql.connect(host='127.0.0.1',  # 或者是写localhost
                          port=3306,  # 端口号
                          user='root',  # MySQL登录用户名
                          password='xxx',  # MySQL登录密码
                          db='test2',  # 要连接的数据库名称
                          charset='utf8')  # 表的字符集
    print("数据库连接成功")
except pymysql.Error as er:
    print('连接失败'+str(er))
1.2.前端编程
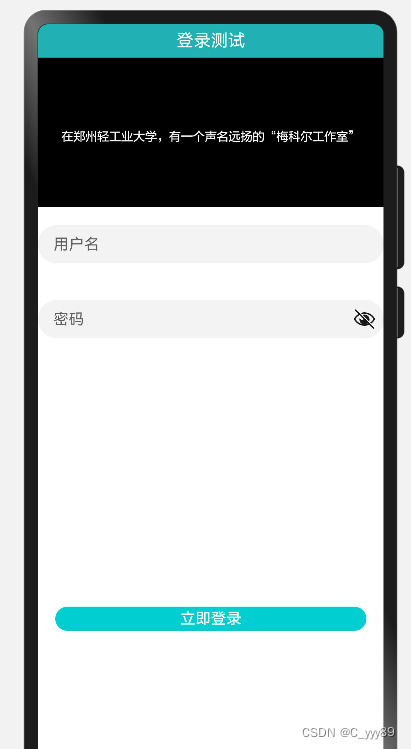
Hml代码如下:
<div class="cb-container">
    <div class="cb-title">
        <text class="cb-title-text">
            登录测试
        </text>
    </div>
    <image src="../../common/images/123.png"></image>
    <div class="container1">
        <div>
            <input name="username" class="input" type="text" maxlength="10" placeholder="用户名" onchange="inputAccount"/>
        </div>
    </div>
    <div class="container2">
        <div>
            <input name="password" class="input" type="password" maxlength="10" placeholder="密码" onchange="inputPassword"/>
        </div>
    </div>
    <div class="container">
        <button onclick="onClick" class="btn-map" style="background-color: darkturquoise; height: 50px;">立即登录</button>
    </div>
    <div>
        <text>
            {
   {winfo}}
        </text>
    </div>
</div>
效果如下:
JS文件代码如下:
import router from '@system.router';
import fetch from '@system.fetch';
import qs from 'querystring';

export default {
    data:{
        winfo:"" //定义winfo用于存放后端反馈数据
    },
    inputAccount(a){
        this.username = a.value;
    },
    inputPassword(a){
        this.password = a.value;
    },
    onClick(){
        fetch.fetch({
            url:`http://127.0.0.1:8007/student/AppReq1/`, //后端路径,一定不能错,用的是反单引号
            data: qs.stringify({'username':'123456','password':'12345'}),//验证,将字符串转发给后端,后端会受到这个请求
            responseType:"json",//请求的参数类型
            method: "POST",
            success:(resp)=>
            {
                this.winfo = resp.data;//令获取到的后端数据赋给winfo
                console.log("返回的数据:"+this.winfo);//打印出数据
            },
            fail:(resp)=>
            {
                this.winfo = resp.data;//令获取到的后端数据赋给winfo
                console.log("获取数据失败:"+this.winfo)//打印出数据
            }
        });
    }
}
css代码不再展示,Badly written hahaha,头疼!
1.2.建表(不依赖DJango)
这里使用的是Navicat,在左侧栏,Select the database where you want to create the table,Right-click and select New Table,原理就是跳过DjangoOperate directly on the database,不需要代码,如下所示:

注意,建好表之后,The back-end code should correspond to the table name and the data in the table.
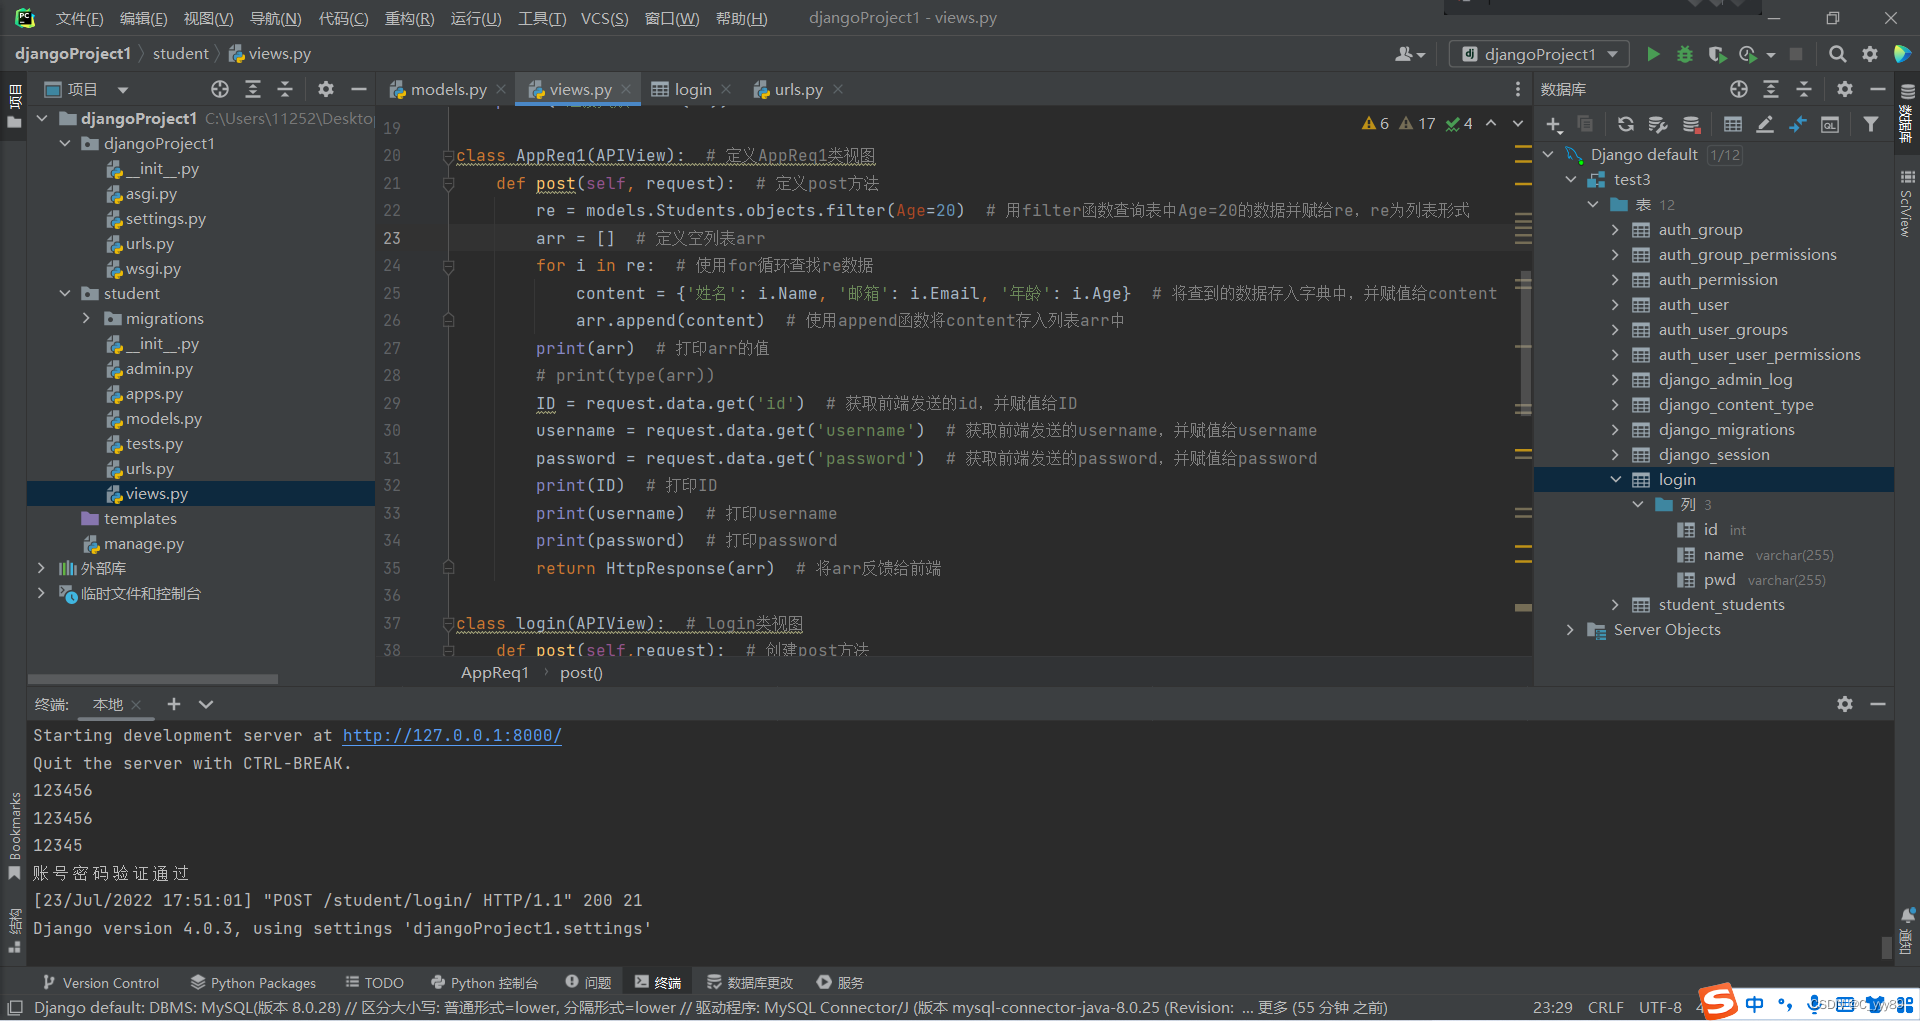
1.3.后端编程
new path login
from django.urls import path
from . import views
from student.views import AppReq1,login
app_name ='student'
urlpatterns = [
    path('AppReq1/', AppReq1.as_view()),
    path('login/', login.as_view()),
]
views.py新增login类
class login(APIView):  # login类视图
    def post(self,request):  # 创建post方法
        username = request.data.get("username")  # Get frontend feedback valueusername
        password = request.data.get("password")  # Get frontend feedback valuepassword
        print(username)
        cur = ct.cursor()  # 创建游标
        sql = "select * from login where name =%s"  # sqlStatement to query data table data,to be the same as the datasheet
        values = (username)
        try:
            if cur.execute(sql, values):  # 执行sql语句
                ct.commit()
                results = cur.fetchall()
                for row in results:
                    # The obtained list corresponds to the column,注意id为第0列
                    Pusername = row[1]  # 获取数据name
                    Ppassword = row[2]  # 获取数据pwd
                    print(Pusername)  # 打印PusernameVerify whether to get it
                    print(Ppassword)  # 打印PpasswordVerify whether to get it

                if password ==Ppassword:  # 验证密码是否正确
                    print("账号密码验证通过")
                    return HttpResponse('Welcome honorable'+Pusername)
            else:
                print('查无此人!')
        except pymysql.Error as e:
            print("查无此人:"+str(e))
            return HttpResponse("请求失败")
注意点:The data key-value pair that the front end feeds back to the back end“键”,Must correspond to the backend,The data in the table obtained by the backend must correspond to the data in the table.
2.效果展示
前端展示: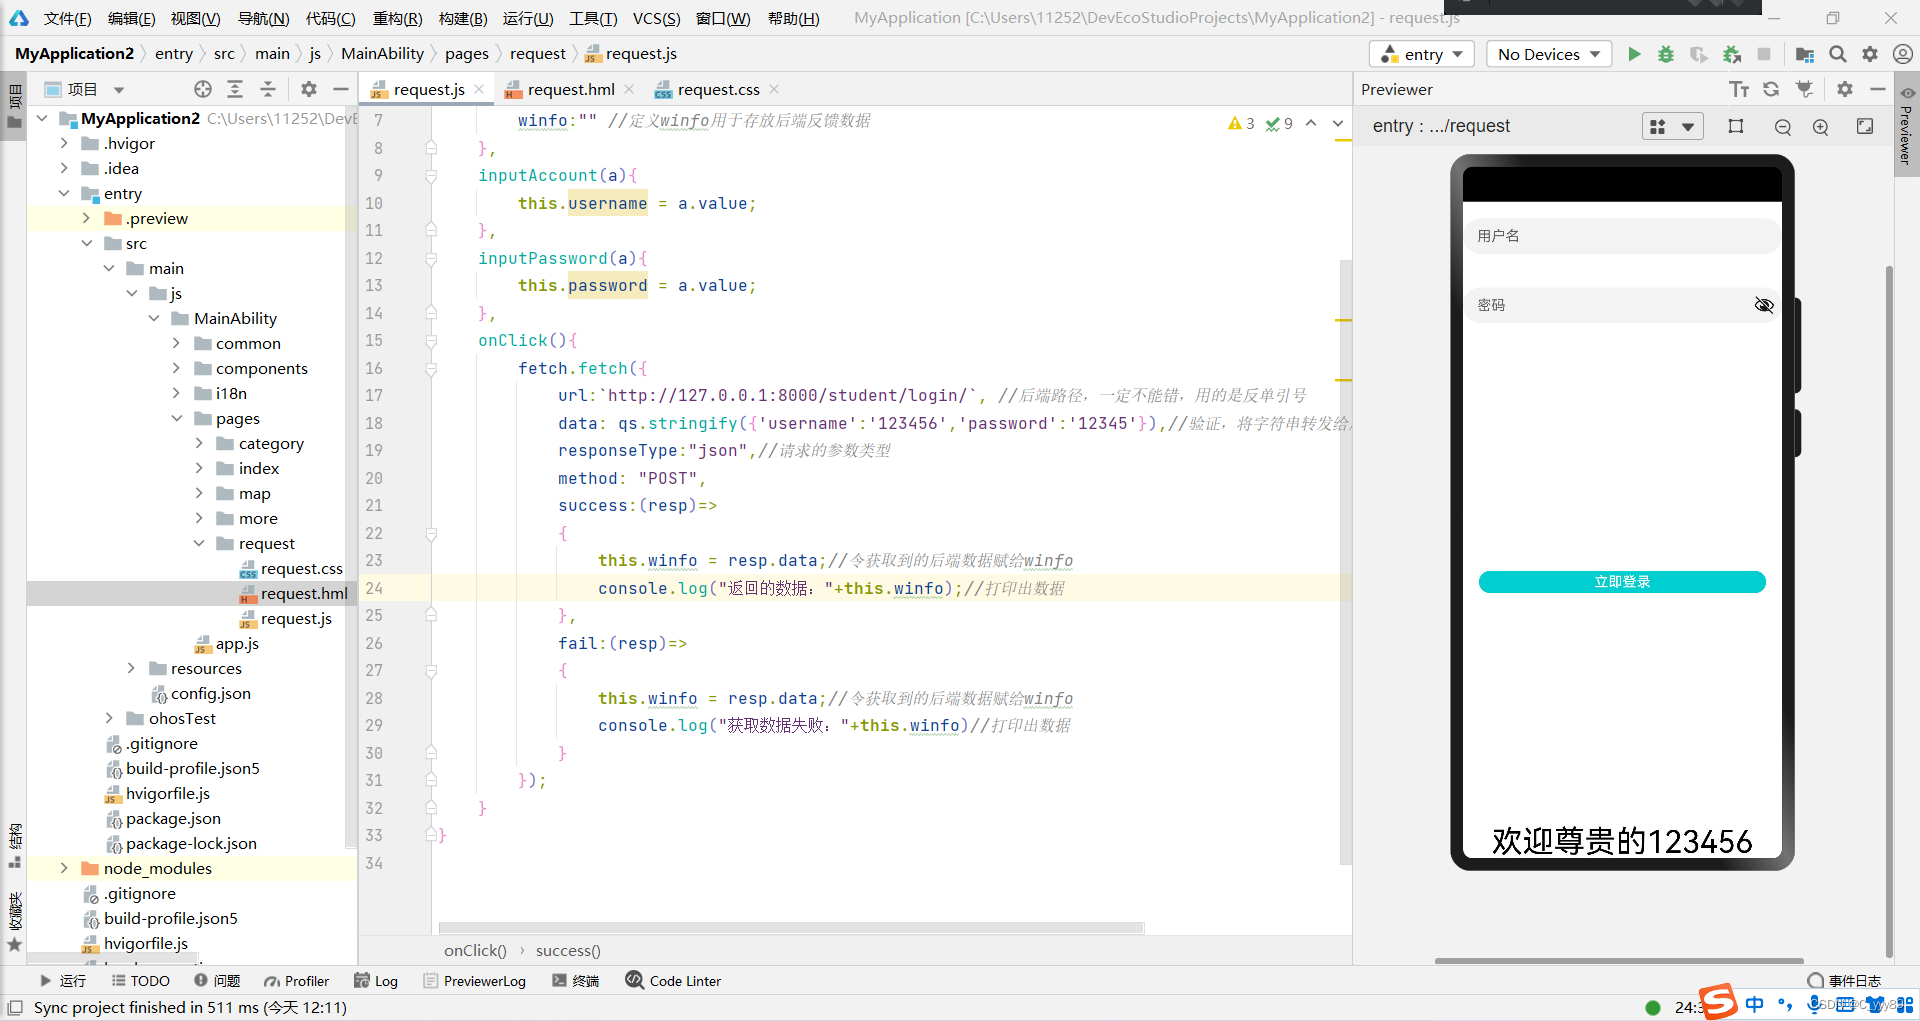
后端展示:
总结
The above is the content of the notes and effects of the fourth training to show this article,The main thing is the correspondence between the front and back ends and the data,Thank you Miss Pan!!!
边栏推荐
- TAMNet:A loss-balanced multi-task model for simultaneous detection and segmentation
- 秦始皇到底叫嬴政还是赵政?
- Redis分布式锁
- 安全帽识别
- Zhejiang University School of Software 2020 Guarantee Research Computer Real Question Practice
- TAMNet: A loss-balanced multi-task model for simultaneous detection and segmentation
- Redis主从复制的搭建
- MGRE环境下的OSPF综合实验
- 梅科尔工作室-华为云ModelArts第二次培训
- NodeRed系列—发送消息给emqx
猜你喜欢
【sqlyog】【mysql】csv导入问题
梅科尔工作室-华为云ModelArts第二次培训
Joint 3D Instance Segmentation and Object Detection for Autonomous Driving
Use regex to verify whether the file name is legal

mysql 间隙锁(GAP-LOCK)演示

CVPR2022——Not All Points Are Equal : IA-SSD
2022年最新安全帽佩戴识别系统

LAGRANGIAN FLUID SIMULATION WITH CONTINUOUS CONVOLUTIONS
梅科尔工作室-Pr第一次培训笔记(安装及项目创建)

【转载】图表:数读2022年上半年国民经济
随机推荐
跳转到微信小程序方法
关于安全帽识别系统,你需要知道的选择要点
GBase 8a MPP Cluster产品高级特性
Mysql导入UTF8编码数据库命令总结
若依分离版—增加通知公告预览功能
梅科尔工作室-HarmonyOS应用开发第三次培训
GBase 8s集中式企业级安全事务型数据库
解决Glide图片缓存问题,同一url换图片不起作用问题
安全帽识别系统
梅科尔工作室-DjangoWeb 应用框架+MySQL数据库第二次培训
Rethinking LiDAR Object Detection in adverse weather conditions
OSI TCP/IP学习笔记
安全帽识别算法
Redis持久化方案RDB详解
华为adb wifi调试断线问题解决
梅科尔工作室-HarmonyOS应用开发第四次培训
GBase 8s中IO读写方法
.Net6 MiNiApi +EFCore6.0高B格操作的WebApi
基于AI智能图像识别:4个不同的行业应用
Pay “Attention” to Adverse Weather